
So you just bought a fancy new laser and now you are wondering how do I get the results that J Tech is getting when I know nothing about lasers? The answer is that you need to always have the laser be at minimum focus to be able to perform cuts and engravings at their optimal performance. Once you master the art of focusing, then you are on your path to becoming a super laser user!
First off, let me say that this is the point where you will need to ALWAYS make sure to have ALL people wear appropriate safety goggles at ALL times and use proper laser safety for your class 4 laser including laser shielding and interlocks. If you ever have any questions about safety, then do not operate your laser.
Ok, now that we are past that part, lets review the basics of what your laser is so we can better understand how to get it to focus.
Focusing 101 Video
Everyone likes videos, so we put all of this information in an easy to watch video. We explain how to set the Z focus from the factory as well as changing out lenses and focusing them. Watch this to get a full overview of the process.
For the people who don’t want videos, here is some information on how to focus the old fashioned way.
What is a diode laser?
A semiconductor diode laser is a device made out of semiconductor (computer chip) material that takes electricity and converts it into light (photons). This device is very small and contains all the needed laser stuff, like an optical cavity and mirrors on each end. Basically, when current is applied to the laser diode, electrons will be excited and will release photons. These photons will travel down the semiconductor cavity and bounce back and forth off the “facets” or sides of the device until there is enough energy to output the light out of the emitter. This process continues as long as the electrical current is applied.
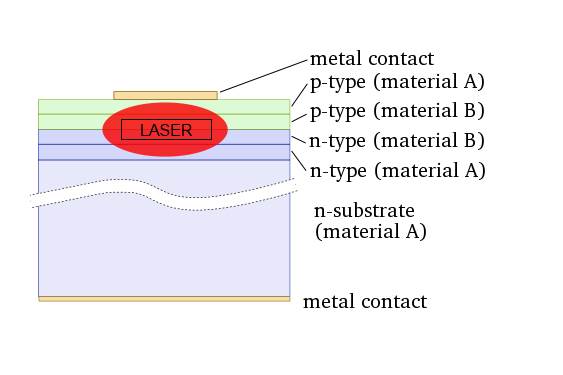
Why is the beam a rectangle and not a spot and what is all the extra light?
Each diode will have an “emitter” in it that is where the laser light comes from. This is seen in the above picture with the rectangle portion labeled “LASER”. There is also some other light that is emitted from the other portions of the diode that are not included in the optical cavity of the laser. This light is probably what you are seeing. It also can be from various reflections from the very large angle light coming out of the diode. The lens have been designed to reduce these reflections but they can still be present. All of the “extra” light has nothing to do with the actual laser and its ability to cut and engrave.
How does the front lens work?
The lens used is a positive or converging lens in air will focus a collimated beam travelling along the lens axis to a spot (known as the focal point) at a distance f from the lens. Conversely, a point source of light placed at the focal point will be converted into a collimated beam by the lens. These two cases are examples of image formation in lenses. In the former case, an object at an infinite distance (as represented by a collimated beam of waves) is focused to an image at the focal point of the lens. In the latter, an object at the focal length distance from the lens is imaged at infinity. The plane perpendicular to the lens axis situated at a distance f from the lens is called the focal plane.

If the distances from the object to the lens and from the lens to the image are S1 and S2 respectively, for a lens of negligible thickness, in air, the distances are related by the thin lens formula:
![]()
Basically, you are imaging the output of the laser emitter onto the surface of your material. You want to find the SMALLEST point at which that image exists.
What is the focal length?
The focal length in this case is adjustable. The closer the lens gets to the laser diode the longer the distance from the lens to the minimal focus is. With our lasers we recommend about 1 to 3 inches away from the work surface. We normally have ours between 2.5″ and 3″ to help keep debris off the lens. Being closer makes the “depth of focus” (the amount in the z axis that it stays small) larger. The farther away you get the harder it will be to get the smallest focus. Above three inches, you will be able to visibly see the rectangular shape of the laser diode. It will still burn and cut, but it will not be as efficient and the size of the line will be larger. We recommend setting up your machine so the focus can be under 3″. If your Z axis has to be taller (i.e. because your gantry is tall) then consider making a new mounting plate that is lower or if possible add some material under your work to put it closer to the laser. Especially for fine picture engraving it will need to be 3″ or under.
*Note* The focal point is not really a point, but rather a position in Z where the beam is at a minimum. This area will be the smallest the beam waist can be. The distance of where this area is called the “depth of focus”. On each size in Z, the focus will start to get bigger. It will look like this:
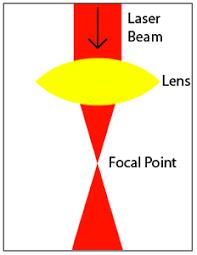
It will look very much like an hourglass.
When you are adjusting your front silver lens screw, you are going to be turning it to look for this small part where the sand can barely get through. If you turn the lens and it is getting bigger, then go the other way. You will notice is gets smaller and smaller, until it then starts to get bigger. You just went past the small part of the hourglass. Then, turn it the other way. You notice is gets smaller now until it just starts to get bigger again. Do this a few times. You will then get a feeling where the smallest part is of the beam. This is the best focus you can get. We will now go into detail on how to do this, but remember the hourglass example while you are doing these instructions.
Ok, so how do I get the smallest focus?
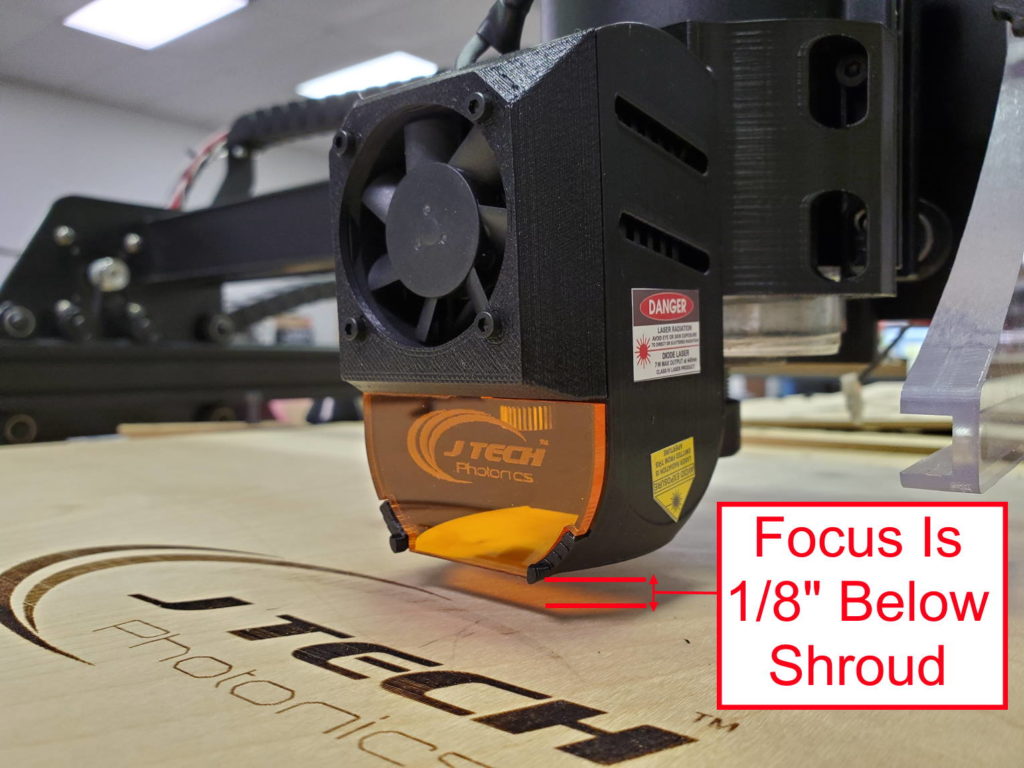
Shrouded Lasers:
On the lasers with the magnetic shroud, your focus comes PRE SET to just 1/8″ below the shroud. This will make it safer because the laser spot will be surrounded by the shroud. Move the Z axis down to the work surface so the laser is just above the work at 1/8″. Here is a picture:

Un-shrouded Lasers:
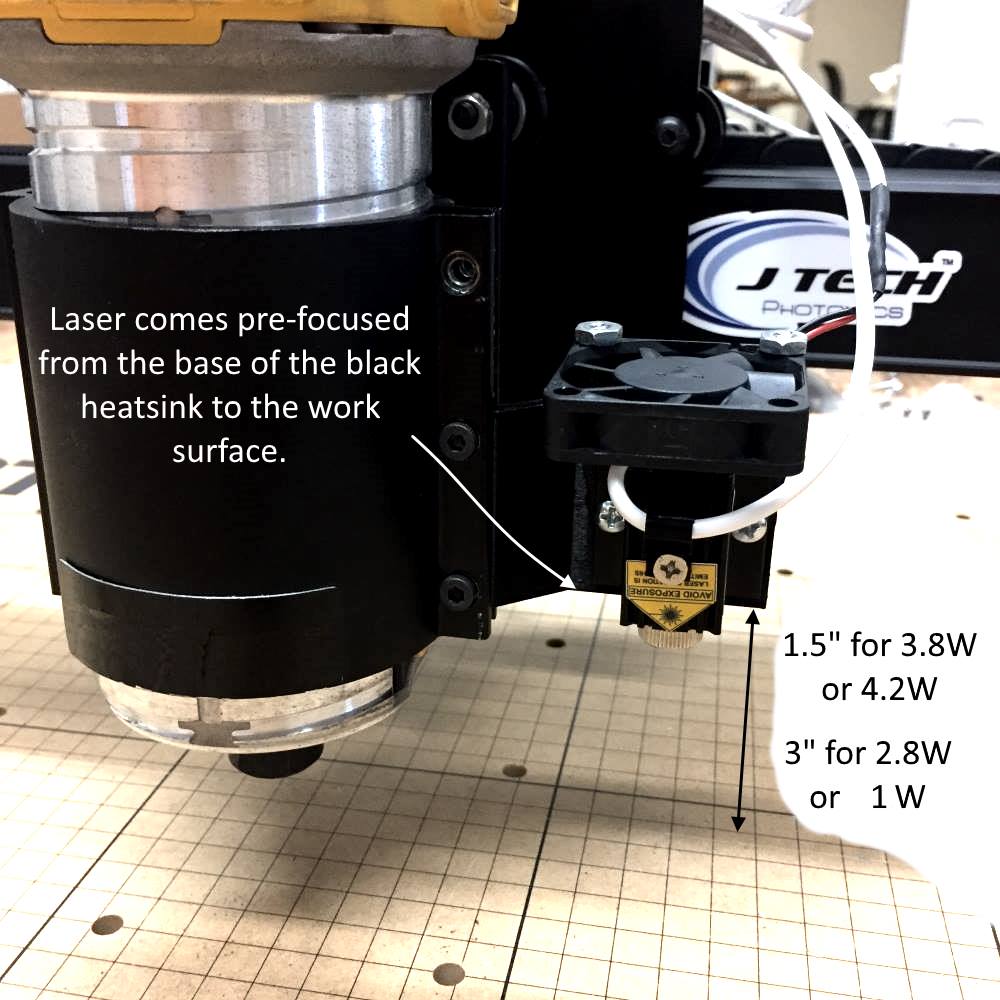
If your laser is a 2.8W, 2W, or 1w your laser shipped with the focus set to 3″ if you bought it from us. You can put it on your machine and set it to 3″ from the front of the lens and you will have a pretty good focus. You can adjust it slightly by moving up or down to get it perfect, but it should work pretty good out of the box.
If your laser is a 3.8W or 4.2W your laser shipped with focus set to 1.5″ if you bought it from us.
The HF lens included in the kit has the smallest focus to closer to the work surface you get. On all of the lasers, the closer to 1″ you get the smaller your spot will be.
Great! The focus looks good out of the box, but I want to adjust it myself. How do I do this?
There are a few ways to do this. You are first going to have to turn your laser power down so you can look at the beam without burning a hole in your material. You can do this two ways:
- Using PWM control – This way is easiest if you have it. Just simply send a command to turn the laser down from your controller. This works for X carve, Shapeoko (1,2,3), and most 3D printers.
- Using the Potentiometer – This way involves turning the laser driver down in current using the jumpers and potentiometer. This is for most Mach3 machines, old CNC machines, and 3D printers running Sailfish firmware (Makerbot).
Here is the detail for a couple of quick methods for finding the minimum spot size focal length. Remember to use laser shielding if possible and your safety goggles when performing this exercise.
Method 1: Using PWM from your controller to turn down the laser and focus. (X Carve, Shapeoko (1,2,3), GRBL, Most 3D Printers)
In this case you don’t need to adjust the potentiometer. It is really easy to set the power down to the minimal level. It basically involves turning the laser power down and putting a white piece of paper on the work surface to see the laser spot clearly. We are going to use the computer controller to set the power level using software to get the laser to turn down power so we can not burn the paper. For most firmware it will be a low number. Somewhere around 1% to 2% of maximum value should do the trick of not burning the paper and being able to see the laser spot on the white paper better.
- Adjust the Z height of the machine so the laser is between 1″ and 3″ (25mm and 75mm). It can be somewhere in this range, but not over 3″. We normally start close to 1.5″.
- Set a piece of black paper or other black material on the work surface, or ON TOP of whatever material you are going to process (or where you would like to set the focus at).
- Turn the driver board on.
- Make sure the front Switch is set to TTL (input control mode) and is pushed to the farthest right looking at the front.
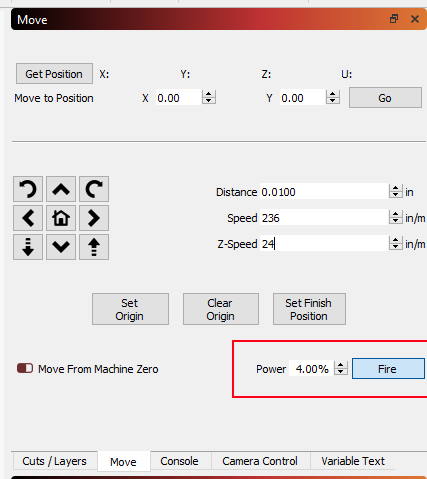
- Using Lightburn, set the laser fire button to your low power (normally around 4%).
Using a sender program or 3D controller software, send a command to the machine/printer to set the power level low. For X Carve or Shapeoko machines we recommend using either UGS or PicSender. UGS tutorial is here . 3D printers we recommend using Repetier Host.
Setting power low (about 2%) for GRBL machines (X Carve, Shapeoko 1-2-3, other GRBL):
For the J Tech GRBL or version 1.1 firmware you will send: M03 S10
For Inventables firmware or standard 0.9 GRBL send: M03 S1400
Setting power low (about 2%) for 3D Printers using Fan PWM control:
For Marlin firmware on a 3D printer with fan control send: M106 S5
For 3D Printers using Repetier Host and fan control use the Manual tab and the FAN slider to turn it down.
If it is too powerful or not enough light then try different levels until you just have the laser turned on.
- Now you can adjust the lens to get the smallest spot at the surface. Adjust the lens one direction and if it gets bigger, then adjust it the other direction until the spot is small. It is fine to pass it a couple of times in each direction until you get a feel for where the minimum will be. Remember the hourglass example from above. Once you have finished this, you can probably be done as it will be a pretty good focus.
- If you want it perfect, you can repeat the same process, but now using your machines Z axis. Adjust the Z axis to get the best possible smallest spot that you can tell by looking at it.
- Now move the Z axis away from your smallest spot in a known increment until you can see the spot get bigger.
- Move the other direction in the known increment until you pass the smallest spot and get to the same size big spot in the other direction. Count how many increments this was.
- The smallest spot is now exactly between these “easier to see” larger spot sizes. Take the count of increments and divide by two and move the Z axis by this amount.
- When you are done, set this new Z location as your “home” location.
You are now ready to process with the laser at its smallest spot size!
Note: If you don’t want to do this procedure every time you try a new material, then focus the spot at the work surface. Then, measure the thickness of the material you are processing and move the Z axis UP this thickness. I.e., if you are cutting 1/16″ Balsa wood, move the Z Axis up 1/16″ so it is focused on the top of the material.
Method 2: Using the potentiometer to turn the laser down and focus.
- Adjust the Z height of the machine so the laser is between 1″ and 3″ (25mm and 75mm). It can be somewhere in this range, but not over 3″. We normally start close to 1.5″.
- Set a piece of white paper on the work surface, or ON TOP of whatever material you are going to process (or where you would like to set the focus at).
- Then WITH THE POWER OFF, turn the pot counter clockwise ALL THE WAY (approx 21 turns). You might hear a slight clicking sound when it has reached the maximum off distance or feel a clicking.
- Then turn the driver board on.
- Switch the front switch (mode selector) to CW (towards the power switch). The laser is now on, but will not be lasing because there is no current.
- Turn the pot slowly clockwise until you just see the laser starting to shine light. Stop when you can see a bright spot in the center. Should be about 1-3 turns.
- Now you can adjust the lens to get the smallest spot at the surface. Adjust the lens one direction and if it gets bigger, then adjust it the other direction until the spot is small. It is fine to pass it a couple of times in each direction until you get a feel for where the minimum will be. Remember the hourglass example from above. Once you have finished this, you can probably be done as it will be a pretty good focus.
- If you want it perfect, you can repeat the same process, but now using your machines Z axis. Adjust the Z axis to get the best possible smallest spot that you can tell by looking at it.
- Now move the Z axis away from your smallest spot in a known increment until you can see the beam get bigger.
- Move the other direction in the known increment until you pass the smallest spot and get to the same size big beam in the other direction. Count how many increments this was.
- The smallest spot is now exactly between these “easier to see” larger spot sizes. Take the count of increments and divide by two and move the Z axis by this amount.
- When you are done, set this new Z location as your “home” location.
- Then switch the mode selector back to “TTL” (right).
- Turn off the driver board.
- Now follow the instructions in the manual (HERE) on adjusting the current. You will be using your meter and adjusting the potentiometer to the desired current output. (see section “adjusting current” in the instructions).
What is another way to find focus? I am having trouble with using my eyes?
Sure, there is another probably easier way to find the smallest focus that does not use your eyes to figure it out. Basically, you are going to use your laser to engrave at various z heights. Start at a lower height and then increment Z up by 1mm or so. Do this several times and then see which is the smallest line. Here are the details:
- Take a scrap piece of wood or other waste material that has some room for lines.
- Set the laser power so it doesn’t cut, but instead gives a nice dark engraving without burning too much.
- Make a program in inkscape with a set of lines next to each other will a little spacing between the lines(see below for our file). Open the file in notepad and adjust the Z axis up by 1mm every line.
- Set your Z to where you think your focus is somewhere than as good as you can get.
- Run the program. It will engrave the first line and increment the Z axis up on each line by 1 mm. If you use our file It will start on the top line in the inkscape drawing.
- Inspect the lines and see if it they get larger or smaller in size. Best case scenario is one line looks thinner than the others. The thinnest one is your best focus. You can then increment the Z axis back to this position (ie., if it is on the 4th line from the top, then you need to increment the Z axis back up by 4mm in the manual control. )
- If the lines just get bigger, then you started too high. Set the Z axis down and then re-run the program again and see if there is a thin line in the group. Set the Z then to this line.
- If 1mm is too big an increment, then re-run the program with smaller increments to “hone in” on where the thinnest line is. If 1mm is too small of increments to tell, then make them bigger and then find the thinnest line and repeat with smaller increments when you get closer.
Inkscape File with example lines
G Code File with 8 lines, Z moving up 1mm each
Note: This will set the focus to the top of the material you are using to check focus. If you want to make the focus be at the work piece then just adjust the Z axis down by the thickness of the material you were using. Then, just measure whatever you want to engrave and adjust back up by this thickness to be sure you are at the top of the material before processing.
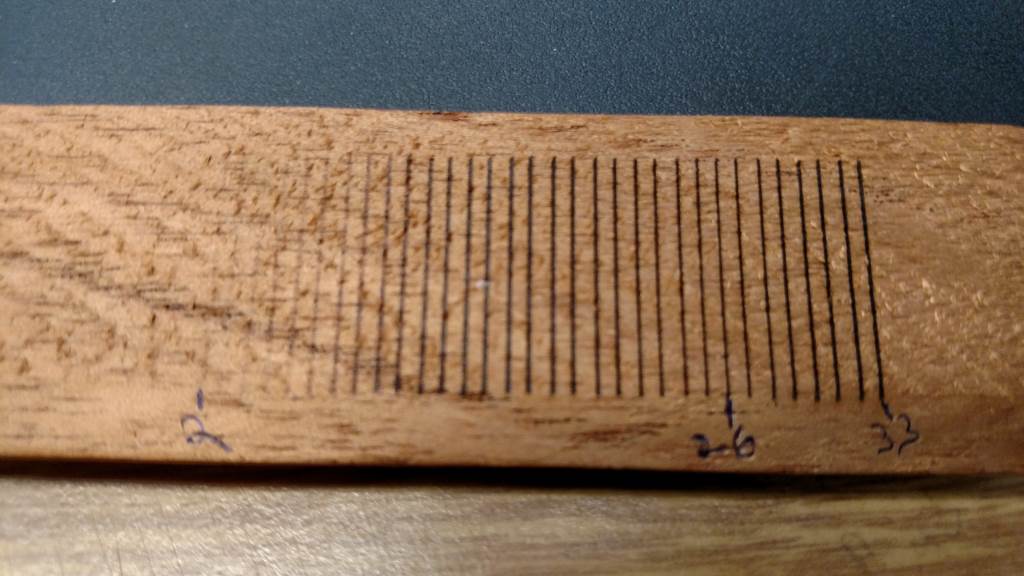
Example of engraving lines while moving the Z axis to find the smallest focus. This case it is 26 mm up.
Conclusions
Focusing the lens to the smallest focus is a very hard thing to get correct without a lot of practice. It is however one of the most important parts needed to get the results shown in the applications pages on this site. If your laser is out of focus just by a little bit, then the power density of the spot goes way down. Think about getting your laser in focus to back when you were a kid and you had a magnifying glass and you used it to try and catch something on fire by focusing the sun (if you never did this then just imagine it). It is hard to get that little image of the sun to stay in one spot in order to get something to burn! This is the same with your laser, but once you get it right you can dial it in every time as long as nothing changes on your machine! Remember, practice makes perfect and good luck!


Excellent article. Focusing can make-or-break fine detail engravings. Using Mach 3 and experimenting with different feed rates and power settings (sometimes less is more!), I’ve successfully engraved 2-point lettering (needed a magnifying glass to see it!). This level of detail can only be had with a properly-focused laser.
Like any other tool (table saw, router, 3D printer, etc) there is a learning curve to using a laser but once you get comfortable with it you’ll be cranking out pieces of art in no time 😉