

Laser Upgrade for MakerBot Replicator 2 and 2X
This was a tougher one to crack because the new MakerBot Replicator 2 and 2x are not open source. But do not fret! A good customer has tested out this solution and it works great!
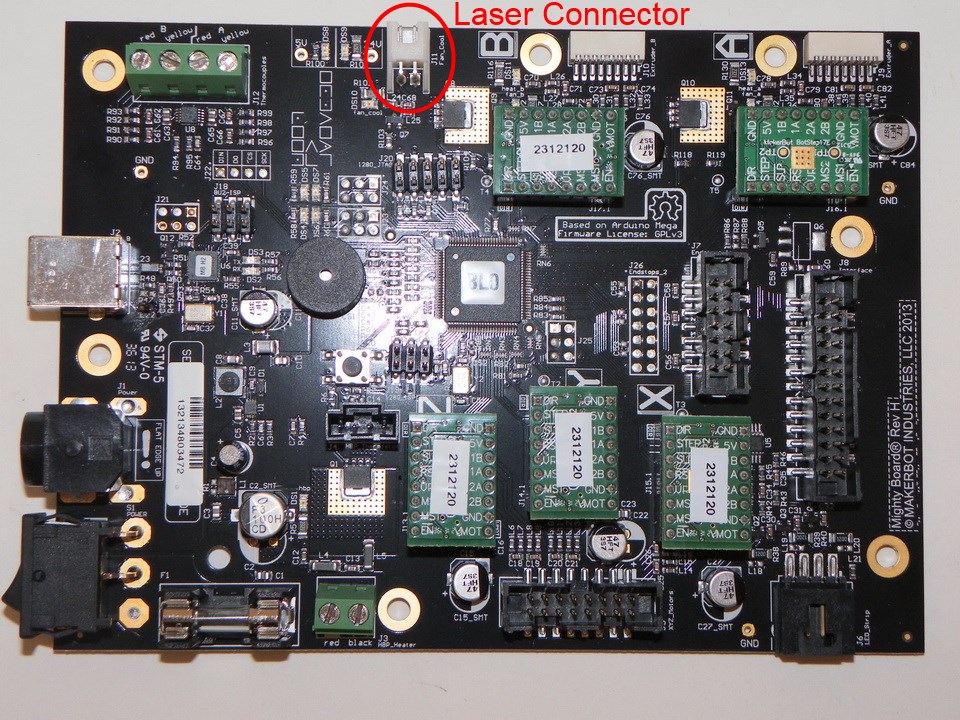
Connecting the Laser
The Replicator 2 and 2X come shipped with either a REV G or a REV H of the mightyboard. This will work on both versions. We will be connecting the laser to the J11 (Fan_Cool) connector. Disconnect the fan that is there and then put in a new connector (it looks like it is a simple Molex style) to go to the laser driver. Connect to the laser driver terminal H2 with the + to the + and the – to the -. Either use a meter to see which pin on the fan connector is positive or just try to connect it. If it does not work then switch the wires because you have it backwards…
The location on the board for this is shown in the following picture:
Turning it ON and Off with G Code
To turn the laser on and off in your program use the following G Code:
- M126 (Laser ON)
- M127 (Laser OFF)
Note – The Sailfish firmware does not support PWM changes during the running of a file. However, Sailfish firmware beta release 7.8 has the ability to set the PWM fan level *before* the program runs. This is nice if you want to mess with the power levels of a particular G Code file without adjusting the feedrate.
Mechanical Mount
Of course part of the fun is figuring out how to mount the laser to the machine. Some people have already done some mounts for their builds and shared them. For the Replicator 2X, one customer has milled out the middle of the two extruders and placed the Laser between them to maximize the cutting area. The file is here: http://www.thingiverse.com/thing:472126/#files

Here is another one that mounts in the front of the machine: https://www.thingiverse.com/thing:770634

Laser Shielding
We now have laser shielding to fit these larger rectangular printers! Click HERE to check it out.

Buy your laser upgrade kit now!

Remember Safety First!

Laser Goggles are also a must!
Disclaimer
The laser used in this project is very powerful and all safety precautions must be taken. Use proper safety eyewear to prevent injury to eyes. This is a project and J Tech Photonics, Inc. is not responsible or liable for any and all damage or injury caused to people or property. The use of these instructions to make a laser cutter is under your own discretion and all safety precautions should be followed. J Tech Photonics, Inc. is not affiliated in any way with Makerbot and they may change hardware and software at any time making these instructions invalid.
I just got the kit and try to fit it on the makerbot replicator 2. I am having issue with converting circle command G2, G3 with GPX to X3g. Anyone can help?
What Software do you use to control the Laser/Replicator2?