

TinyG Laser Upgrade
 The TinyG project is an open source CNC control system for embedded CNC motion control. Many people build CNC machines with this controller. It is very similar to the GRBL controllers, but just with different firmware. For more information check out the TinyG wiki here: TinyG Wiki
We have many customers using the TinyG with our lasers with success, so we now have decided to put the instructions up for everyone to use. It is pretty simple to get up and running and only needs a small configuration for the PWM function. In the end, you will have laser connected with PWM power control enabled. Let’s get started!
Electrical Connection
On the side of the board with the three screw terminal connectors there is a signal called “PWM”. It is on the screw connector closest to the reset button. The “PWM” terminal will be the laser driver “+” signal. On the same screw terminal, there is a “GND” connection. This will be the laser driver “-” signal.
Here is a diagram showing these connections:
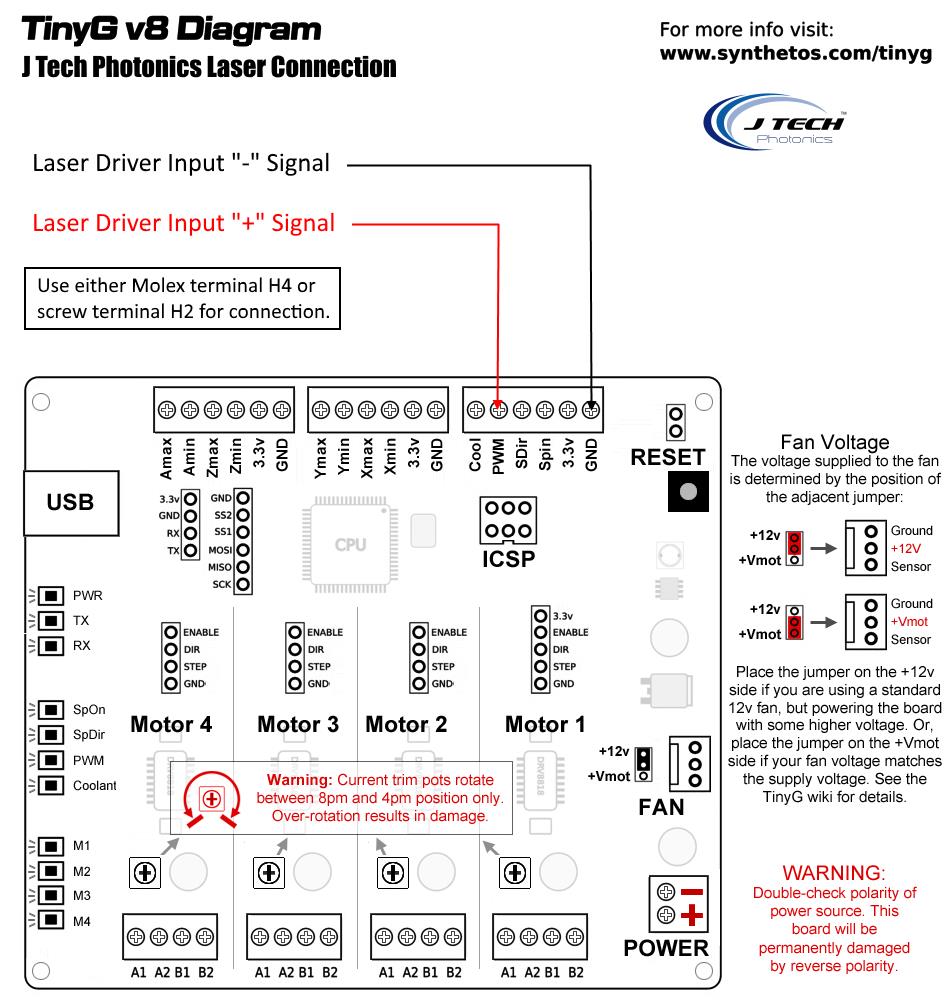
For the J Tech Laser Driver use either the Molex Header H4 or the screw terminal H2.

PWM Configuration
Now that you have the electrical connections completed, you need to configure the PWM function of the TinyG.
From the TinyG wiki:
There is currently only one PWM channel (p1), but the configs are structured for multiple PWM groups. The PWM channel is set up to act as a remote control Electronic Speed Controller (ESC), but can be used for other PWM functions using these settings.
| Setting | Description | Notes |
|---|---|---|
| $p1frq | Frequency | in Hz, e.g. 1000 |
| $p1csl | Clockwise speed low | In RPM – arbitrary units unless you calibrate it, e.g. 1000 |
| $p1csh | Clockwise speed high | In RPM |
| $p1cpl | Clockwise phase low | 0.000 to 1.000, e.g. 0.125 for 12.5% phase angle |
| $p1cph | Clockwise phase high | 0.000 to 1.000 |
| $p1wsl | Counter clockwise speed low | In RPM |
| $p1wsh | Counter clockwise speed high | In RPM |
| $p1wpl | Counter clockwise phase low | 0.000 to 1.000 |
| $p1wph | Counter clockwise phase high | 0.000 to 1.000 |
| $p1pof | Phase off | 0.000 to 1.000 used to set OFF phase for PWM devices that are not off at 0 phase |
Ok, this all seems a bit complicated, but you don’t need to worry about most of these settings. We will need to now configure your TinyG board to the correct settings to run the laser.
Here are the settings you need to enter:
$p1frq=1000
$p1csl=0
$p1csh=255
$p1cpl=0
$p1cph=1
$p1pof=0
Follow these steps to enter the codes to your TinyG:
- Connect to the TinyG using the control panel software.
- Click the Gcode tab (upper left)
- Enter PWM settings line by line in command line prompt on bottom of screen
- Confirm settings after each line, they will be echoed above

Software Commands
Your commands for running the laser will be the same as the spindle on command with RPM. It is:
- M03 SXXX
Where the “XXX” is a number between 0 and 255. So, some examples are:
- Laser ON 100%: M03 S255
- Laser ON 50%: M03 S127
- Laser ON 10%: M03 S25
- Laser OFF: M03 S0 (or M05 will work as well…)
You can use many different programs to generate your g code to run on your TinyG. Some tutorials on these are located here:
Running the TinyG Laser
Most people use chilipepper to run the TinyG controller. There is also a version for running a laser. You can find it here:
http://chilipeppr.com/tinyglaser
LaserWeb is also a program that will run with the TinyG controller. You can learn about it here:
So there it is! Now you are ready to start creating!
Buy your laser upgrade kit now!

Remember Safety First!

We sell laser shielding to block laser radiation and reflections!
Laser Goggles are also a must!
Disclaimer
The laser used in this project is very powerful and all safety precautions must be taken. Use proper safety eyewear to prevent injury to eyes. This is a project and J Tech Photonics, Inc. is not responsible or liable for any and all damage or injury caused to people or property. The use of these instructions to make a laser cutter is under your own discretion and all safety precautions should be followed. J Tech Photonics, Inc. is not affiliated in any way with Synthetos and they may change hardware and software at any time making these instructions invalid.