

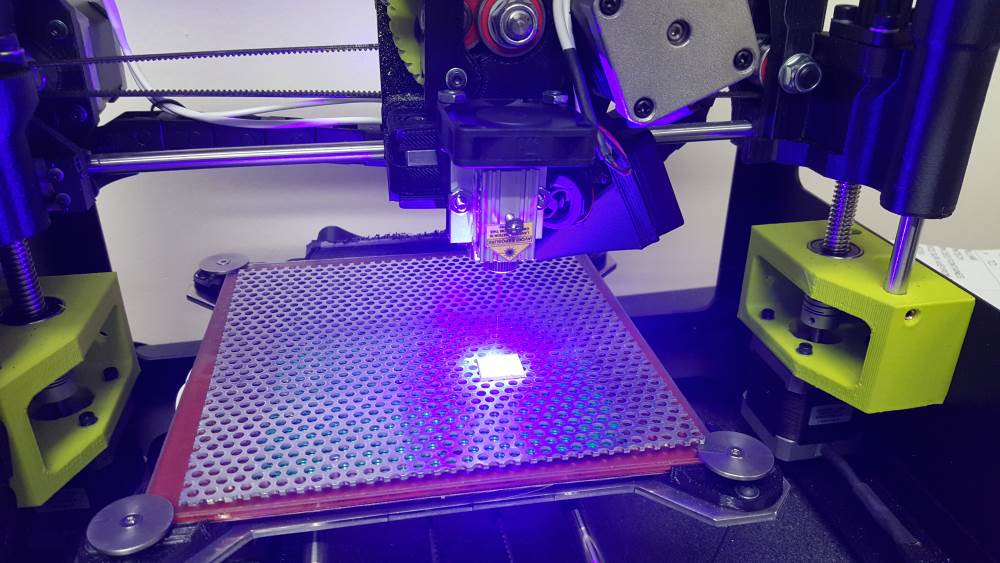
One of the newer open source printers that is gaining a popular reputation for being a well built printer that just plain works is the printers from Lulzbot. We got our Lulzbot mini about three months ago and it prints perfectly on every print running production every day non-stop! Needless to say, we love our Lulzbot, but it is missing something… A Laser! You can’t have a 3D printer without a laser! Come on now.
Here we outline the instructions for upgrading the Lulzbot mini, but the Taz is just the same. It has the same extruder and electronics, the platform is just a bit larger. If you want to see how to build a laser only system, check out our blog post here.
So here it is – Instructions on how to upgrade the Lulzbot printers. Let’s start!
****(NOTE: The pictures are mainly for the Lulzbot Mini and the TAZ 5 printer. If you have the TAZ 4, there is a separate mount and a bit different electrical connection).
Electronics
Mini
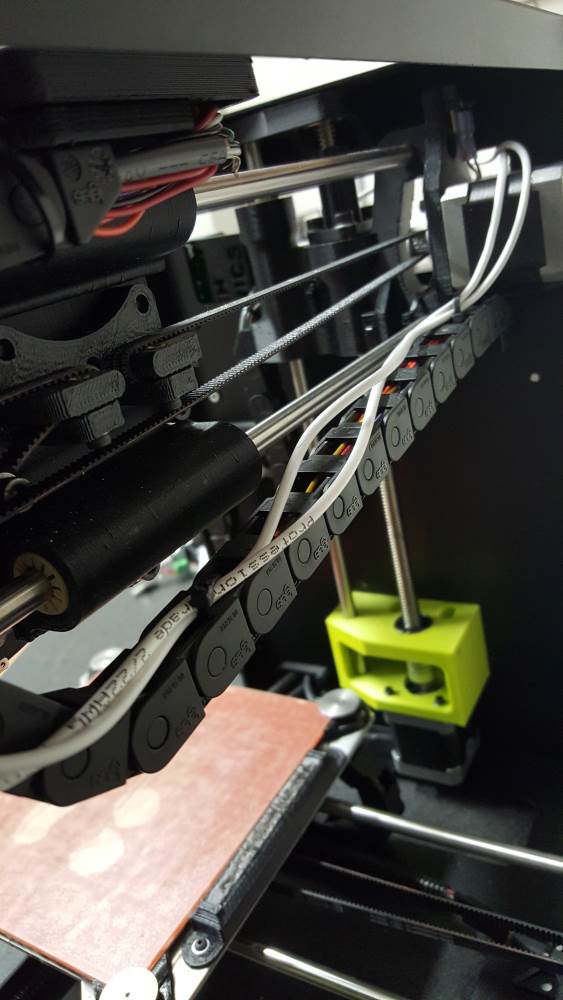
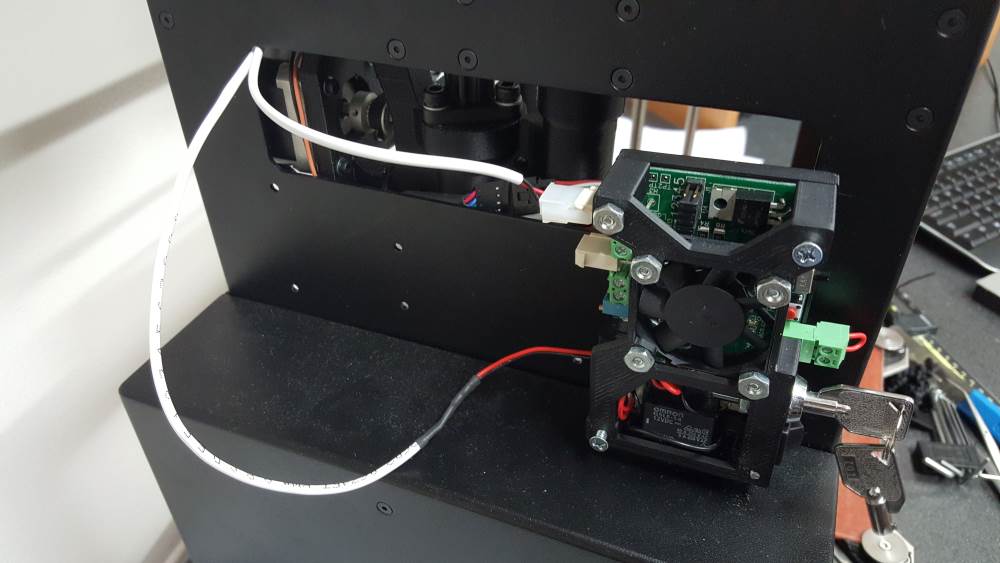
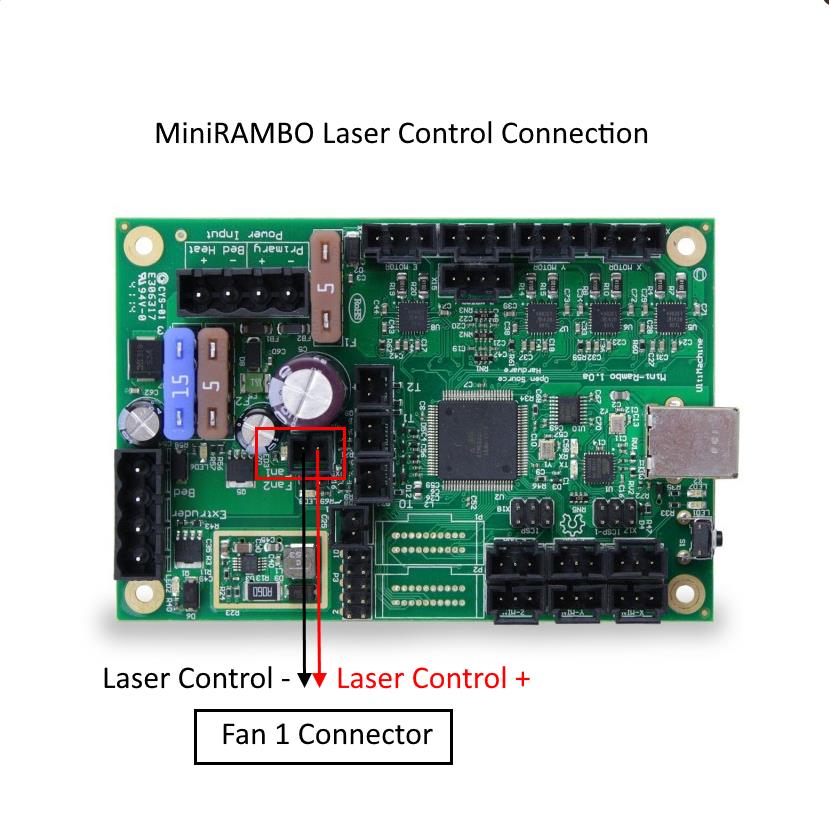
We are going to use the fan1 connection on the Rambo board to control the laser. It has PWM control needed to do picture engraving and is easily controlled with M106/107 commands in software. We decided to mount the laser in front of the extruder so you can print then laser without any changes. We choose to mount the driver on the side of the printer because there was already a hole for the driver to attach to and the existing cables in the laser upgrade kit will reach it. We routed the laser and fan cables up the wiring harness chain to the Z axis and made it all nice and tidy with zip ties. You can cut the fan cable and either splice the wires to the laser driver intput H2 or maybe even put a nice little switch in to change between laser and printing.
The Mini uses the RAMBOmini board. 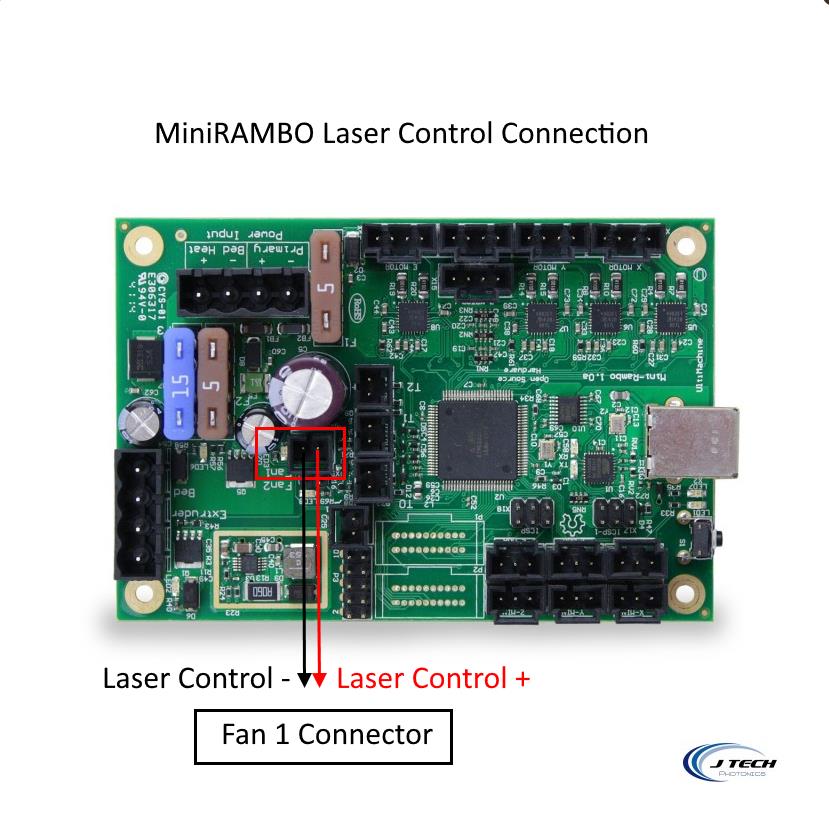
 Open the electronics enclosure to see the miniRAMBO board.
It is the Black and White cable.
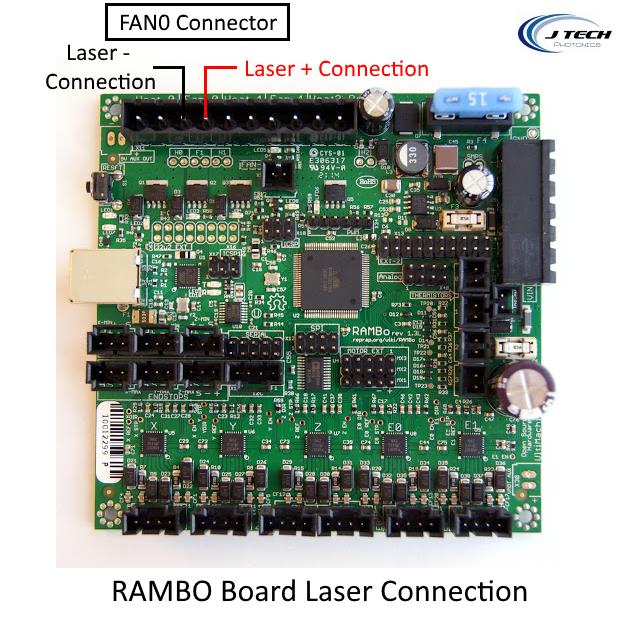
Taz 4, 5 and 6
The Taz is pretty much the same, but it will be using the FAN0 connection on the Rambo board. It is:


Mechanical
*note* all of the new printers are coming with fans in the place of where the laser is normally mounted. For the new Taz printers we recommend using the exchangeable full mount below. Make sure you understand the mounting before beginning the upgrade.
Mini and Taz 5
We designed a nice little mount for the laser to attach to in front of the extruder. There are a couple versions of the mini printer now, so there are going to be two ways to mount it:
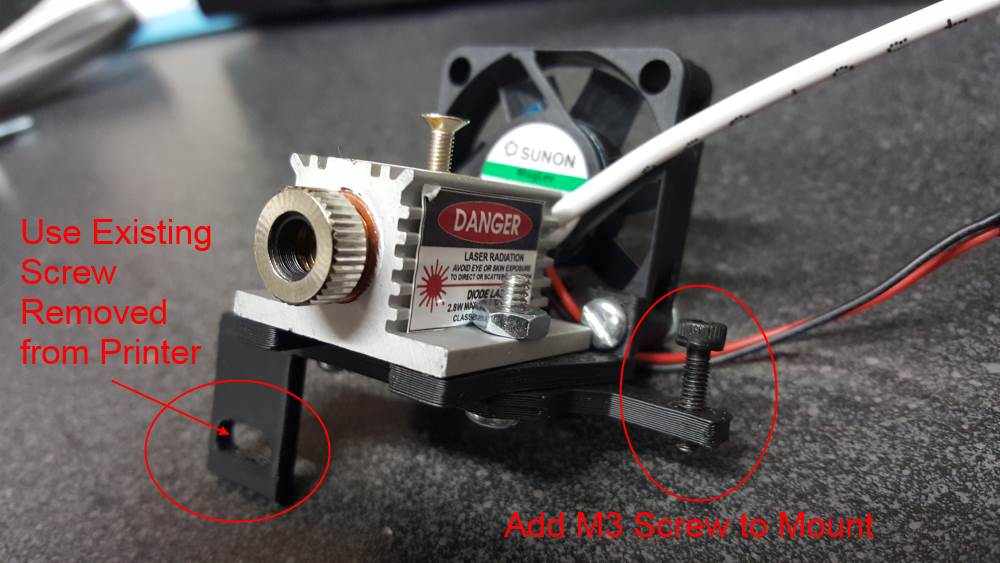
- Utilizing a small M3 screw hole that is on the aluminum heat plate, or…
- Utilizing the two screws that hole the extruder to the plate.
#1 Option: Check if you have the extra screw. It should look like this:

If you have it, the good news is it just needs one additional screw! You do need to get a small M3 screw and it will mount to the existing little hole in the aluminum plate on the extruder mount. Take the other screw from the left of the assembly off and put it through the new mount.
Download the STL by Clicking HERE (or on the picture)

#2 Option: If you don’t have the screw hole (or the extra M3 screw) then you can use the two screws that are holding the extruder to the aluminum plate and base. It requires a bit more of taking things apart, but it should not be too hard to accomplish. Here is the mount for this option.
Download the STL by Clicking HERE (or on the picture)

We will go into how to install these in the instructions below.
Taz 4
A very helpful customer, Russel Bogner designed a mount to fit on the previous Taz priters. It is very similar and mounts in front of the extruder. You use the same screws that hold the extruder plate down to put the mount in.
Download the STL by clicking HERE (or on the picture)

To protect the build plate we put some plastic with a sheet of aluminum on top of it and taped it in place. You can use whatever material you want for a sacrificial material and tape it or secure it somehow to the platform.
Optional Full Mount On all Taz (including Taz 6)
One of our customers designed a full mount that you can replace the extruder with the laser. Since Lulzbot makes it super easy to change the extruders out with just one screw, he decided to make a platform for the laser on this. It takes a bit of time to print out, but in the end you will have a cool laser attachment for the printer. Plus, the laser will be centered where the extruder normally is, meaning no offsets to worry about!
Download Extruder Mount STL File

Software
***** You might not need to do this part. Some of the Lulzbot printers were shipped with firmware that will work. Check in Repetier Host after you install your laser whether it will work with the FAN SLIDER in the manual tab. If you can slide the slider bar and the laser gets brighter the more you slide, you are good. No changes needed. If it just kinda flashes and gets bright then dark again, then you need to update your firmware. ****
We had to modify the firmware of the Lulzbot because the PWM frequency was set way to high for it to control the laser for our machine. Here is how:
You can get the firmware from Lulzbot here:
or for the TAZ printer it is in the software folder here:
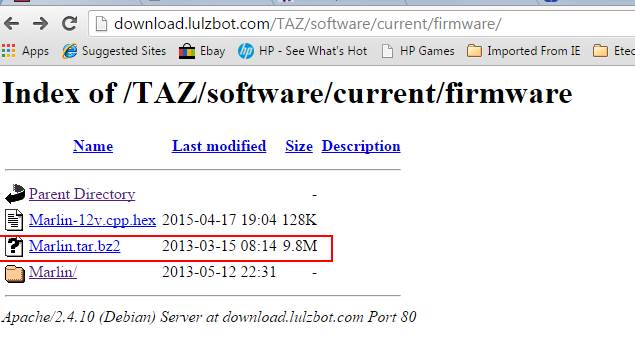
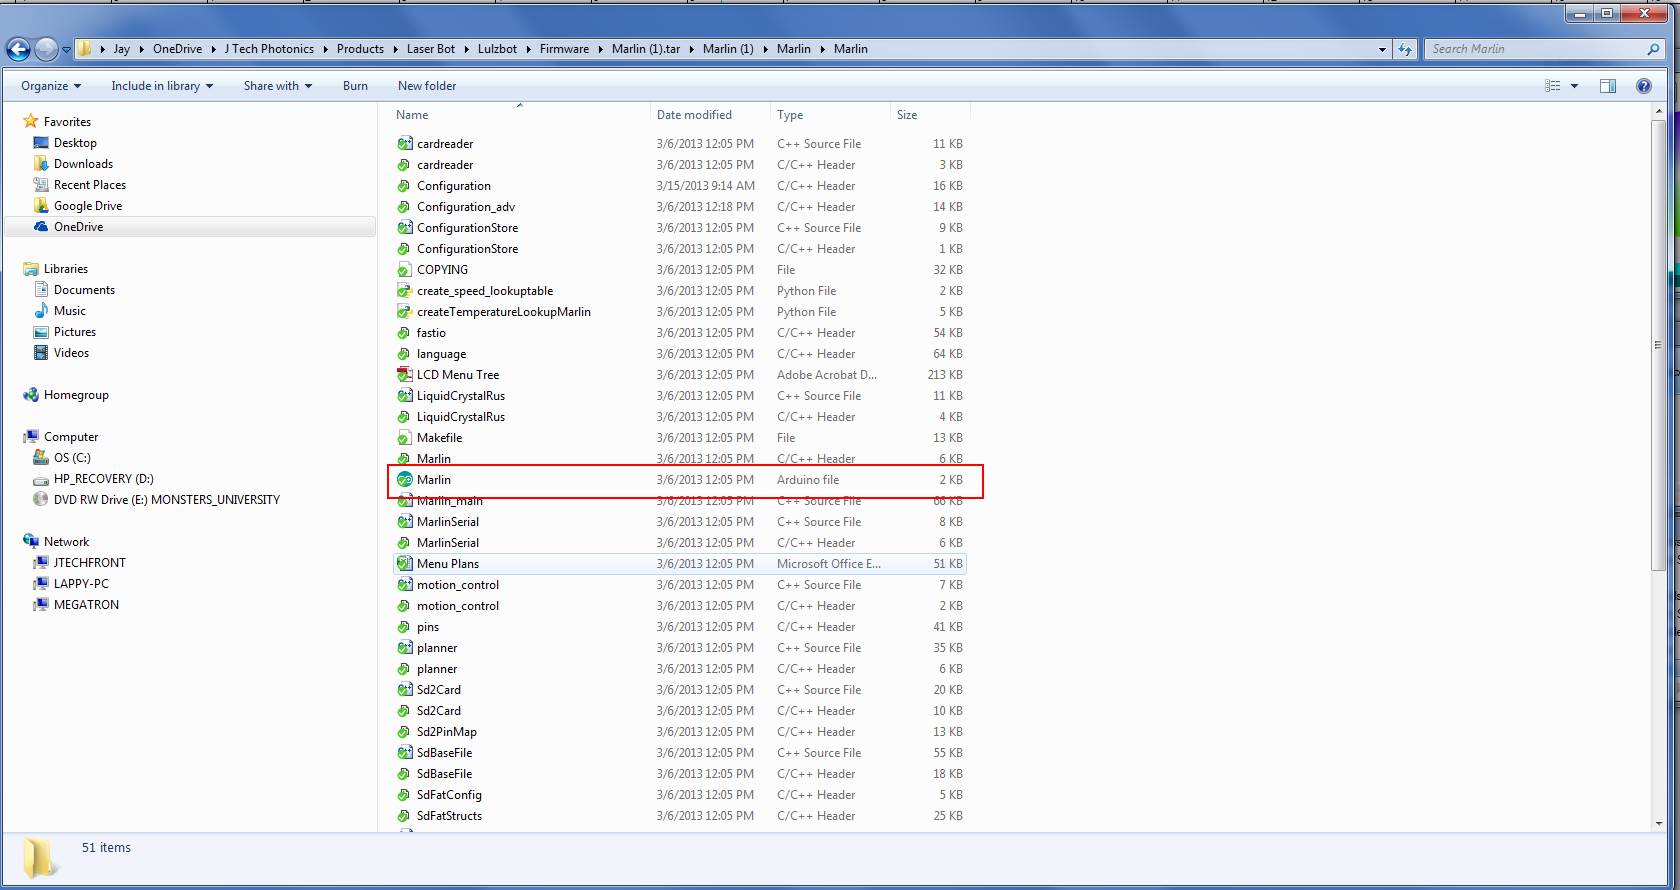
Download the .tar file and open it with a program like 7-zip and extract all of the files.

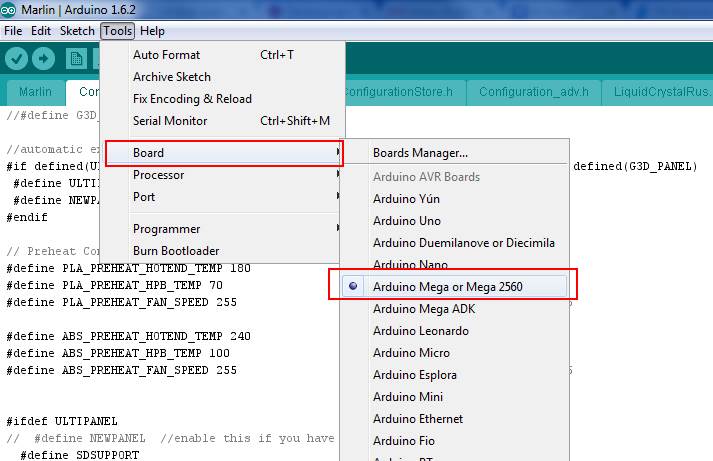
Make sure you have the newest version of the compiler downloaded from Arduino HERE. Open the file called “marlin” that is an arduino sketch file.
Once you double click it, it should load up the entire sketch for you. Set you board as Arduino Mega or Mega 2560 .
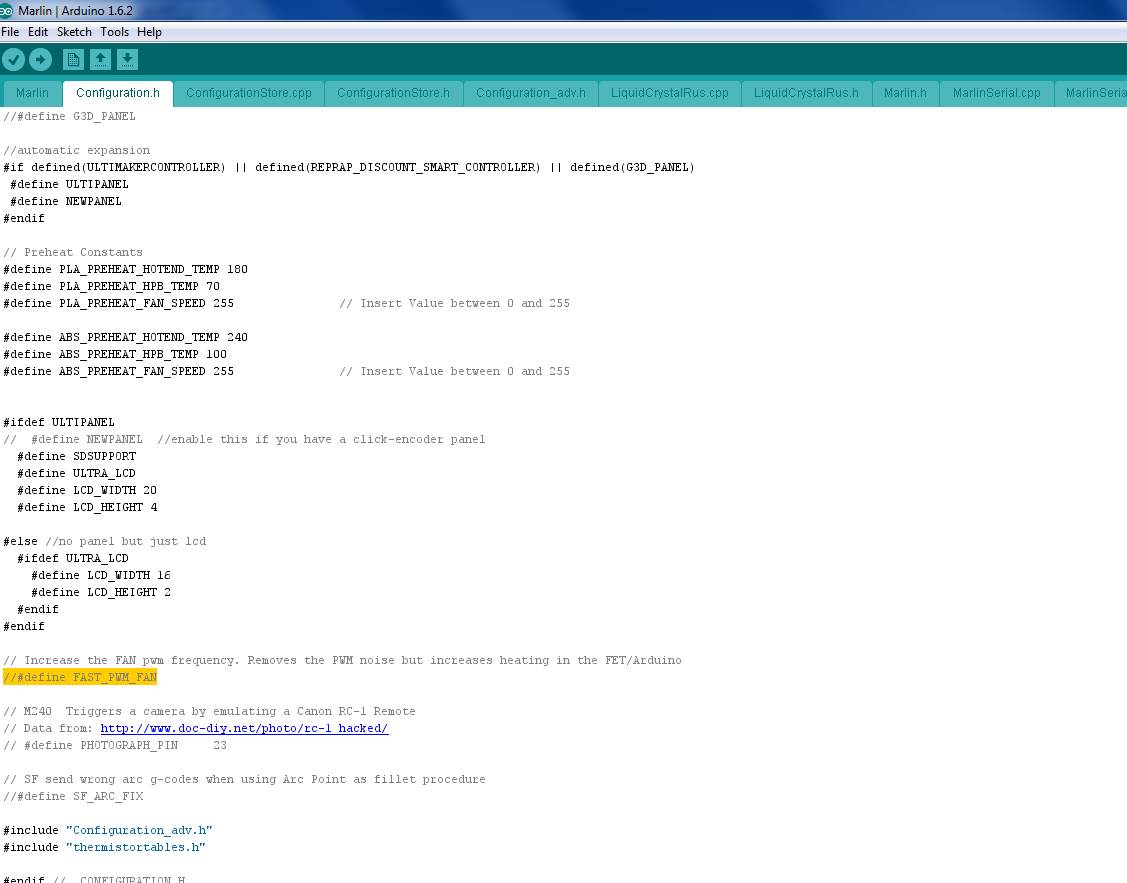
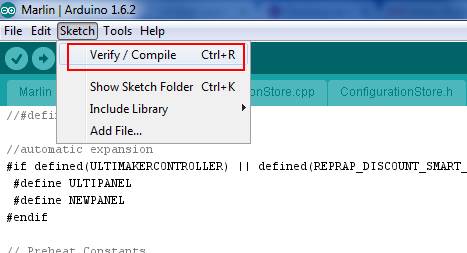
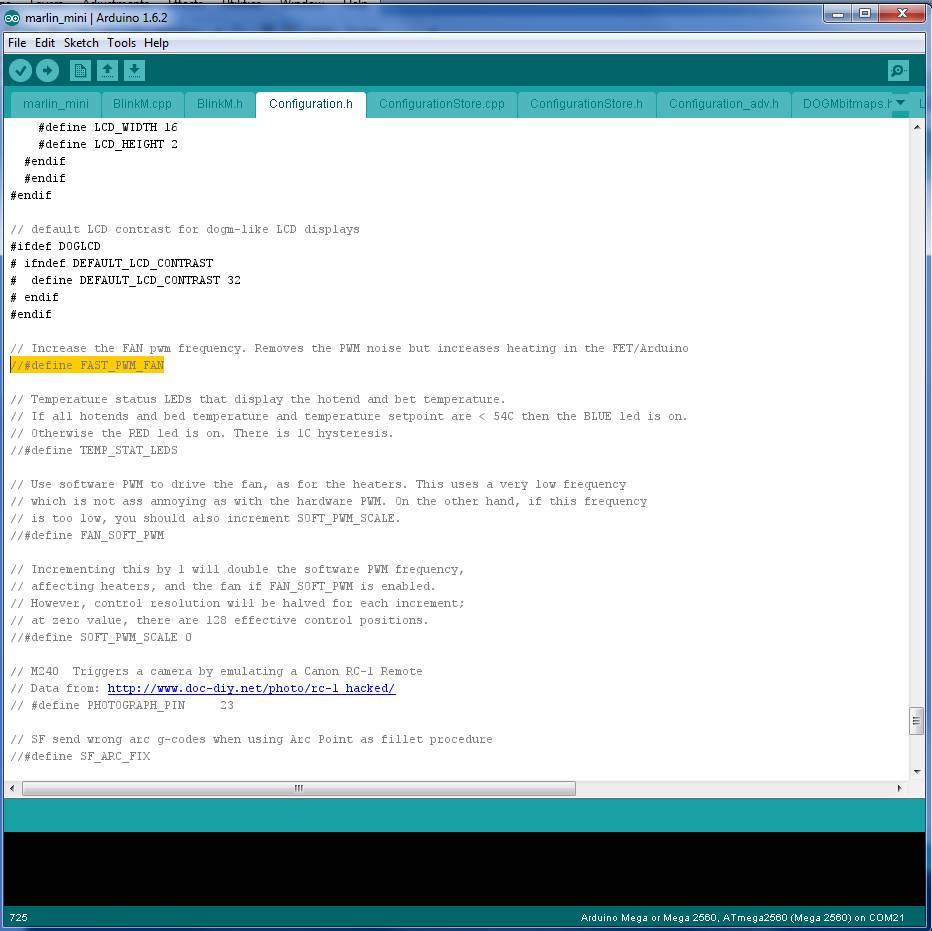
Then in config.h, comment out the line:
//#define FAST_PWM_FAN
Then make sure your are connected to the correct COM port. Make sure your printer is connected to the printer.
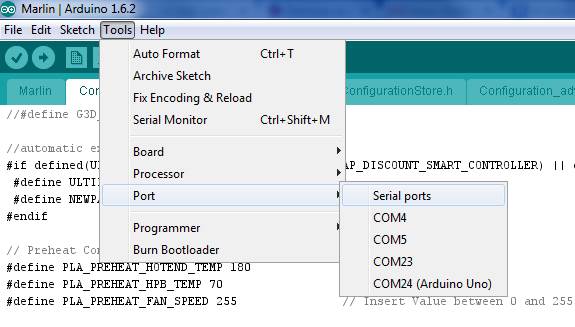
Compile your new firmware and send it to your printer:
You are now done!
We used Repetier Host to control the printer. We like the “preview” feature for the G Code and it does a good job with everything else as well. You need to adjust some of the settings because the table will be slightly smaller. Here are instructions for the configuration:
Lulzbot Laser Setup Instructions
Ok, now let’s get to the upgrading with pictures!
Step 0 – Print out the mount
There are a couple of versions of the mount to print depending on your printer and the year you bought it. Check up at the mechanical section to choose which one you want.
Step 1. Remove the left screw on the extruder assembly.
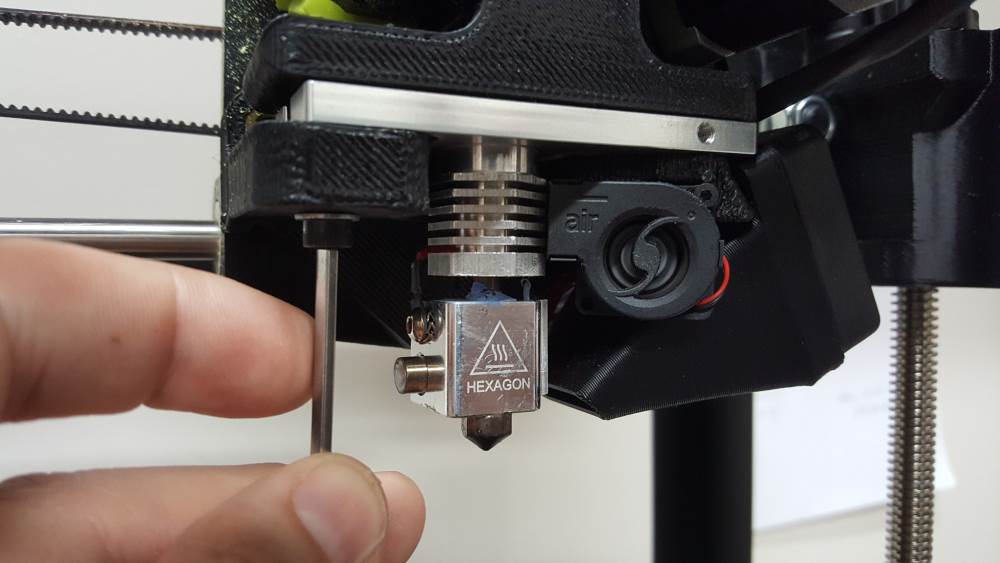
Step 2 – Mounting for Option #1 on the Mini
Attach the laser to the mount like in the picture above. Note the screws are going through the back.
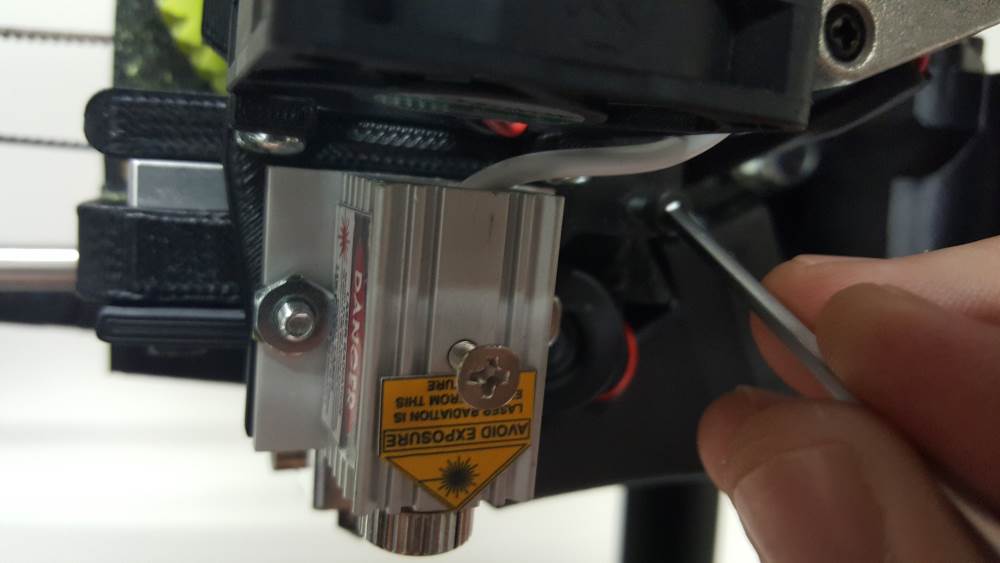
Place the mount in front of the extruder and screw it in.
Step 2 – Mounting Option #2
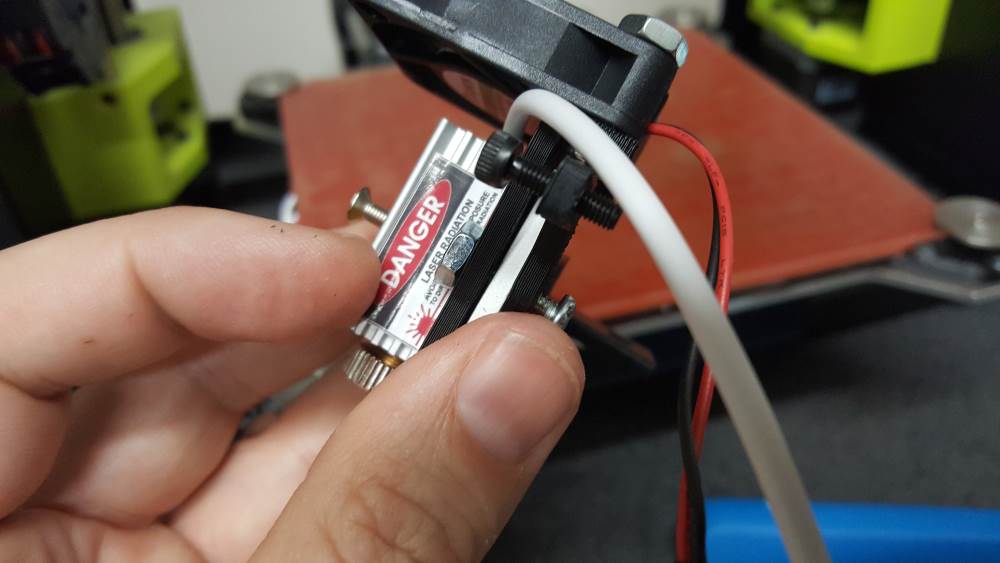
A. Put the laser on the mount:

B: Remove the small fan. Put the small screw aside so you don’t lose it.
C: Remove the side fan and nozzle assembly.
D: Remove the large screws holding the extruder and aluminum plate.
E: Carefully place the laser mount between the bottom plastic and the aluminum plate. Line the laser up with the extruder making sure it is in the center. Make sure it is not over to the right, or the small fan will not fit back in. After getting it aligned, tighten the screws back holding it secure.
F: Put the side fan nozzle back into position. Make sure the side fan is out of the way and the small fan cord lies on top of the nozzle for later installation.
G: Replace the fan on the fan nozzle mount.
H: Put the small fan back carefully. It should fit behind the laser mount with the front right next to the extruder.
I: It should come all together again with the laser tightly right in front of the extruder. Now take a rest and get ready for the next part!
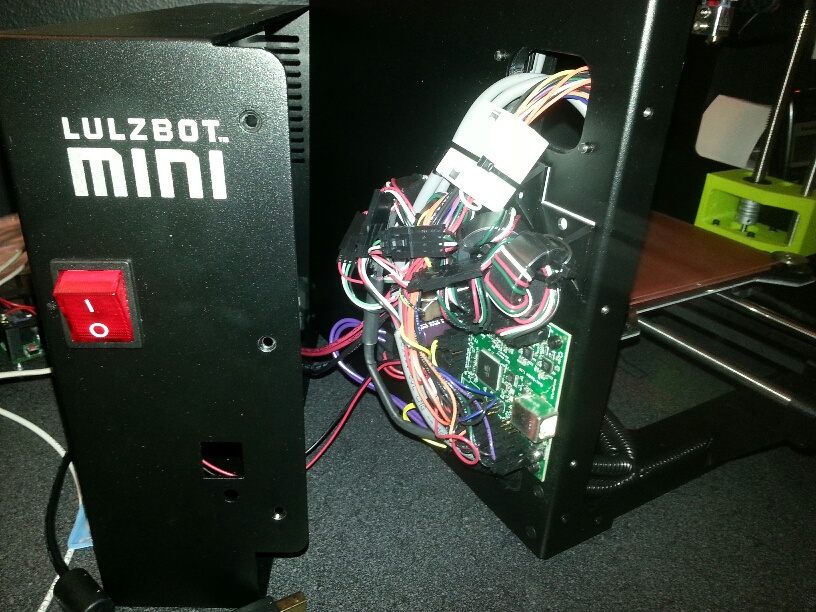
Step 5 – Route cables to the back cable chain.
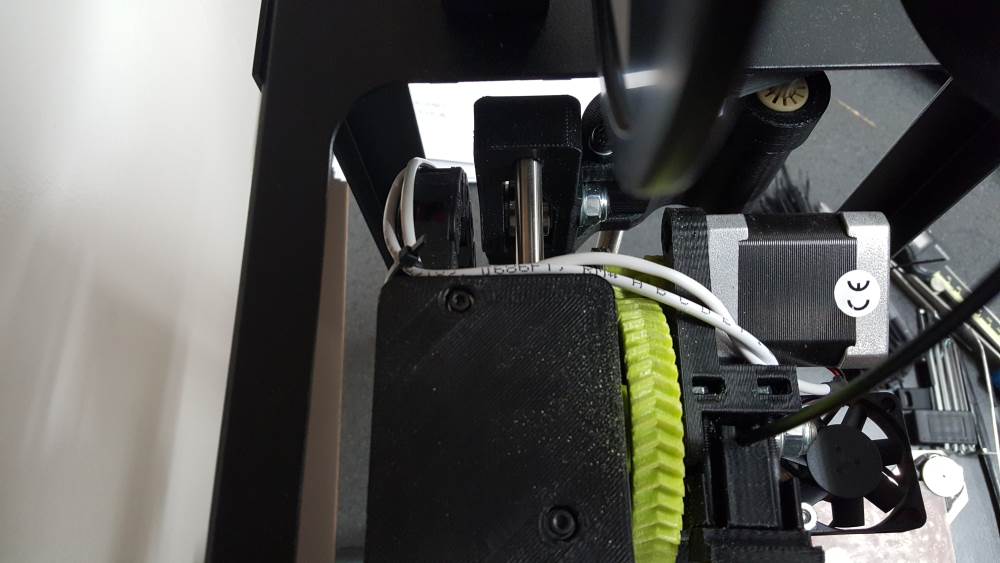
Step 6 – Zip tie cables to chain.
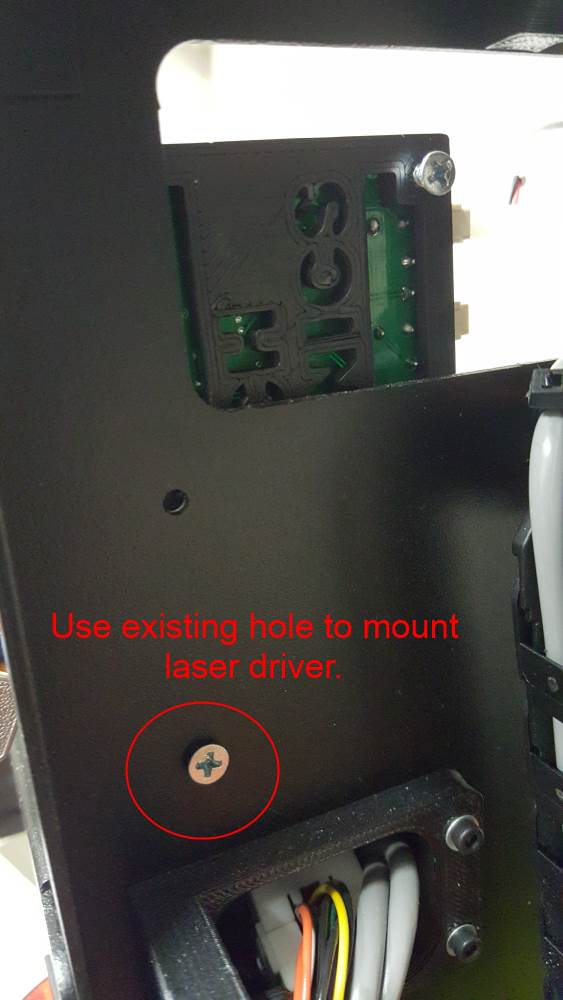
Step 7 – Put laser driver on front side of printer.
Step 8 – Use existing hole to mount the laser driver.
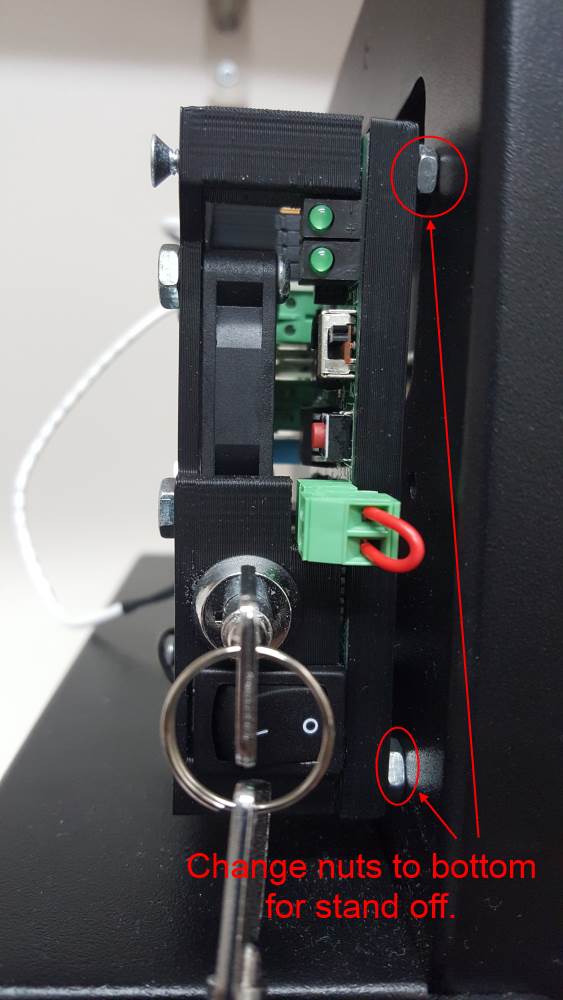
Step 9 – Change out the driver nuts to make spacer to hold driver when you screw it in.
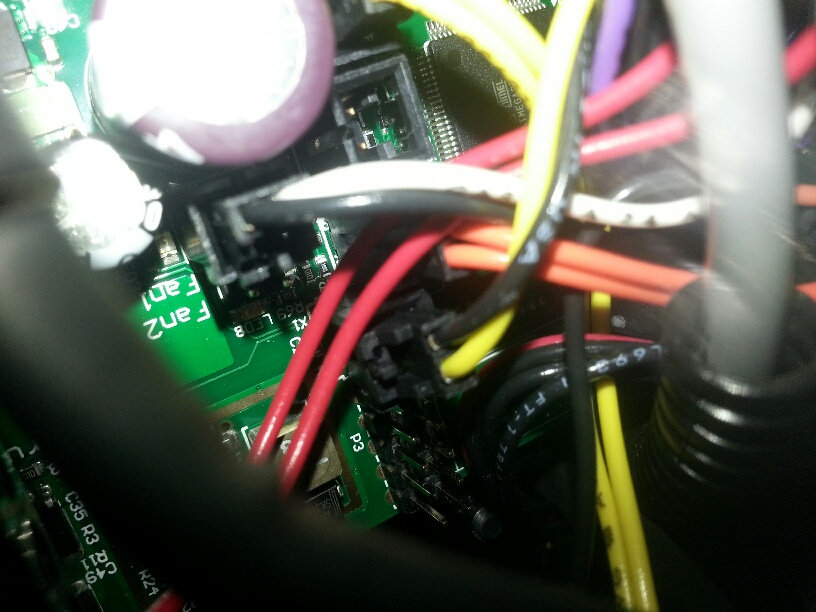
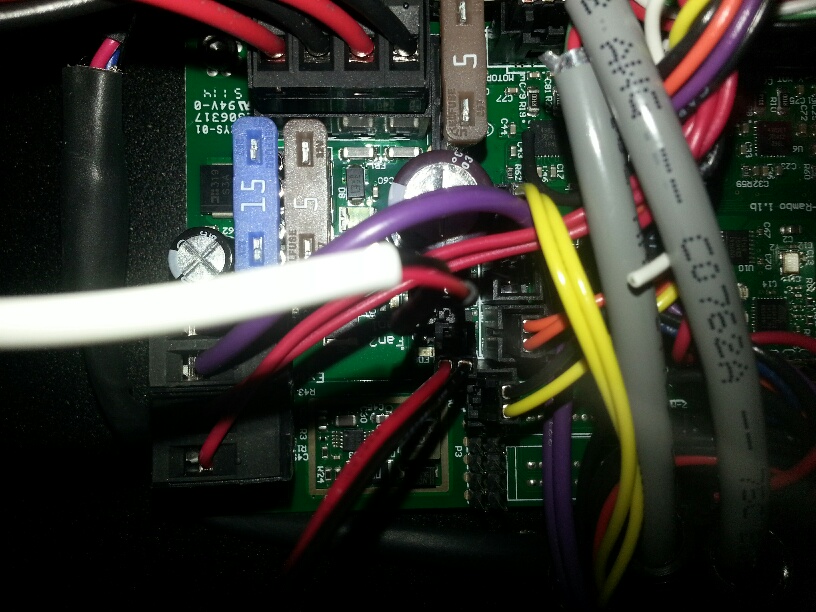
Step 10 – Open electronics to get to the fan cable.
Step 11 – Cut fan 1 cable and splice in cable for laser driver.
Step 12 – Open the Arduino SW and load the Marlin firmware (either Mini or Taz). In config.h, comment out the line FAST_PWM_FAN like in the picture. You can also use SW PWM, but make sure it is not above 5KHz.
DONE! READY for LASER!!!
Buy your laser upgrade kit now!

Remember Safety First!

We sell laser shielding to block laser radiation and reflections!
Laser Goggles are also a must!
Disclaimer
The laser used in this project is very powerful and all safety precautions must be taken. Use proper safety eyewear to prevent injury to eyes. This is a project and J Tech Photonics, Inc. is not responsible or liable for any and all damage or injury caused to people or property. The use of these instructions to make a laser cutter is under your own discretion and all safety precautions should be followed. J Tech Photonics, Inc. is not partnered in any way with Aleph Objects Inc. and they may change hardware and software at any time making these instructions invalid.
Should the switch be on CW or input control mode for the Lulzbot Mini?
Should the switch be in CW or input control mode for the Lulzbot Mini?
Will Lightburn software work with a Lulzbot upgrade or only the xcarve and Shapeoko machines?
Lightburn should work if you have Marlin installed on your printer. Try downloading the trial here and see if it works for you. https://lightburnsoftware.com/pages/trial-version-try-before-you-buy