


The ShapeOko project is one of the fastest growing open source do it yourself CNC machines ever. It is made from the popular makerslide and standard Arduino electronics. Check it out at ShapeOko.com.
So, if you are one of the thousands who own a ShapeOko and are having fun making stuff but want more, this is your answer! Let’s put a laser on it and do some engraving and cutting!
These instructions show how to electronically connect the laser driver and the commands needed to control the laser in G Code. So let’s get started!
Mechanical Mount
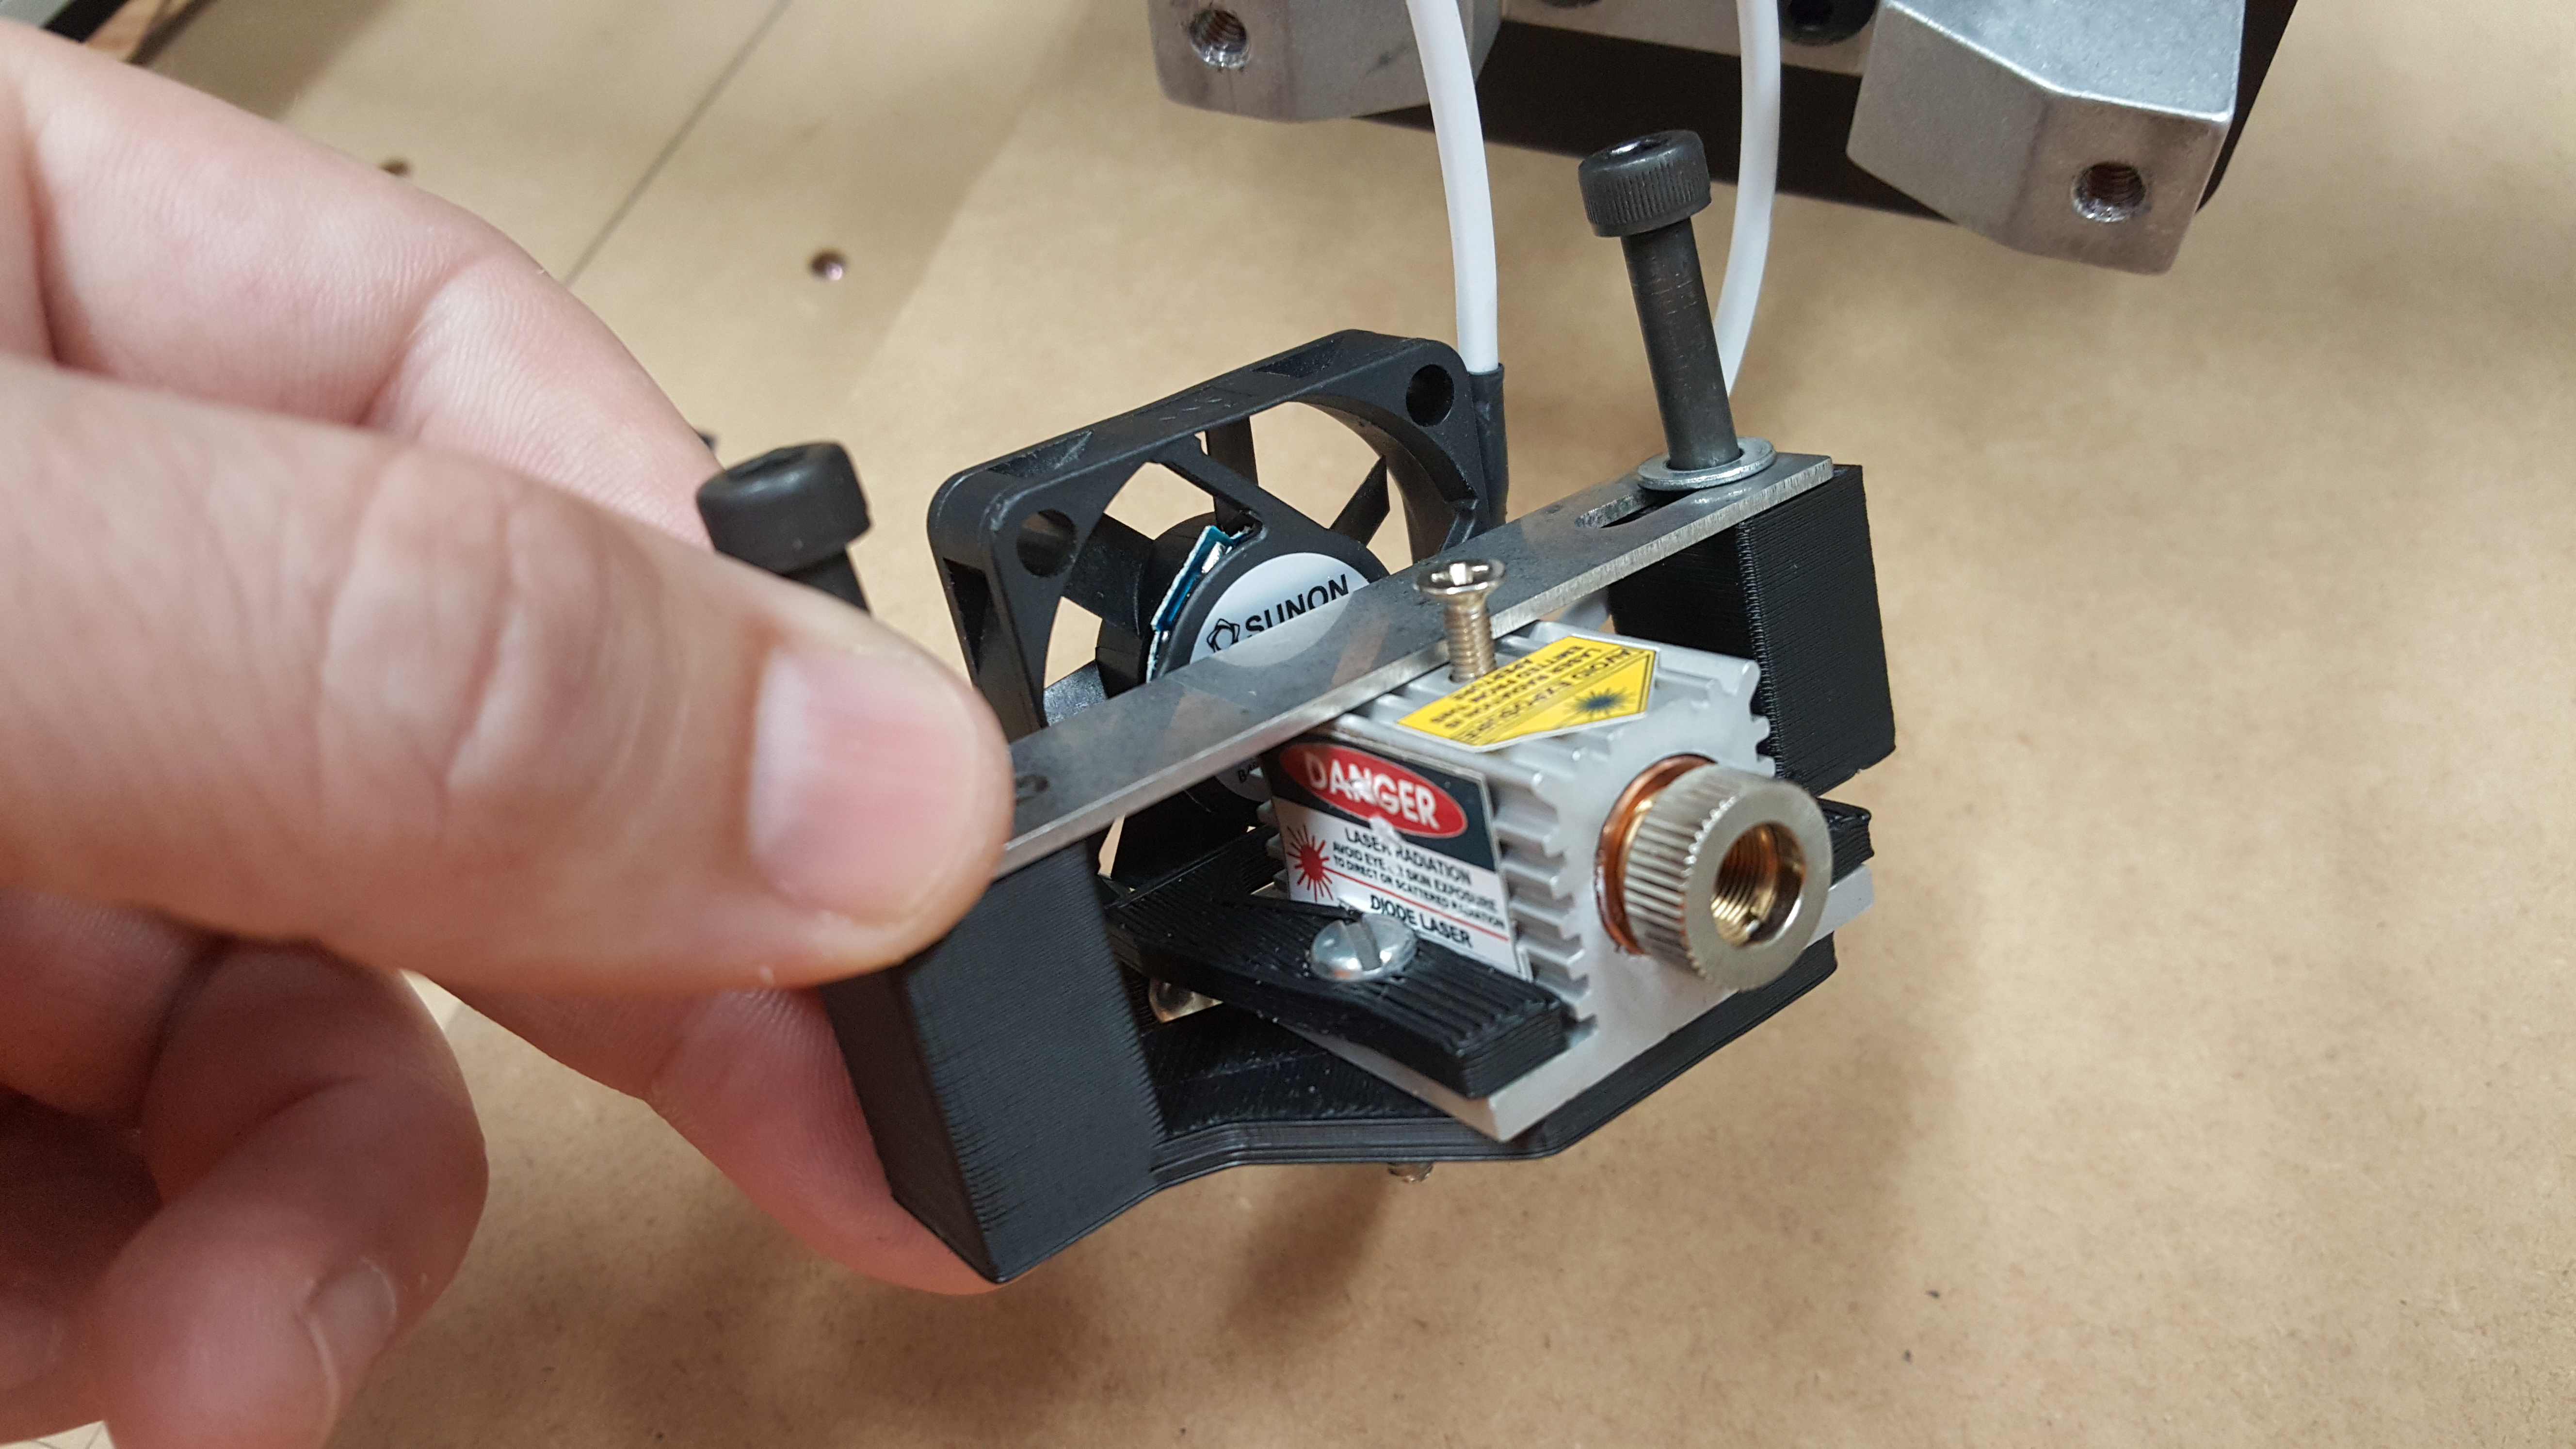
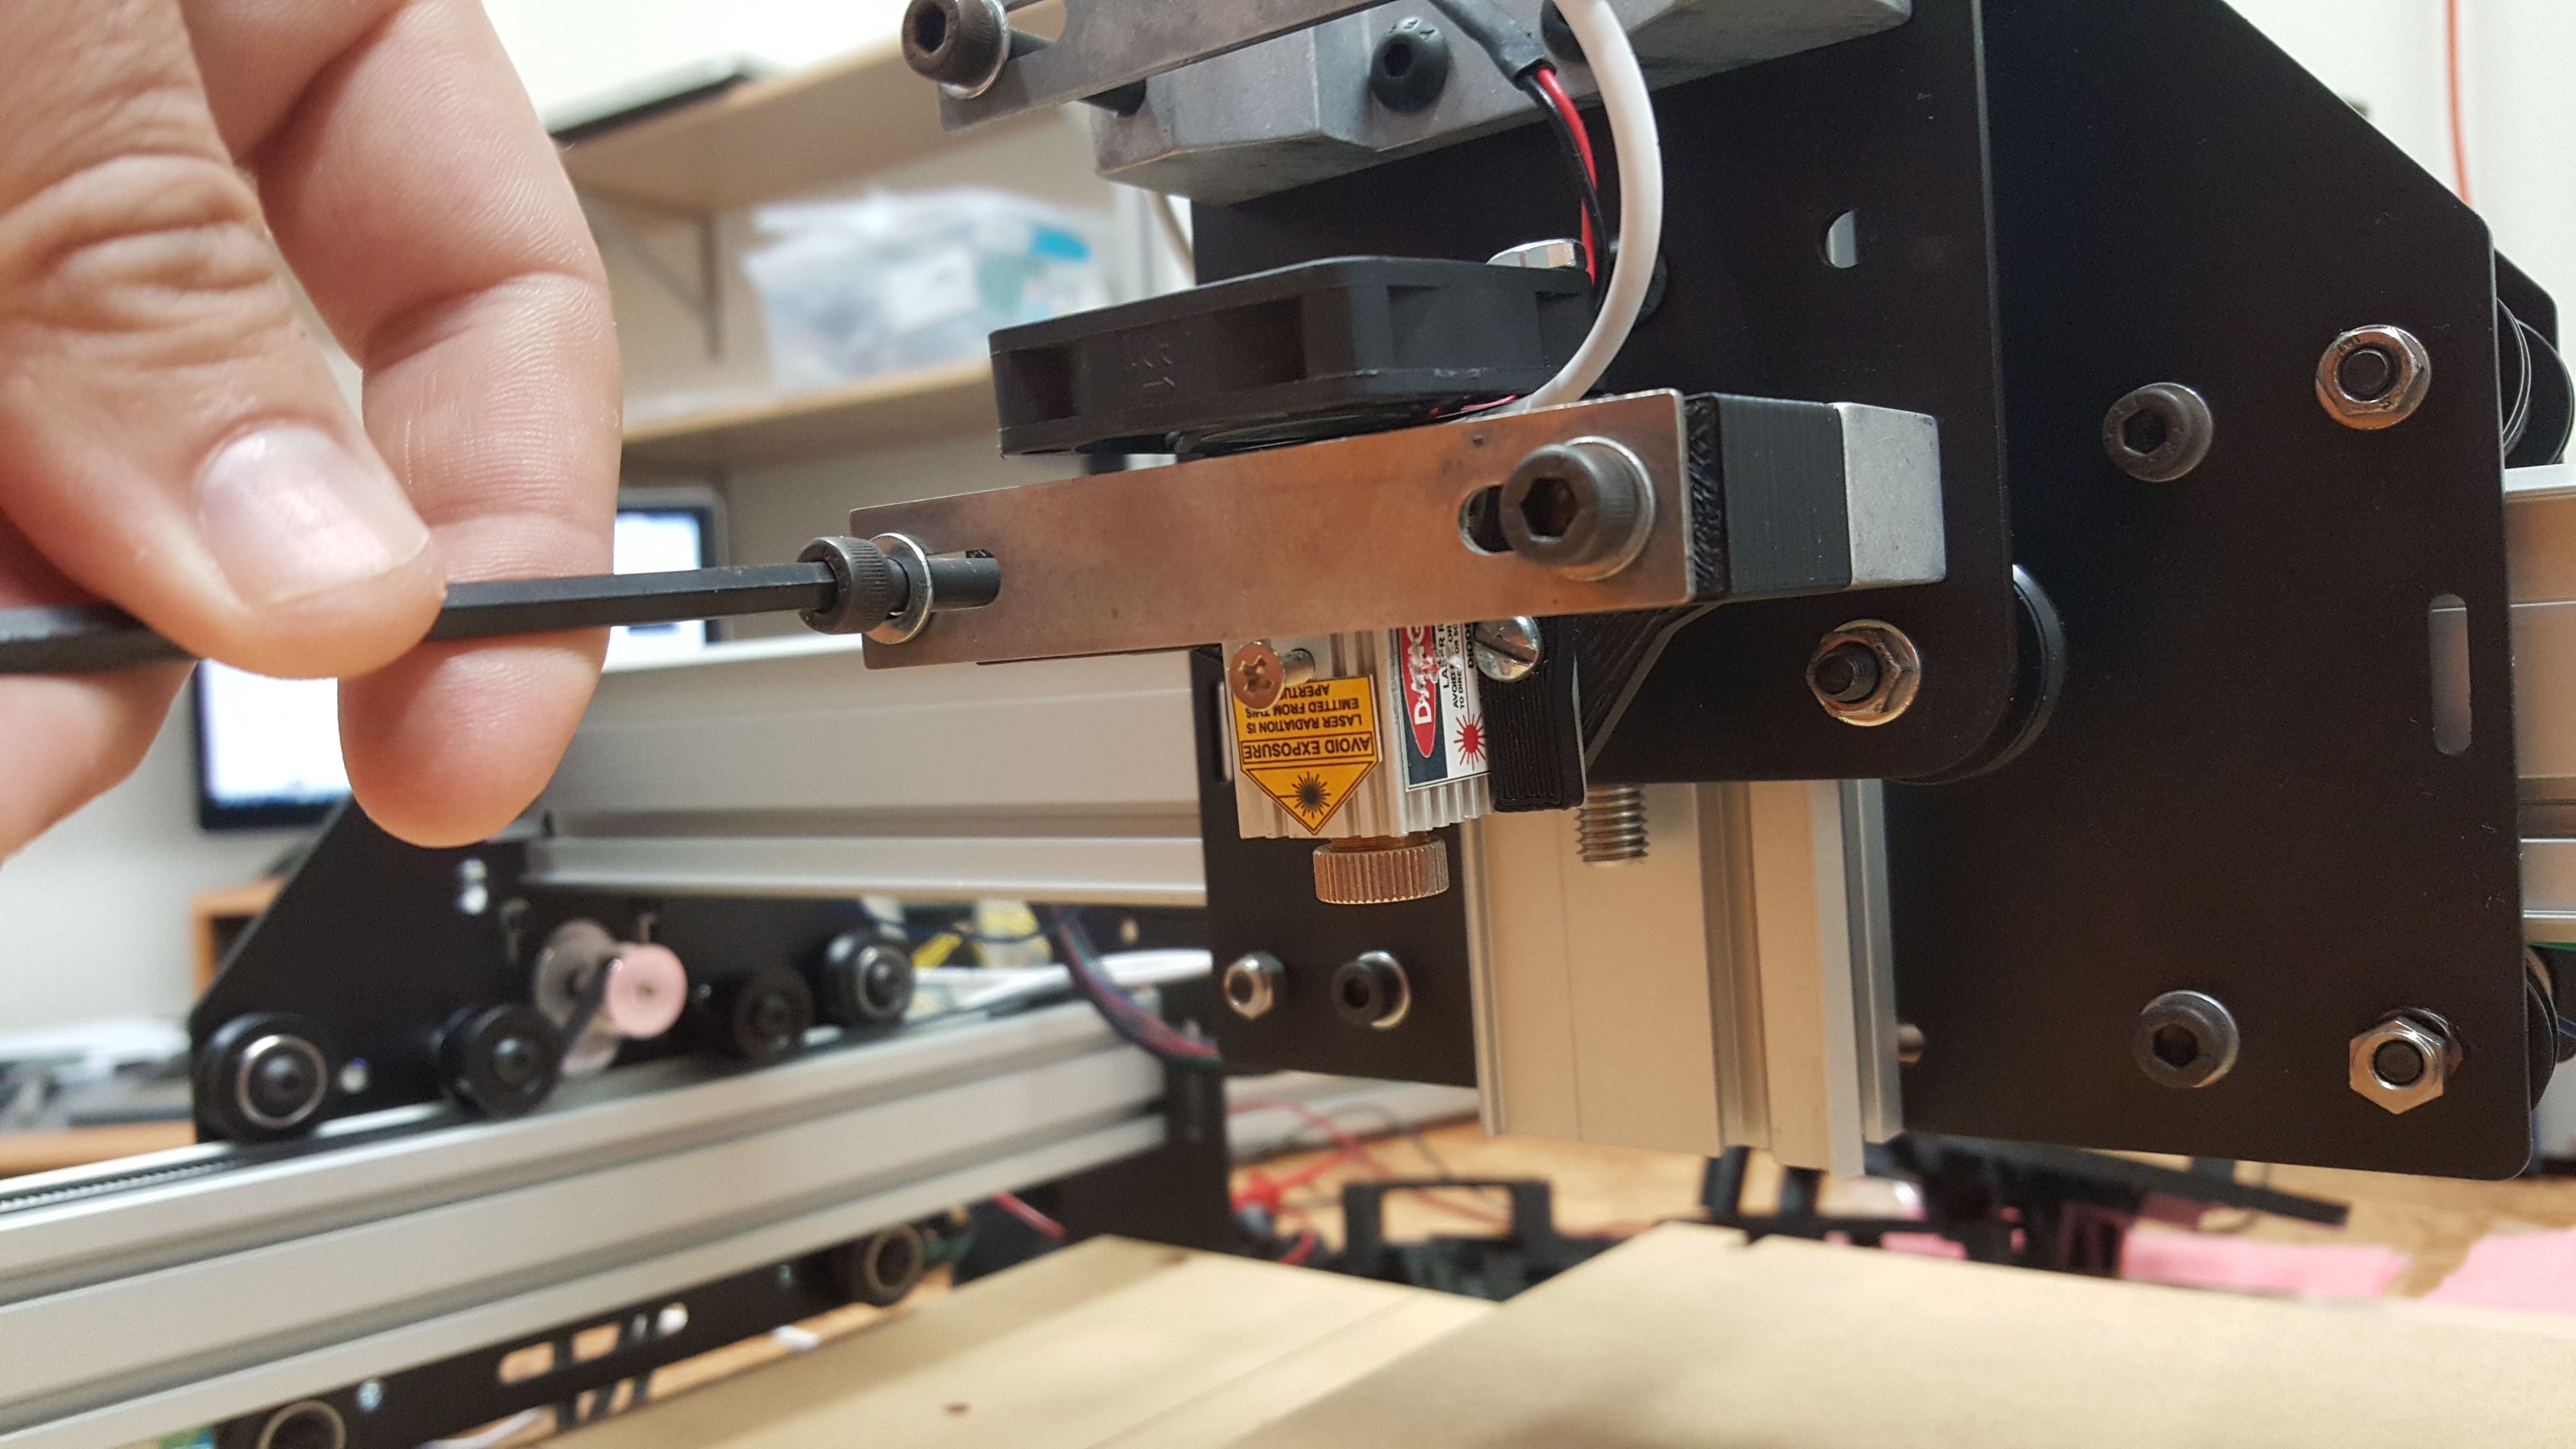
Many people have integrated the laser onto the Z axis of the ShapeOko with success. Just look at the mounting dimensions on the documentation page for the hole locations. It is also advisable to provide a fan for active cooling behind the laser as well. Mounting a fume extractor is also beneficial when cutting materials like plastic as the fumes can be dangerous.
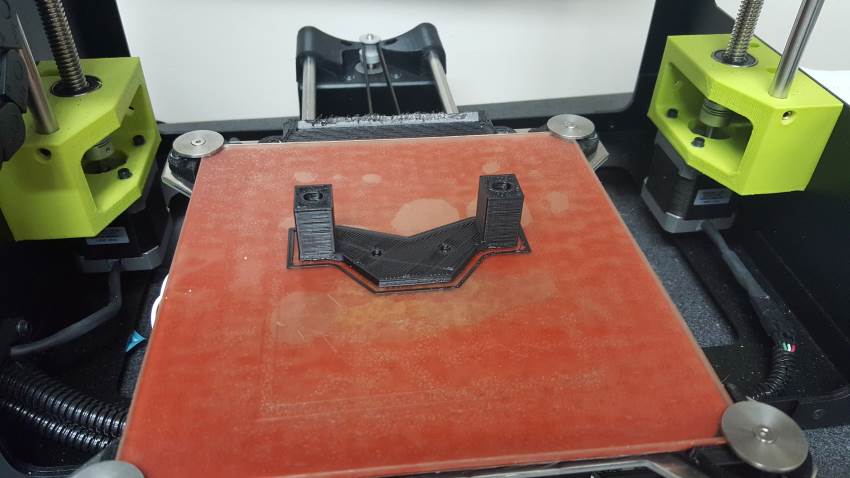
We have made a custom mount for the shapeoko that fits into the existing spindle holders. If you have a 3D printer you can download it here: DOWNLOAD CUSTOM SHAPEOKO MOUNT
If you don’t have a 3D printer, then buy it in our store! Click here to buy the mount.
Electronics – Connecting the Kit
The standard ShapeOkO2 electronics are the Arduino Uno and the GShield. If you bought from the Inventables and got the entire kit, you got an original Arduino Uno. If you bought the electronics from Synthetos then you will have a different Arduino board. No matter, the connection is the same either way!
The Shapeoko uses the popular open source machine control firmware GRBL for its operation. They now have different versions which require you to hook up the laser differently. We will cover both versions here.
GRBL Version 0.8 and lower (Shapeoko 1 and older 2’s)
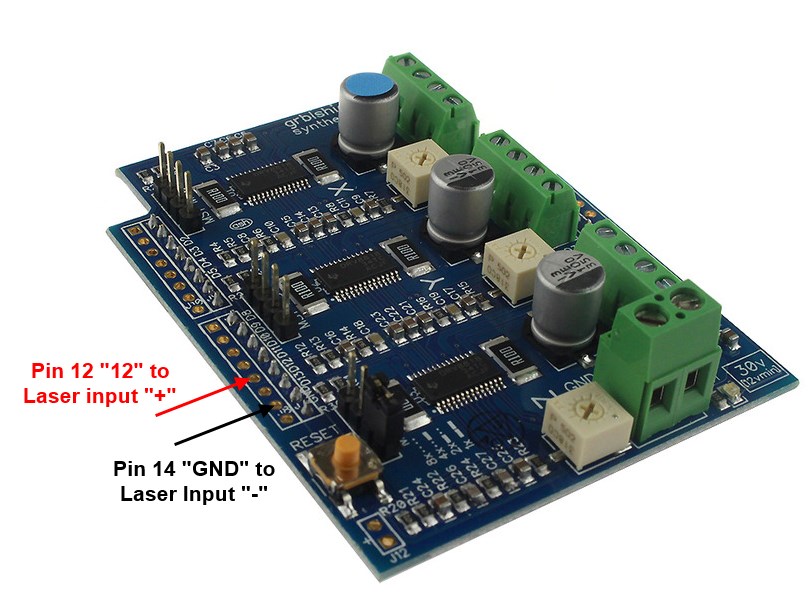
If you bought your Shapeoko before January 2015 and have not upgraded your firmware then you probably have GRBL 0.8 on your machine. The connection is pretty easy. You can either connect to the GShield on the top or to the bottom with the Arduino. Soldering a wire into one of the holes is the easiest way to get going. Or you can solder a piece of a standard break away header and use a jumper wire cable. Either way you are going to need to connect the following:
- Pin 12 Labeled “12” on either Arduino or GShield to Laser Driver Input “+”
- Pin 14 Labeled “GND” on either Arduino or GShield to Laser Driver Input “-“
Here is the picture of the GShield with the hookups:
And the Arduino Uno:
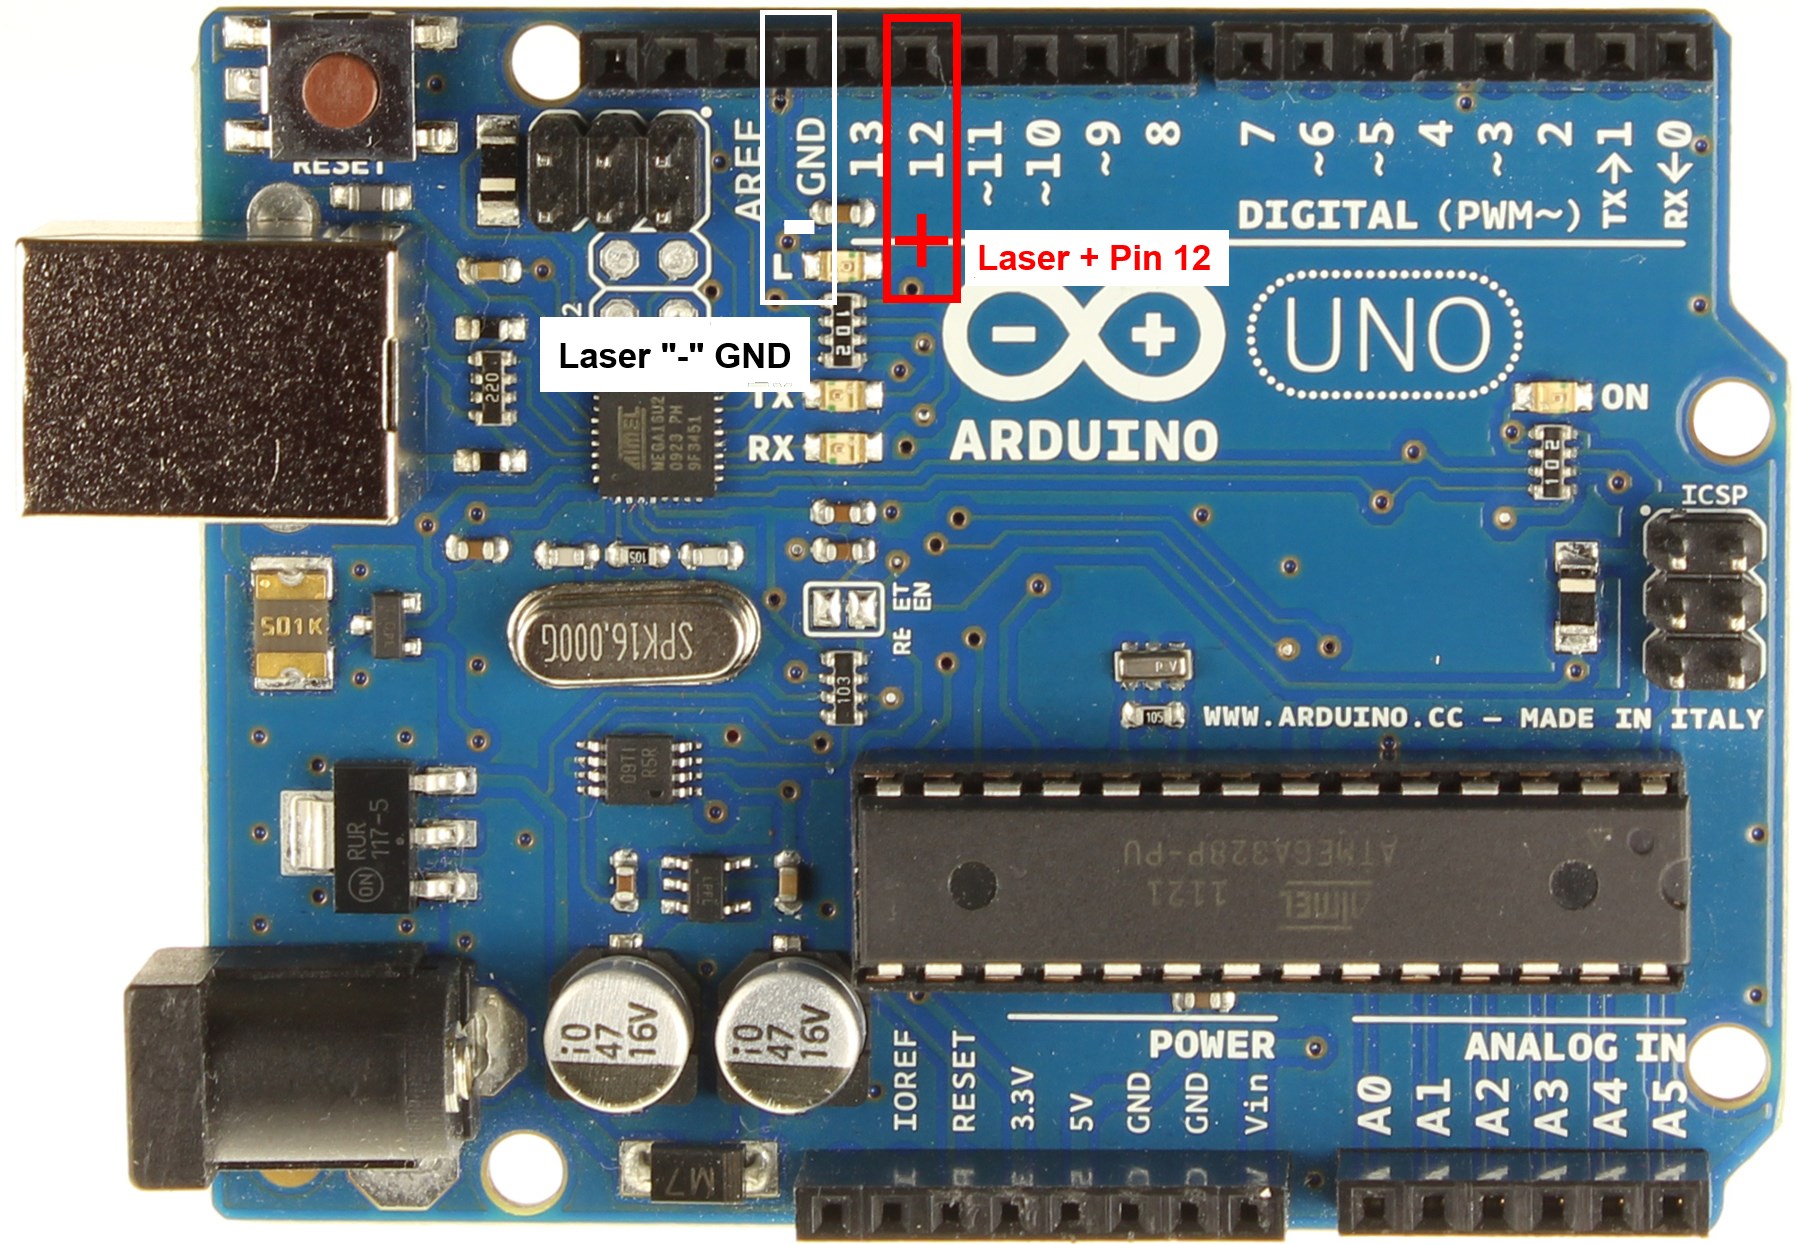
The laser driver board has an input connector for input control. You can use either a Molex mini fit Jr. and use H4, or connect to the screw terminals on H2. Here is the picture showing connectors H4 and H2:

GRBL Version 0.9 and J Tech GRBL 0.9 (Newer Shapeoko 2)
If you have a new machine or have upgraded your firmware then you have the following for laser control. You can either connect to the GShield on the top or to the bottom with the Arduino. Soldering a wire into one of the holes is the easiest way to get going. Or you can solder a piece of a standard break away header and use a jumper wire cable. Either way you are going to need to connect the following:
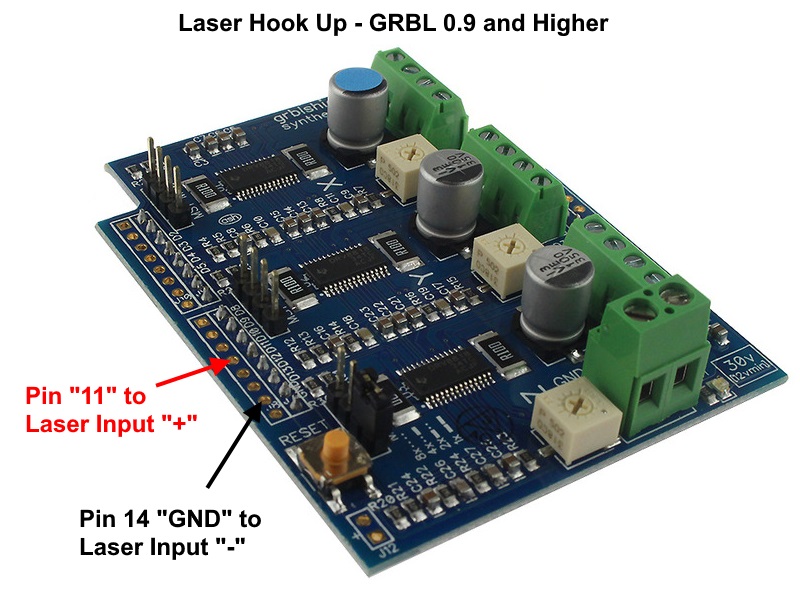
- Pin 11 Labeled “11” on either Arduino or GShield to Laser Driver Input “+”
- Pin 14 Labeled “GND” on either Arduino or GShield to Laser Driver Input “-“
Here is the picture of the GShield with the hookups:
And the Arduino Uno:

The laser driver board has an input connector for input control. You can use either a Molex mini fit Jr. and use H4, or connect to the screw terminals on H2. Here is the picture showing connectors H4 and H2:
Software – Controlling the Laser
Now that you got everything ready with the wiring, now it is time to turn on the laser with GCode!
The GRBL firmware supports a feature to turn on a spindle and turn it off. Typically, most of the spindles are Dremel type ones with no external trigger and require a manual turn on, so this pin probably is not used. Even if it is, there are numerous connection points so the two can share (but make sure to turn off the spindle power before you run!).
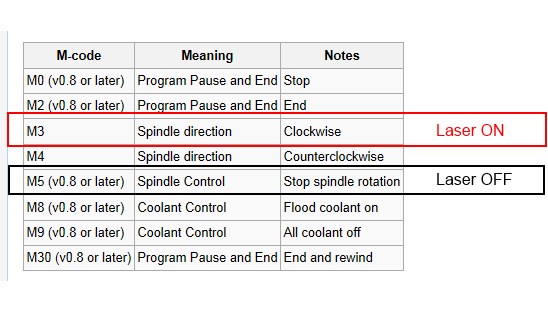
So, what are the commands? The standard command to turn on the spindle is M3 and to turn it off is M5. So, to turn on and off the laser it is:
- M3 – Turn Laser On
- M5 – Turn Laser OFF
If you want to use PWM for power control (and have GRBL version 0.9 or higher installed) then the commands are:
- M03 SXXXXX
Where the “XXXXX” is a number between 0 and 10000. So, some examples are:
- Laser ON 100%: M03 S12000
- Laser ON 50%: M03 S6000
- Laser ON 10%: M03 S1200
- Laser OFF: M03 S0 (or M05 will work as well…)
If you are using the J Tech GRBL version, then the command will be:
- M03 SXXX
Where the “XXX” is a number between 0 and 255. So, some examples are:
- Laser ON 100%: M03 S255
- Laser ON 50%: M03 S127
- Laser ON 10%: M03 S25
- Laser OFF: M03 S0 (or M05 will work as well…)
Set-up for Photo Engraving
The firmware that comes with your machine will not be able to do very good picture engraving if you don’t have version 1.1f or newer on your controller. It stops for EVERY pixel to adjust the intensity. Now, this might work if you turn your laser power on your driver really low and you are willing to wait hours for your engraving to finish but I think you might have better things to do with your time. This is why the new firmware was developed so the intensity of the laser can change without stopping for every pixel. So, in order to set up your X carve for photo engraving you will need to follow a few steps. Here is the blog post on how to set up your machine:
Workflow Examples
Consider the new laser as an “interchangeable toolhead” on the machine. Instead of the spindle, you now have a laser. It is exactly the same way to control it, but now you are drawing in 2D and not 3D. The ShapeOko website has a good tutorial on how to make 2D drawings with several programs, then send them to a toolpath generator and process it. Here is the link on how they say to complete this workflow:
http://www.shapeoko.com/wiki/index.php/Basic_workflow_2D
Running Your ShapeOko 2 Laser
Running your new laser upgraded system will be exactly like when you were running it with a spindle on it. Just make sure you have all of your safety gear in place, the laser focused, power set, and everything powered on and ready to go. Here is the link to running your machine on the ShapeOko website. Instead of using a spindle, just replace all of it with a laser. We set our focus for the laser at about 3″ for the shapeoko. This will be about at the bottom of the Z travel using our mount.
There are a lot of different “sender” programs that will work with your machine. In the inside of your machine is something called “GRBL” that directs how the machine moves and interprets the G Code file. The G Code file is the “instructions” and GRBL just needs some program to “send” it to the GRBL that is in the firmware of your control board.
Here is the wiki page with all of the sender program available:
http://www.shapeoko.com/wiki/index.php/Communication_/_Control
We like to use the “universal G Code sender” as it is the standard for the previous shapeoko machine and has a very large user base. It is located here:
https://github.com/winder/Universal-G-Code-Sender
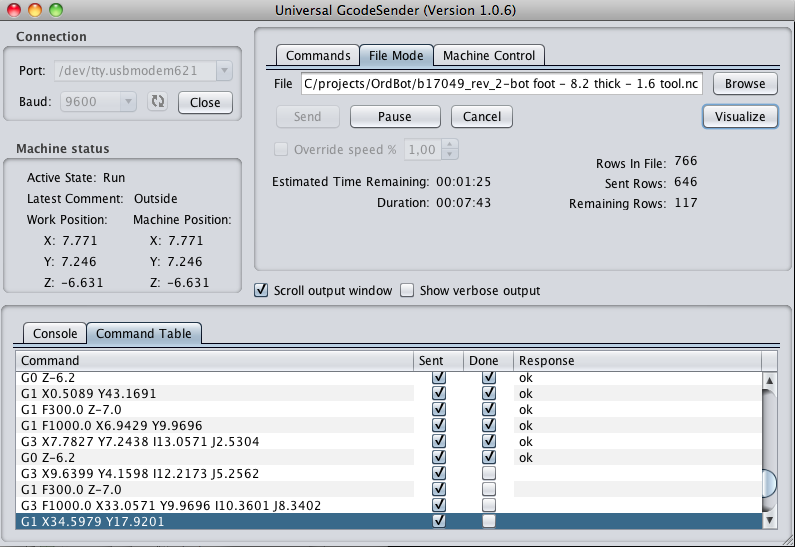
Here are some instructions on running the shapeoko3 with Universal G Code Sender:
http://www.shapeoko.com/wiki/index.php/Run_Your_First_Job
So there it is! Now you are ready to start creating!
Buy your laser upgrade kit now!
Remember Safety First!

We sell laser shielding to block laser radiation and reflections!
Laser Goggles are also a must!
Disclaimer
The laser used in this project is very powerful and all safety precautions must be taken. Use proper safety eyewear to prevent injury to eyes. This is a project and J Tech Photonics, Inc. is not responsible or liable for any and all damage or injury caused to people or property. The use of these instructions to make a laser cutter is under your own discretion and all safety precautions should be followed. J Tech Photonics, Inc. is not affiliated in any way with ShapeOko or Inventables and they may change hardware and software at any time making these instructions invalid.
I’ve read about ‘run your first job’ instruction.. I didn’t hear any click and woosh sound of the stepper motor engage… How should I know my motor is good or not??
Thank you for your information..
This looks awesome and for a relatively decent price.
I have not yet acquired a CNC router yet, and was looking at Shapeoko.
Are you planning on making a laser cutter add on to Shapeoko3?
Thanks!
Here is the link to the Shapeoko 3 instructions: https://jtechphotonics.com/?page_id=3145
We have many people successfully using the ShapeOko 3 from Carbide with success. We recommend not using the Carbide motion however, as it produces a delay in the laser on signal. We use Universal G Code sender or PicSender to control ours.
Purchasing the ShapeOko3. Has your laser been configured for that setup uet?
Thanks
Tom Woodrow
Yes. Here are the instructions. https://jtechphotonics.com/?page_id=3145
We have many people successfully using the ShapeOko 3 from Carbide with success. We recommend not using the Carbide motion however, as it produces a delay in the laser on signal. We use Universal G Code sender or PicSender to control ours.
Any way to hook this up with a TinyG controller? Thanks.
Hi, I’m looking to get a cnc machine with a laser to cut fabric/cloth ansd I’m woundering if this laser could do that.
Hi Alfonso,
Yes, our lasers will cut cloth. The speed depends on which laser you are using and the material type (thickness, etc.). For the 2.8W laser you can expect a speed of about 250mm/min on a typical cotton cloth and the 3.8W laser will be about 500mm/min to cut. Here is a picture:
Hi,
I have a problem using this post processor… My laser make micro “stops” on every node in Vectric Aspire.
Between nodes it moves smoothly, but on every node it makes lets say 0.2 s stop. I do not know why.
The stepper driver is DRV8825 and the steps are set to 16 micro-steps.
I use Arduino Uno with CNC shield, DRV8825 drivers, 2W 405nm Laser and GRBL 0.9 (the last from GRBL site).
This is a big problem, because on this places the laser reduces the speed and then it accelerates. but the power of the laser stays the same and the engraved line become as a wire with nodes.
This is very bad when I work with a flammable materials.
Can someone advise me?
Thank you in advance best regards
Denis
Can the focal length of the laser be adjusted? I am considering mounting the laser horizontally and redirecting with a mirror which might require more than a 3″ focal length.
I purchased a shapeoko 3 and wanted to integrate a laser. This may be a stupid question, but if you are able to use the router as well as the laser upgrade, how is this accomplished if you change the firmware. curious, can you explain? or do you run one program for the spindle and one for laser during individual applications……
Have you thought about making a Laser Mount w/electronics “carriage” that mounts to the side of the router for the Shapeoko 2 alternative. The current mount only allows me to mount to my SO2 instead of having my spindle.
Is there a special waste board required to run the laser?
I have a Shapeoko 3 xxl and would like to cut through 600 Dernier nylon fabric with it. Can your laser mod do this, and if so, what minimum power would you recommend.Thanks