

We have got a lot of people wanting to upgrade the Replicator 1 and its plethora of clones with our laser kits. Customers have done this already, but we have been so busy that we have not gotten the instructions out! Wait no longer, here it is!
Connecting the Laser
This will work with up to version E of the makerbot mightyboard that was shipped open source. The mightyboard has an EXTRA FET for use on the board. On versions of this board that are shipped from Makerbot the FET is there, but check if you are buying from a third party. We are going to use this to turn on and off the laser.
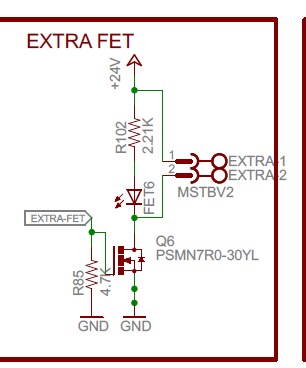
The location on the board for this is shown in the following picture:

Connect the “+” pin to the laser driver header H2 “+” terminal and the “-” pin to the laser driver H2 “-” terminal.
Turning it ON and Off with G Code
To turn the laser on and off in your program use the following G Code:
- M126 (Laser ON)
- M127 (Laser OFF)
Mechanical Mount
Of course part of the fun is figuring out how to mount the laser to the machine. Some people have already done some mounts for their builds and shared them. For the clones of the Replicator with 2 extruders, one customer has milled out the middle of the two extruders and placed the Laser between them to maximize the cutting area. The file is here: http://www.thingiverse.com/thing:472126/#files

Another mount for the Flashforge printer is here as a replacement for the left extruder. Thanks to our customer for this: http://www.thingiverse.com/thing:607867 .
Laser Shielding
We now have laser shielding to fit these larger rectangular printers! Click HERE to check it out.

Buy your laser upgrade kit now!

Remember Safety First!

Laser Goggles are also a must!
Disclaimer
The laser used in this project is very powerful and all safety precautions must be taken. Use proper safety eyewear to prevent injury to eyes. This is a project and J Tech Photonics, Inc. is not responsible or liable for any and all damage or injury caused to people or property. The use of these instructions to make a laser cutter is under your own discretion and all safety precautions should be followed. J Tech Photonics, Inc. is not affiliated in any way with Makerbot and they may change hardware and software at any time making these instructions invalid.
Hello,
I’m interested in the 3.8w or 2.8w 3d-printer add-on KIT for USA..
Could you provide more info..
I have made the upgrade to my CTC 3d printer for the fan modification.
So should be ready to go..
I also have a spare 3d printer with a RAMPS board that may get this upgrade.
Either way..
Does the software come with kit? and Does the wiring for unit come as well?
I just want to make sure i get everything when i purchase this item to completely run.
I’m looking to etch designs in acrylic plastic .. for a 3 dimensional effect..
What other safety equipment would i need..?
Thank you for your time,
– Christopher LeFrois
There is a comparison of the different lasers here: Lasers
The 2.8W kit will allow for smaller engraving with a spot size of about 0.008″. The 3.8W laser will offer 2x faster engraving (or cutting) with a spot size of about 0.014″.
The inkscape software is free to make vector drawings. Inkscape Overview
For wiring to your controller, you can either use the screw terminals on the back of the driver or you can purchase the Molex Cable here: Molex Mini Fit Cable
The kits come with one pair of OD2 goggles. Additional safety gear is located here: Safety Gear
Feel free to email us or call for more information. We are happy to help!
Regards,
Jay
Hello Chaps…
Have done all of the above, but M126/M127 does not work? Laser just stays on?