

Welcome to the official troubleshooting guide for J Tech Photonics lasers. Whether you’re using our 7W+ for photo engraving or our high-power 64W 3-in-1 for fast cutting, this guide helps resolve common issues quickly and safely.
All tips apply to current products using the Safety Interface Board. For installation help, visit the Laser Manuals page or the Instructions Page for Specific CNC Installations.
We test every laser bundle that leaves the shop here, but sometimes things happen in life and can go wrong. Also, sometimes getting everything all working together with the hardware and software can be a bit of a challenge. Here are a list of some of the top questions we get with both the hardware and software. Hopefully this can help along the process of getting your laser set up on your machine and working smoothly.
Initial Setup Troubleshooting:
I just unwrapped my package. What are the connectors on the back of the Safety Interface?
Great! You just got your laser. First things first, we recommend if you are going to test your laser before you put it on your machine, make sure you DO NOT have it pointed in a direction that can cause harm to anyone or anything and always use the proper safety goggles. That being said, your laser will attach to the farthest Mini Fit Jr. Connector on the edge of the laser driver in port H3. You will have the 4 pin molex extension cable run through your CNC machine. The following picture will show this:

-Plug the input mini fit Jr. molex connector from your mounting kit in terminal H4. If you have your own input signal cable, then put it in screw terminal H2.
-Plug the wall power adapter into the bullet style power connector.
-If you have a remote reset cable, it goes into the JST port on the far right.
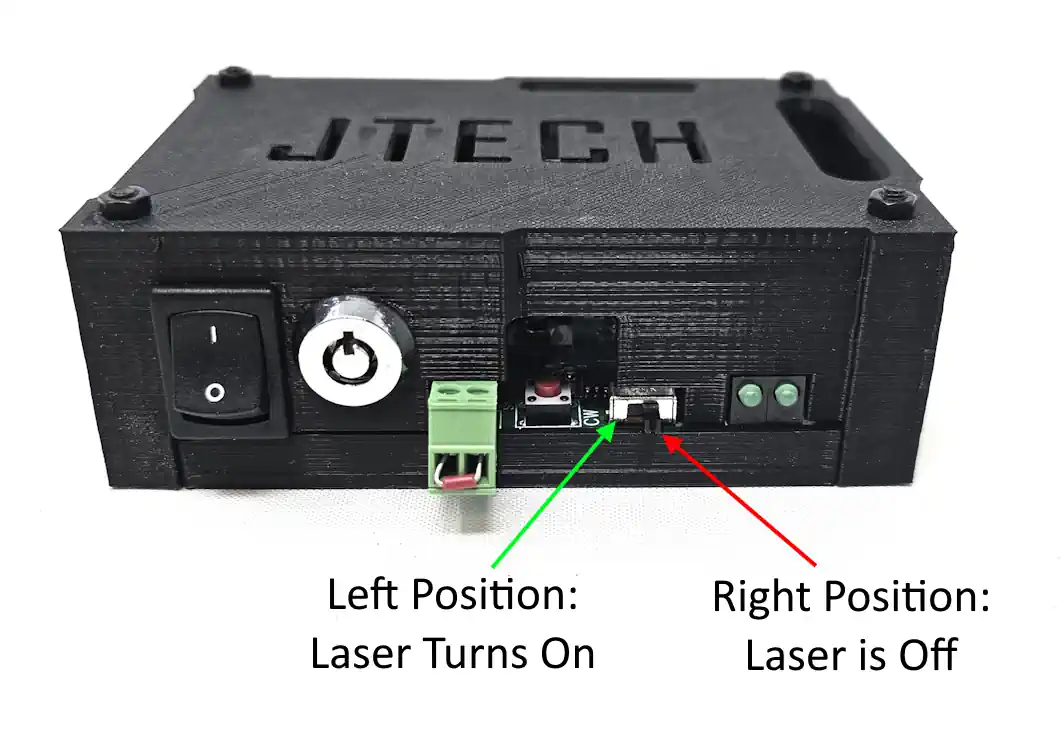
I plugged in the laser driver wall adapter, turned the key, and pushed the power switch and nothing happens. What now?
First, you need to turn the keyswitch to the right and then you need to press the red reset button on the front of the laser driver. This will enable the interlock circuit and allow the laser driver to turn on. You should hear a “click” sound with the interlock engaging. If you then turn on the power switch, you should see the left LED go green and both the driver and laser fans should start to spin. If the mode selector switch in the front is to the right (like in the picture) the laser should be OFF as well.

If your Safety Interface has a fan on it, then it should start spinning. Here is everything you should see when it is working properly.
- Fan is spinning on the Safety Interface Board (if you have one) and on the laser.
- Green LED is lit on the LEFT led.
I think the laser is on, but I have no laser light. What now?
Symptoms:
- Laser won’t fire
- Laser doesn’t respond to commands
We are going to check to see if the laser is working without any connection from the computer or controller. Here is the process:
- Turn the key switch.
- Press the red reset button (if you have not already).
- Make sure you have the laser pointed at the workpiece and have something under it that you don’t mind burning.
- Push the power button.
- Make sure your goggles are on, and push the mode selector switch in the front to the left in CW (manual) mode. The laser should fire. Switch it to the right to turn it off again.
For this test, the switch will look act like this:
The laser should fire if it is connected correctly. Make sure the extension cable is connected and the fan on the laser head is running. If the laser still does not turn on, then contact [email protected], or give us a call.
The laser works in CW (manual) mode, but I can get it to turn on with the controller like Lightburn. What now?
First, check you GRBL settings. We recommend using GRBL 1.1f to control your laser. You can see how to set up lightburn here: https://jtechphotonics.com/?p=10204
In the Console type in “$$” and press enter to see your settings. You should have this:
$30 = 1000 (max laser power)
$31 = 0 (min laser power)
$32 = 1 (laser mode)
Now that we have the settings correct, lets send a command to the laser. With the new GRBL 1.1f for safety the laser will only turn on when in a G1 coordination move mode. So, you will have to send the following command to get the laser to turn on in the console:
G1 F100 M03 S1000
This will turn the laser on full power. To turn the laser off, use the command “M5”.
If you want to turn it on in low power, use the fire button in lightburn:

Your laser and controller will have different levels depending on the electronics inside of it. So, yours might turn on at 1% while others will turn on at 13%. Try bumping it up until it just turns on.
I tried sending a G1 F100 M03 S1000 command and it still doesn’t turn on. What now?
If you have the correct GRBL settings using GRBL 1.1f and it still does not turn on, then there is a problem with your connection. Make sure your machine is connected to the controller and you can jog the machine. Try sending the command again and see. If this still does not work, then you will need to verify your output with a volt meter.
Start by sending the command “G1 F1000 M03 S1000” and look at the signal at the controller. If you have an X Carve, then it will be the Spindle PWM signal and GND to test the voltage. If you have a Shapeoko3, then it will be on the Carbide board where you soldered. If you have another machine, then look at where the instructions told you to set it up. You should see 5V at this connection. If you don’t, then check your screw terminal connection or your solder job.
If you saw 5V at the controller, then check at every connection on your way to the laser driver. On the laser driver, you can check on the screw terminal H2. It should read 5V on your meter when the laser on command is sent with full power.

If you have a Shapeoko Kit, then it might be your press fit connection. There is a second place on the Carbide board that allows you to have a better connection with the cable without using the press fit. The video on this is here:
For the X Carve:
- check your connection at Spindle PWM and GND connections on the X Controller.
- Send the following in the console “G1 F100 M03 S1000”.
- This should turn on the laser full power and you should have 5V on the X Controller at the Spindle PWM and GND screws. Check with a meter at the X Controller.
- If you have 5V there, then check at screw terminal H2. If you don’t get 5V here, then connect wires direct from the X Controller to the screw terminal H2. You can also cut off the black Molex connector on the input cable and connect it direct to the screw terminal H2.
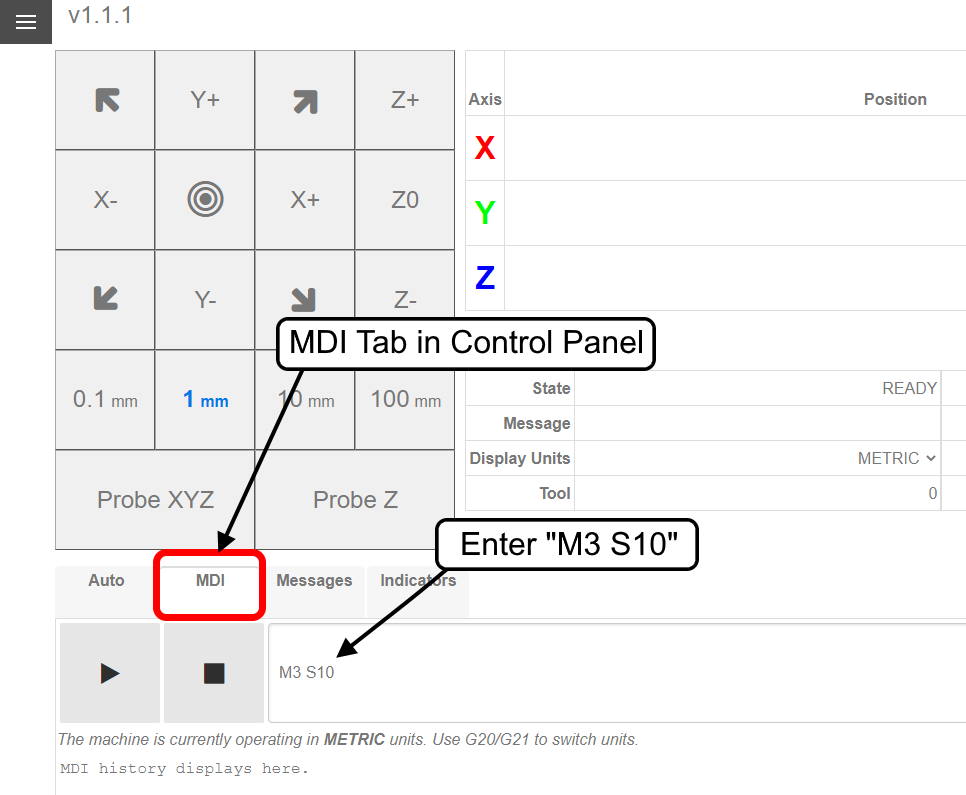
For Onefinity:
In the MDI, enter M3 S1000 to turn it on full power. Here is an example of the MDI but with a lower power.
If you still have issues, please contact [email protected] for help.
Laser Software Troubleshooting
This video shows how to initially set up lightburn.
This video answers all of these questions/issues
My laser fires full power all of the time.
My laser power doesn’t vary.
My pictures are all just black.
There are lines between the letters in my engravings.
The laser power is now really weak compared to before.
This next video answers these questions/issues.
When I press start the machine goes and crashes.
The user origin button doesn’t work.
How do I reference my work piece and zero the machine?
How do I use absolute positioning?
Focusing/Lens Questions:
I have a 24W Laser. How often should I clean the lens?
If you always run the air assist, then you should not need to clean the lens often at all. However, if you forget to use the air assist, then you need to clean the lens immediately after you notice to reduce the chance of damaging your lens cover. The good new is, if you damage your lens cover, we sell new ones in the accessories section of the site here.
We have a procedure on how to clean the lens on the 24W here. DOWNLOAD 24W LENS CLEANING PROCEDURE
I mounted my laser on my machine, now where is the focus going to be?
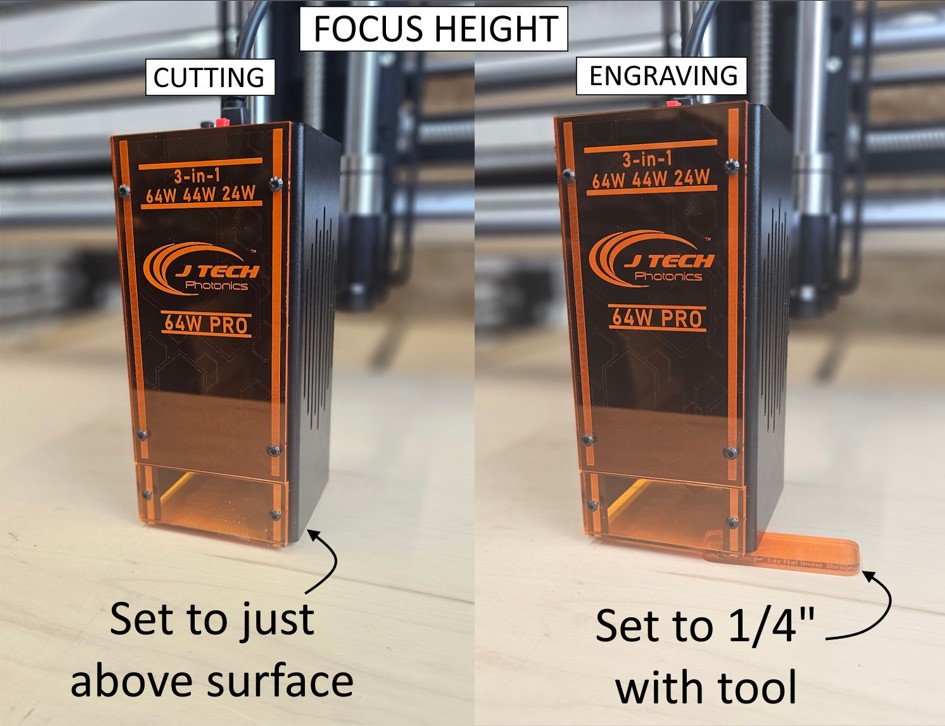
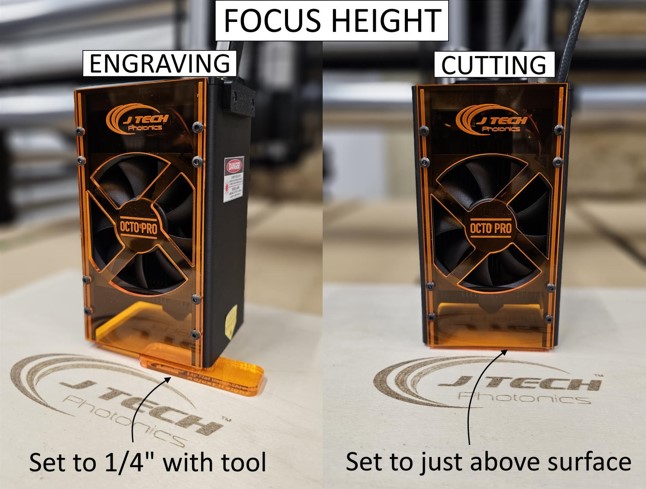
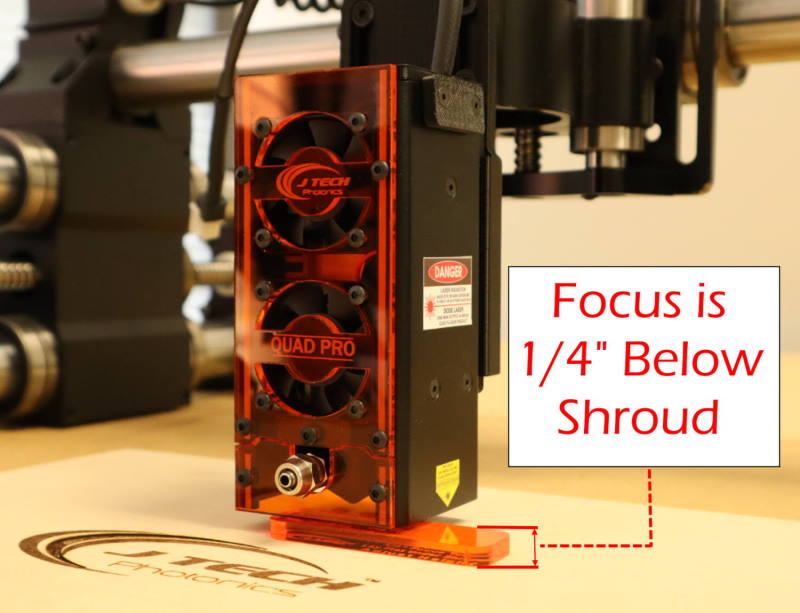
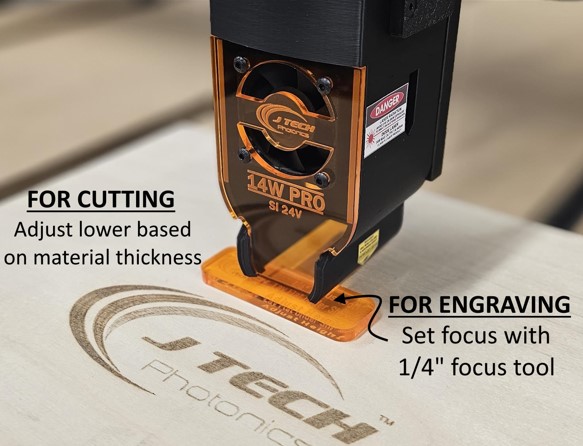
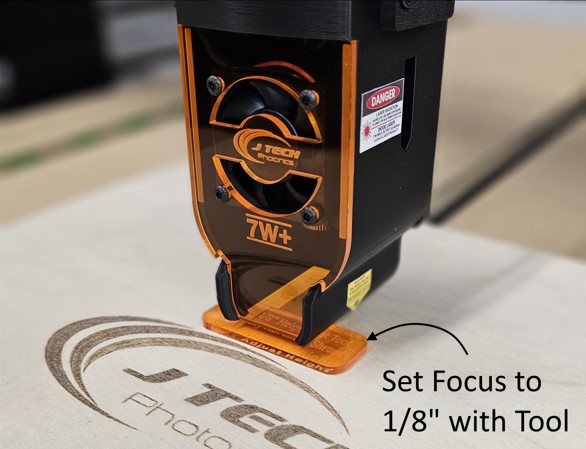
You can set the laser to this pre-focused position and start.
For older 7W lasers and the new 7W+ laser, the focus is adjustable. It is set to 1/8″, but If you rather do a different focus position, then you can focus the laser yourself using the focus instructions. Remember, the closer to the work surface, the smaller the spot can get. The farther away, the larger the spot. You can use the focusing instructions here to focus the laser:
I focused the laser, but my laser spot is a rectangle. Why is this?
The 455nm lasers are what we call “multi mode”, which is a fancy way of saying they are a rectangle. They are a semiconductor laser and emit from edge of the semiconductor, which happens to be a rectangle. If you have a 7W+ laser it is going to be more like a square. The 14W is the same way. If you have a 24W or higher, then it will be a set of lines.
My laser doesn’t cut as good as it used to or is lower power and barley engraves. What now?
Having trouble cutting, noticing lower power, or your engravings aren’t as dark as they used to be? This usually means your lens is dirty or possibly cracked. Over time, smoke and debris from engraving can coat the lens, diffusing the beam and reducing its intensity. A cracked lens can also scatter the laser, leading to poor performance. Clean your lens gently with isopropyl alcohol and a soft swab, and inspect it under a light—if you see any haze or fractures, it’s time for a replacement. Using air assist will help keep it clean longer.
Dirty or Damaged Lens
Symptoms:
- Scattered or uneven beam
- Poor engraving or cutting
- Laser fires but barely burns material
✅ Fix:
- Clean with isopropyl alcohol and cotton swab. Avoid scratching.
- Replace if visibly cracked or discolored.
- Always use air assist to keep lens clean—especially on 14W/24W/44W/64W models.
Replacement Lens Covers are available in the shop. Covers are for the the higher power lasers, high efficiency for the 7W+, and lens for the 14W.
Replacement Lens and Lens Covers

Rotary Troubleshooting
Using the J Tech Rotary?
✅ Check:
- Set “Enable Rotary” in LightBurn before turning on machine.
- Use correct steps/rotation based on your object size.
- Level your cup or object carefully—use the included bubble level.
- Use dark coating (Sharpie or spray) for glass engraving.
Full rotary setup instructions here »