


Formerly CNC Router Parts, the AVID CNC machine is a great value for what you get. It has become a popular alternative to larger more expensive machines for the DIY CNC enthusiast. Now, lets add a laser to it!
Upgrade Mounting Options
There are a few options you can do for choosing your laser kit.
The Spindle mount bundle will attach the laser into the chuck. With this option you don’t need to fabricate anything for the laser but you do lose out on about some of the Z travel.

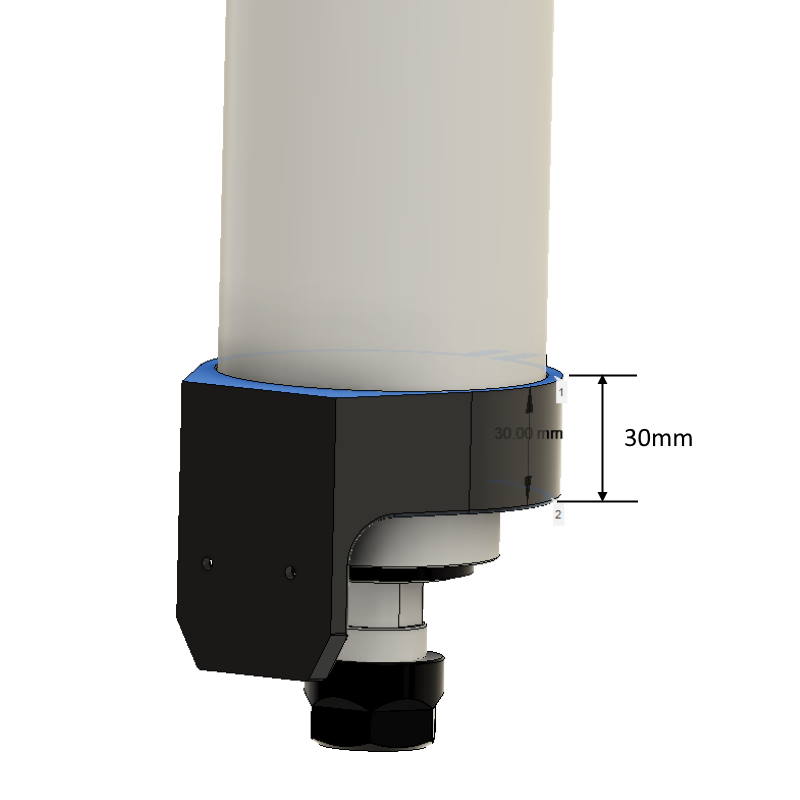
You can mount it to the bottom of an 80mm spindle. You will need to make sure you have enough room on the bottom of your spindle to accommodate the laser.
If you have the Dewalt router mount for the AVID, then you can use this mount for the laser.

The last option is the generic magnet mount. The generic magnet mount requires you put the laser in front of the spindle on a plate that you manufacture to hold the plastic magnet plate that will attach to the laser. If you are handy with fabrication, this option will allow you to swap out your laser quickly.
Hooking Up the Laser
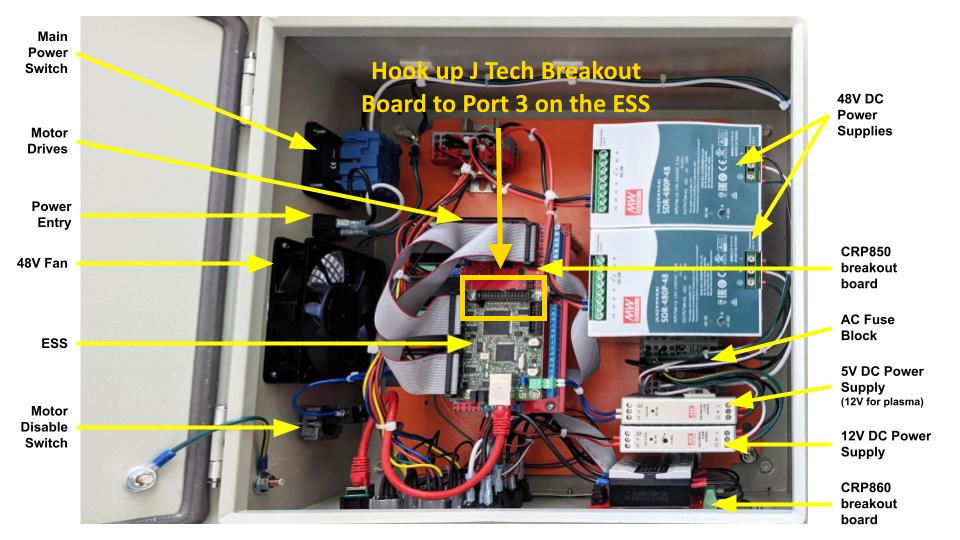
First thing to do is connect the breakout board to the Ethernet Smooth Stepper in the electronics cabinet.
In the electronics cabinet, find room to put in the J Tech IDC 26 Breakout board and mount it in the cabinet.
The J Tech IDC26 breakout board is specifically designed to work with the ESS from Warp 9. Connect this with the supplied ribbon cable to port 3 on the ESS.
Port 3 on the ESS is shown below with the yellow box.

Take the 3′ mini Molex cable with the black Molex connector and the other end with bare wires and hook it up to the breakout board. Connect the red wire to Pin 16 and the black wire to GND on the breakout board.
Mount the laser driver and then plug the input cable into the black molex port on the back of the laser driver.

Plug the input cable into the port H4 on the laser driver.
Connect the long extension cable to the back of the laser driver. Depending on which laser you purchase it might have one four pin connector or it might have a two pin laser and two pin fan connector.
The 4 pin extension cable will go from the laser driver through the cable chains and up to the gantry. Remember to check that you have the correct side BEFORE you start putting it through the chains.
When you are done with the extension cable, then find a place on the gantry to put the magnetic mounting plate. It needs to be high enough not to get in the way of the chuck when you don’t have a laser attached, but low enough that the laser will be below the chuck when installed.
Setting Up Mach4
First thing to do is make sure you are using the correct version of Mach4 and the ESS plugin. The current recommended version for laser use is Mach4 Hobby version 4.2.0.4809 with ESS 283. This version will work with the laser the best. Version 284 of the plugin should not be used. Version 285 is being released, but is currently not recommended for laser.
After you verify this, you can open up the mach4 loader by clicking on “Mach4GUI” and it will bring up the prompt to choose your profile

Once the loader is open, clone your working profile for your CNC by clicking the “copy profile” button. You can then name the new profile “J Tech Laser”. Never modify your working CNC profile.
When prompted for a screen set you may choose the same AvidCNC.set and modify it. Alternatively, it is possible to use the generic laser screen set for Mach 4: ESS Laser Screen Set v 3.0
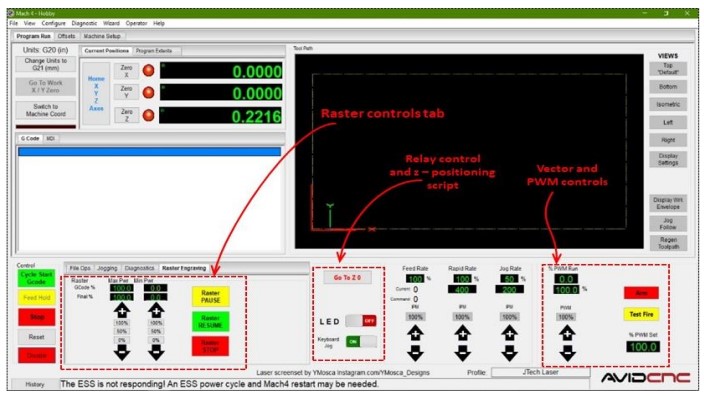
You can see an example of the laser screen set below. It is not necessary to use the laser screen set. You can just keep your standard one if you want.
The next thing you need to do is Download these lua macros, unzip them, and place these macros in your “C:\Mach4Hobby\Profiles\YOUR_PROFILE_NAME\Macros\” folder.

To set up a Laser, go to Mach4 Menu -> Configure ->Control..>(was Mach4) -> Plugins.

Make sure that the Core, LUA, Regfile and ESS plugins are enabled.

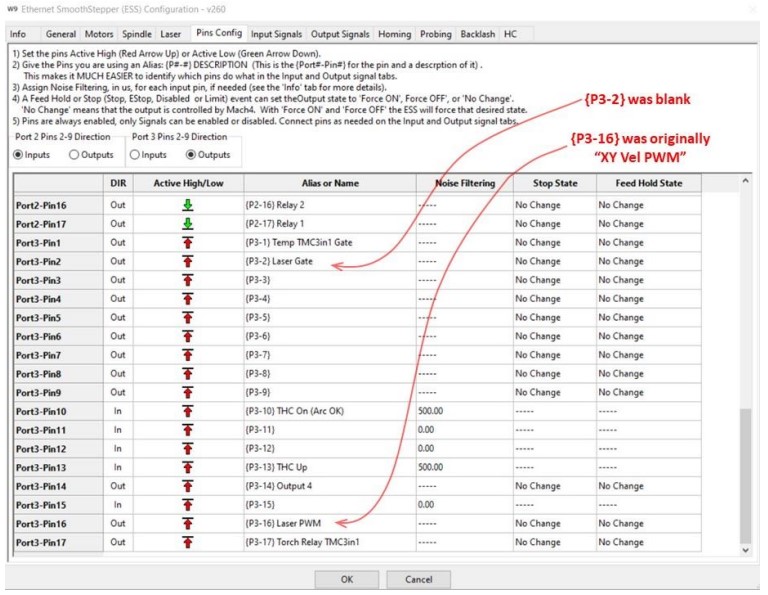
Now, go to Mach4 Menu -> Configure ->Plugins… -> ESS ### -> Pins Config Tab

In the Pins Config tab, we are going to assign a name to two pins for our Gate and PWM signals. I used Port 3 because I have nothing else on it and it is easy to expand out.
- Determine which output pin will be your Laser PWM output pin (I picked Port 3- Pin 16).
- Determine which output pin will be your Laser Gate output pin (I picked Port 3-Pin 2).
Chose pin {3-16} and type in “Laser PWM” as the alias. Use pin {3-2} for the laser gate.
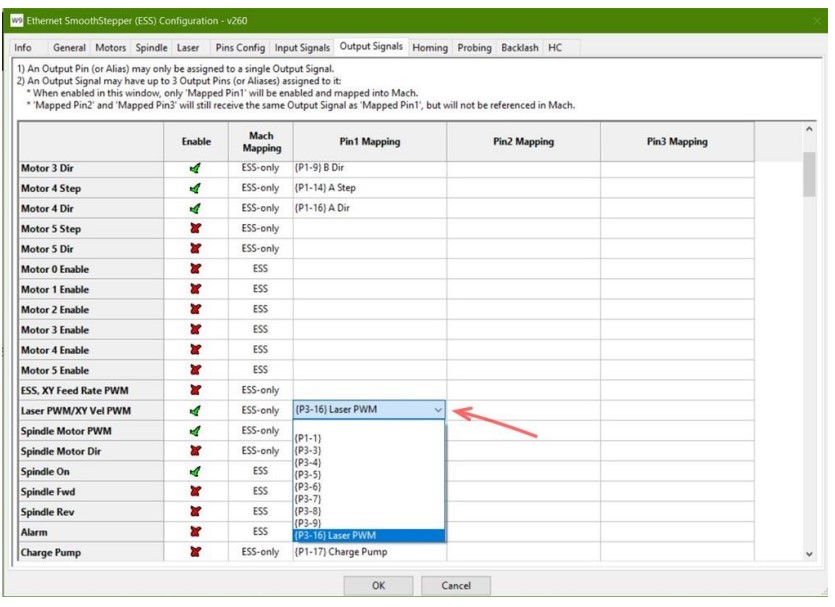
Now go to the “Output Signals” tab. Enable the “Laser PWM/XY Vel PWM” and set the pin mapping to {P3-16} in the drop-down menu.
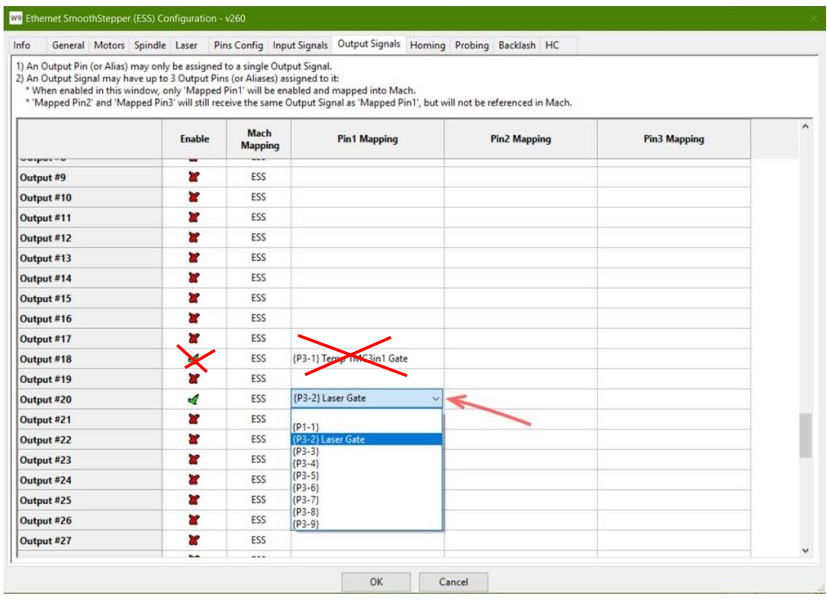
In the output signals tab, in the Output #20 pin mapping, choose “{P3-2} Laser Gate. Also, turn off output 18 and remove the drop down from it.
Now click over to the HC tab. In 1) set it to disabled. Uncheck the torch relay box in 3) and uncheck the box in 4) and the drop down should be “_”.

In the first laser tab, select the laser gate output number in the dropdown (we used output 20). Then, set your Laser Test Mode to a percentage that is low for your laser. We have it at 1% here, but you might have a different number. This is only if you chose the laser screen set.

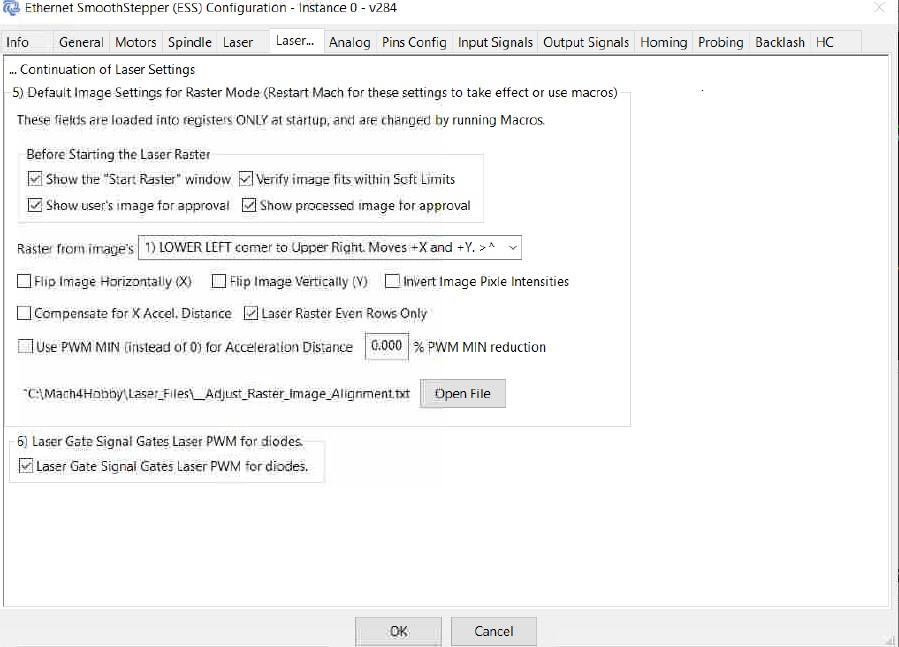
In the second laser tab, make sure you have the “laser gate signal gates laser PWM for diodes” checked.
If you are running a new version with analog outputs, then you need to also click on the Analog output tab. Click on the analog output tab and make sure to copy the following.

After this, close down Mach4 and restart to get the changes to take effect.
Running J Tech Lasers with Mach4
Now you have the setup all done, let’s go through a project really quickly.
We are going to do this in Vectric Using the J Tech Mach4 post processor. You can get it here:
If you have the Vectric Laser Module, then you can get the post processor here:
You need to install the post processor for the laser into Vectric. For help on how to do this, we have a video here:
Once you have your post processor loaded, you can do your files like normal and load them into Mach4.
For running the laser for engraving, then use the included focus tool that came with your laser bundle.
For cutting, then just put the laser almost touching the board. This will set the focus below the wood so it makes it easier to cut through.
All done! Good luck lasering! If there are any questions about your J Tech Laser on the AVID CNC, please contact customer support here at J Tech Photonics.