

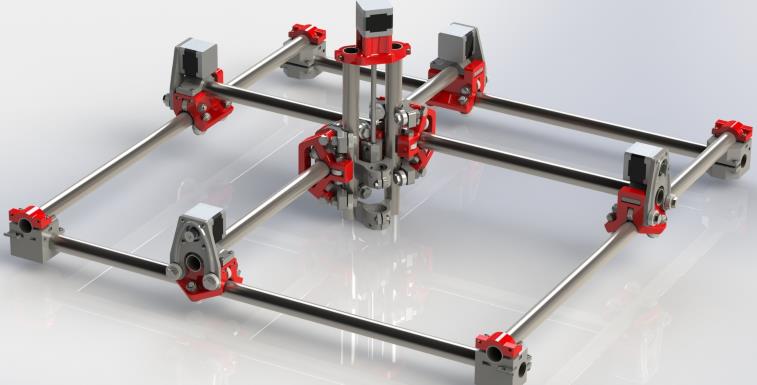
 Ryan Zellars came up with a pretty cool design for a CNC that runs on conduit to win a design contest. Well, he won. The reason was because it is a pretty cool idea on how to make a very inexpensive multi purpose CNC platform. All you really need for this is some conduit, bearings, nuts/bolts/screws, and 3D printed parts. Mostly 3D printed parts…
The main website for the machine is located here: www.vicious1.com
You can find out details on the BOM, how to assemble it, and there is a nice forum of users.
He also put everything on Thingiverse for everyone to share. It is here: www.thingiverse.com/thing:724999
So there are several people who have upgraded their mostly printed CNC’s so far, so we thought we would put up some of the instructions based off of their designs here. The mechanical parts are all the same, but the controller is chosen by you. We will lay it all out here on this page on how to get started.
Mechanical
There have been a few people who have put up some mounting techniques for the laser. For the newest 7W laser Jeff Green has made a great mount here on Thingiverse that works with our generic magnetic mounting bundle.
https://www.thingiverse.com/thing:4018010

Here is a mount that you can attach without the spindle as well:
https://www.thingiverse.com/thing:4017961
If you want a standard mount for it that incorporates a fan, then you can use this one:

It also has a little cover which is not shown in the picture. The basic mount for the laser can be found here: www.thingiverse.com/thing:868628
If you want to have something with a bit more pizzazz, then we suggest using the next mount. It includes two line lasers in it for making a cross to exactly show where the cutting/engraving beam will be. Super cool!
It is located here: www.thingiverse.com/thing:1025450
Another one is located here: http://www.thingiverse.com/thing:964070
Here is a newer mount that also incorporates the red laser pointers:
It is located at: http://www.thingiverse.com/make:320502
Here is the newest updated mount for the new machine (9-5-2018)
It is located here: https://www.thingiverse.com/thing:3080732

Daniel Dunn created a mount for the spindle mount laser and the Dewalt DWP611. You can find it here: https://www.thingiverse.com/thing:4761056

Electrical
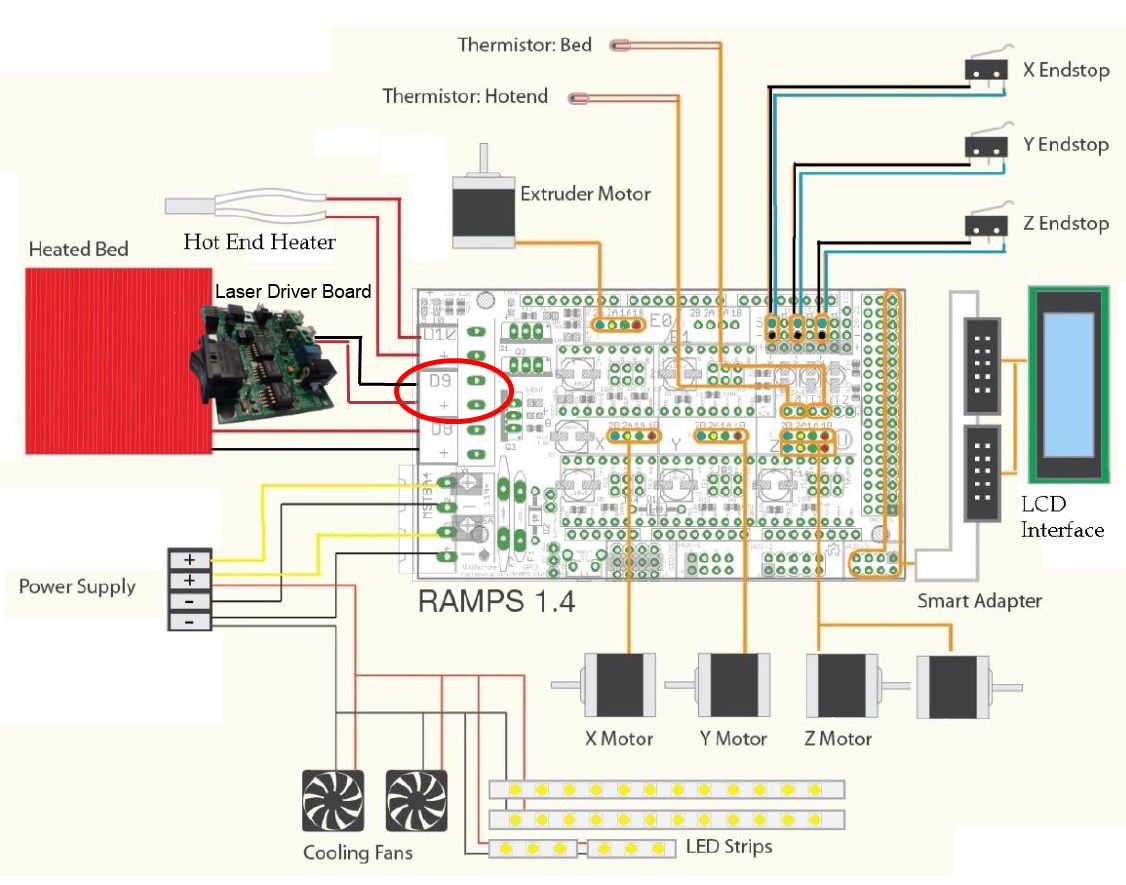
You have a choice on what you want to do for your electronics on this machine. Ryan suggests using the RAMPS 1.4 controller with the Arduino MEGA and the MARLIN firmware. It is a pretty easy and well established solution. You can also choose to use the Arduino UNO and the G Sheild, which we explain on the Shapeoko and X carve pages. We will cover the RAMPS 1.4 here.
We already have instructions located here for the RAMPS board, but we will overview it here. The laser driver input will need to be connected to the fan output on the RAMPS board. It is on connector D9. Here is the electrical diagram for the connections based on a 3D printer. You can ignore all of the extruder and heatbed stuff, just look at the Fan output:
Here is the detail of the D9 connection:
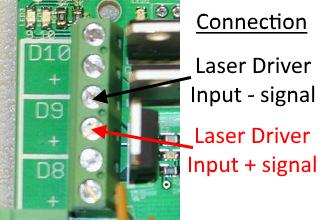
Simply connect the “+” wire from terminal D9 to the “+” input of H2 on the laser driver board. Then, connect the “-” wire from terminal D9 to the “-” input of H2 on the laser driver board.
If you use the Molex Mini fit jr. cable then connect the black wire to the D9 “-” terminal and the red wire to the D9 “+” terminal. This cable connects to the H4 Terminal of the driver board.
Software
The commands to turn on and off the laser in G Code are:
LASER ON: M106
LASER OFF: M107
Using PWM to control the laser
You can have power control as well with the RAMPS1.4 board. Simply use “M106 Sxxx” command to turn on the laser where “xxx” is a number between 0 and 255. 255 is full power and 0 is off.
- M106 S255 = Turns the laser on at full power
- M106 S0 = Turns the laser off
- M106 S127 = Turns the laser on at 50% power
- M107 = Turns the laser off as well
Issues with Marlin Firmware V2
If you have issues with doing fills and rastor images, then you might need to modify your firmware to include this. Jeff Green was nice enough to figure out this issue and share with everyone how to do it. You basically need to comment out the delay from the planner to allow for rastor moves to happen unimpeded.
in the Marlin.cpp file.
// Limit check_axes_activity frequency to 10Hz
static millis_t next_check_axes_ms = 0;
if (ELAPSED(ms, next_check_axes_ms)) {
planner.check_axes_activity();
next_check_axes_ms = ms + 100UL;
}
To fix the problem it needs to be changed to this.
// Limit check_axes_activity frequency to 10Hz
//static millis_t next_check_axes_ms = 0;
//if (ELAPSED(ms, next_check_axes_ms)) {
planner.check_axes_activity(); //< THIS IS THE ONLY LINE OF CODE YOU LEAVE UNCOMMENTED
// next_check_axes_ms = ms + 100UL;
//}
Once this is done, recompile , upload and viola laser works as it should.
Controlling the Machine
First make sure you download the Arduino software to make sure you have the drivers installed before you plug in your board. Download it here: www.arduino.cc/en/Main/Software
Many people use Repetier Host for controlling the machine. Some settings can be found here: www.vicious1.com/repetier-host/
Using Your Machine
There are several ways to generate G Code for your machine. We have a few, but these are certainly not all of them.
- Inkscape Plugin (FREE) : Vector Based Outlines
- Lightburn: Does it ALL!

Once you have your G Code created then load it into Repetier Host and start engraving!
Here are some examples of the Mostly Printed CNC in action:
So there it is! Now you are ready to start creating!
Buy your laser upgrade kit now!
Remember Safety First!

We sell laser shielding to block laser radiation and reflections!
Laser Goggles are also a must!
Disclaimer
The laser used in this project is very powerful and all safety precautions must be taken. Use proper safety eyewear to prevent injury to eyes. This is a project and J Tech Photonics, Inc. is not responsible or liable for any and all damage or injury caused to people or property. The use of these instructions to make a laser cutter is under your own discretion and all safety precautions should be followed. J Tech Photonics, Inc. is not affiliated in any way with Mostly Printed CNC and they may change hardware and software at any time making these instructions invalid.
I can cut, burn and rasterize 1,2,3,4 and 5 mm thick cardboard?
Hello,
I have a MPCNC with a RAMBo 1.4 board. Will you provide instruction for this board?
Thank you,
Michel