


Now that you have put your machine and laser together, there are a lot of options for how to run it. It will depend on what software you might already have and if you want to purchase any new software or not. We HIGHLY Recommend getting the Lightburn software package as it will run the entire process and make it the easiest to use your machine. We will be doing all of the rest of the instructions with this software. However, since this machine is based on an open source controller architecture, there are a lot of choices out there. We cover Lightburn in detail here.
All in One Software Package:
- Lightburn Software – *recommended* This is an “all in one” software package that you can do vector art, import SVG files, engrave images, and run the machine all in one place. We recommend using this software as it will be the easiest to use and run the machine. You can get it here:

We are going to show how to set up the Shapeoko3 and the X Carve systems using lightburn in this post. Scroll DOWN if you have a X Carve.
Setup Video
Check out the video we made to walk you though setting up lightburn from start to finish.
If you want to do the step by step instructions then they are all below.
Set Up Your Machine – Shapeoko3
Ok, now that you have downloaded Lightburn software, we can get started with the rest of the setup. When you install the Lightburn software, you might see Windows trying to protect you. Click on the bottom “Run Anyway” button to install it. The Shapeoko3 has some things you need to change to get it all working, so we will cover it here.
When you first run Lightburn, you should have a quick setup wizard walk you through the setup. Here is what you need to do to get it set up.
There will be a section in the start where lightburn will “attempt to detect” your laser. It will not work for most GRBL machine like the Shapeoko3, so we recommend setting it up manually.

Choose to set up manually:

Choose GRBL from the list:
You need to have GRBL 1.1f installed on your machine to do pictures. You can find the installer here: http://docs.carbide3d.com/support/carbideupdater/

(if you don’t have GRBL 1.1f and don’t want to upgrade, then choose GRBL-M3 (1.1e or earlier) from the list. You will not be able to do pictures though).
2. Choose Serial/USB

3. Name your machine and put in the dimensions.

We have the XXL in this example. If you have the smaller machines, then measure out your distance and put it in for your table.
4. Choose your origin and unclick “autoHome” (unless you want it to home everytime…)

5. Click on “Finish” to complete setup

6. Connect to the machine
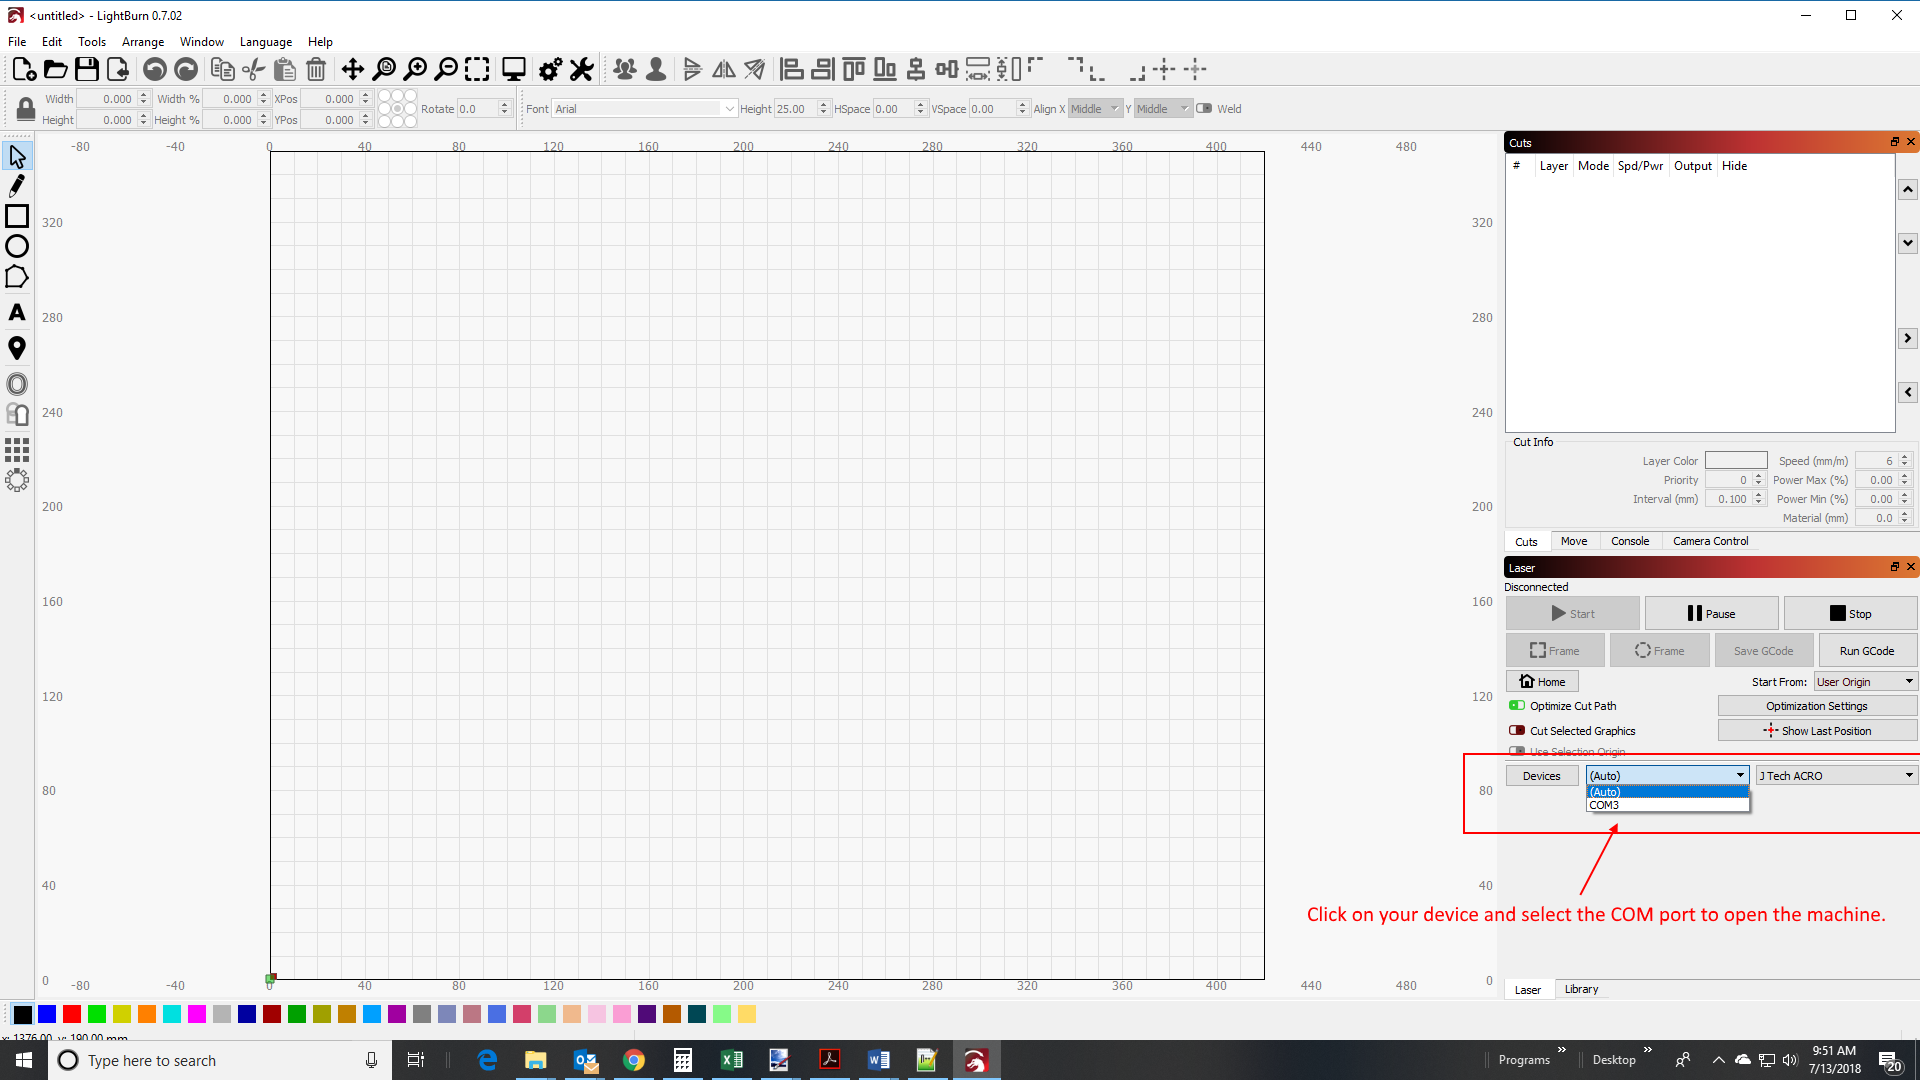
Click on the bottom right to select your machine from the drop down and click on the COM port to connect it. Make sure the USB cable is attached and the power to the machine is on (plugged in).
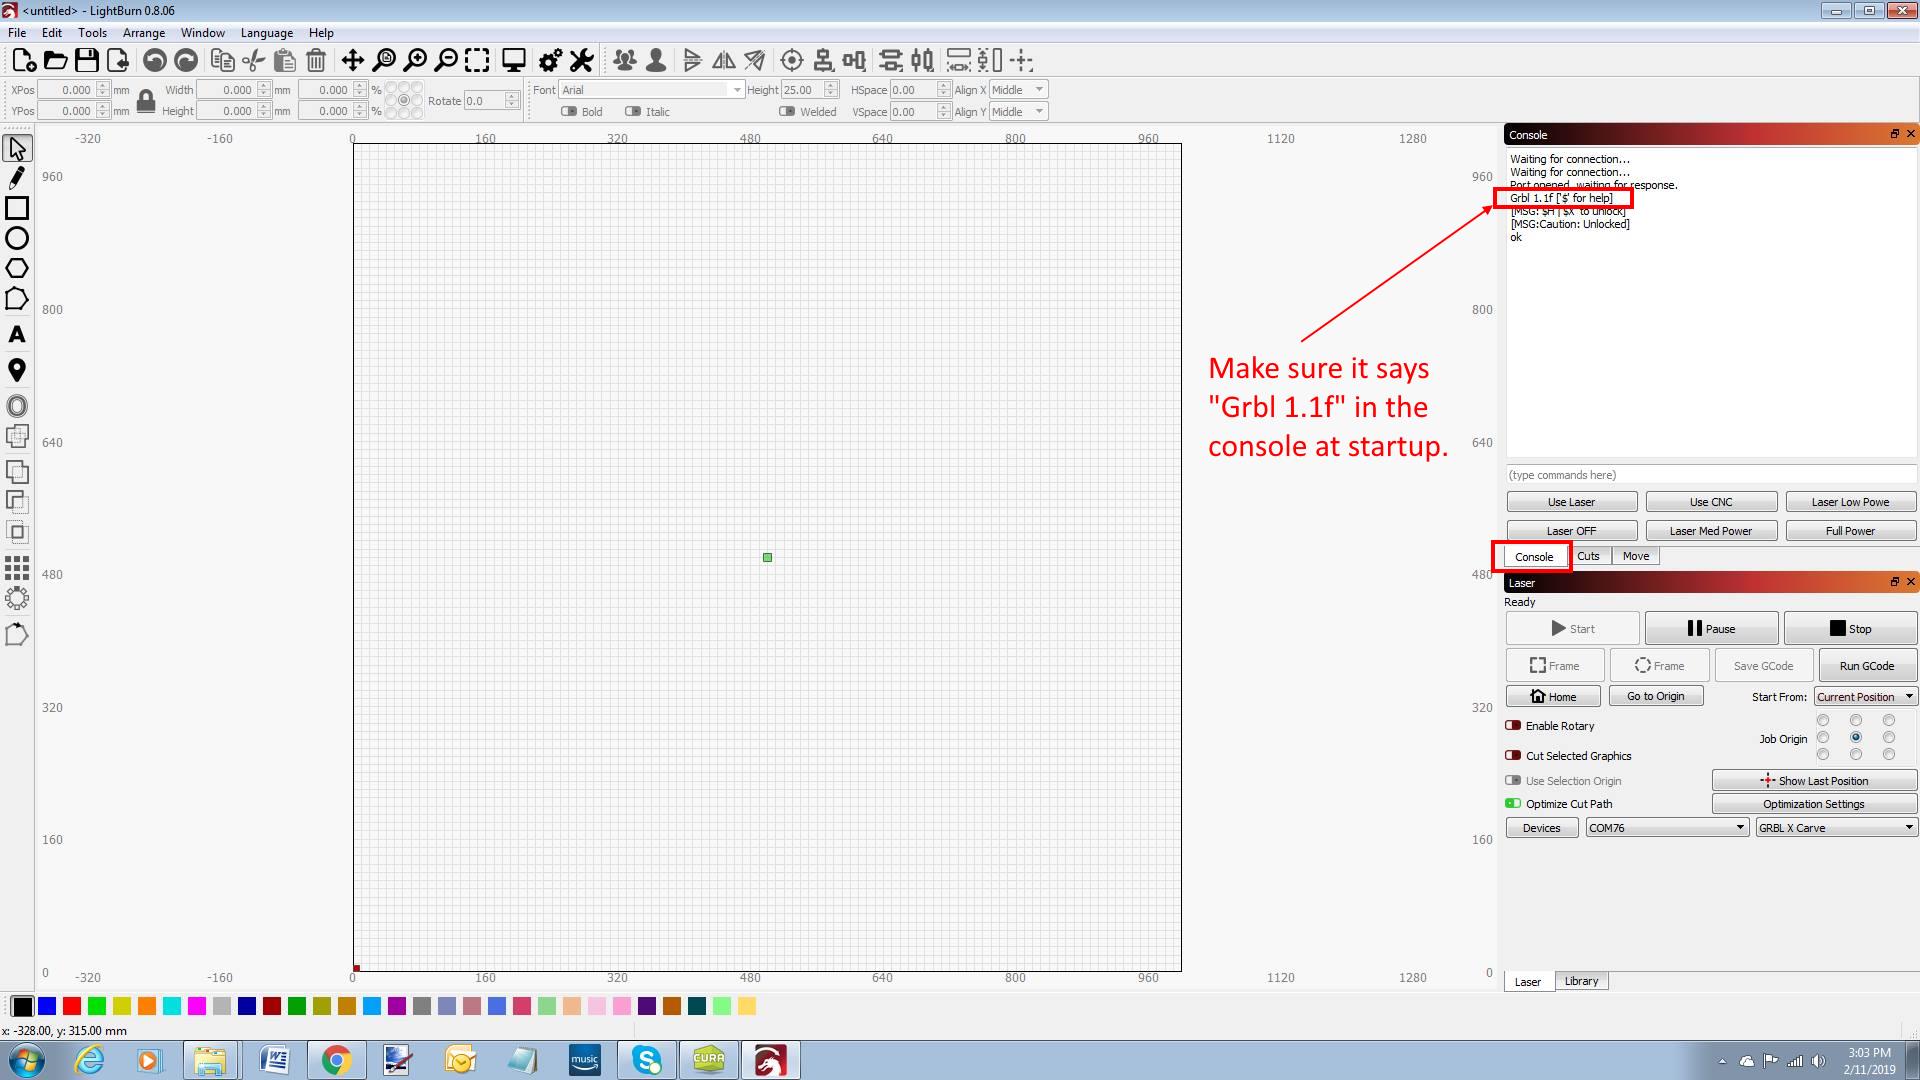
7. Check your GRBL Firmware Version
Lightburn works best with the newest version 1.1f (or higher) with dynamic laser mode enabled. When lightburn connects to your machine, you will see in the console your version you are on. If it does not say “Grbl 1.1f” (or higher version) then you have the wrong version.

If you have Grbl 1.1f (or higher), then go to the next step.
If not, then you need to update your firmware. Close down lightburn and start the process. Here is how:
Click here to use the Carbide Updater program:
-or- use this process.
Download GRBL 1.1F Firmware
- Download and extract: 1.1f ( Main Branch Merge – NEW)
If you want to check and see if there is an even newer version, then go to the main GRBL page here in the release section.
Now that you have your firmware downloaded and have extracted the .hex file, we will walk through the rest of the process.
Load Your Firmware
For MAC: Download Hex Uploader
For PC: X loader is a cool program that makes it easy to load new firmware to your controller. You can download it here:
After you download the file, extract it and run the application. You should see a dialog box like the following:

Browse for the GRBL “.hex” file. Choose “Uno (ATmega328) in the Device drop down. Select your COM port and put the Baud Rate at 115200.
Can’t figure out your COM port for your machine? Here are some videos to help:
Finding COM Ports in Windows 10
Finding COM Ports in Windows 7
Hold down the Z limit switch and press the “Upload” button. It should say “uploading” for no more than a minute and then it will say “completed” and the size of the file uploaded. If it runs forever, you have either the wrong device chosen, the wrong COM port, or the wrong Baud Rate.
You now have the new version of firmware on your machine. Start lightburn up again and go to the next step.
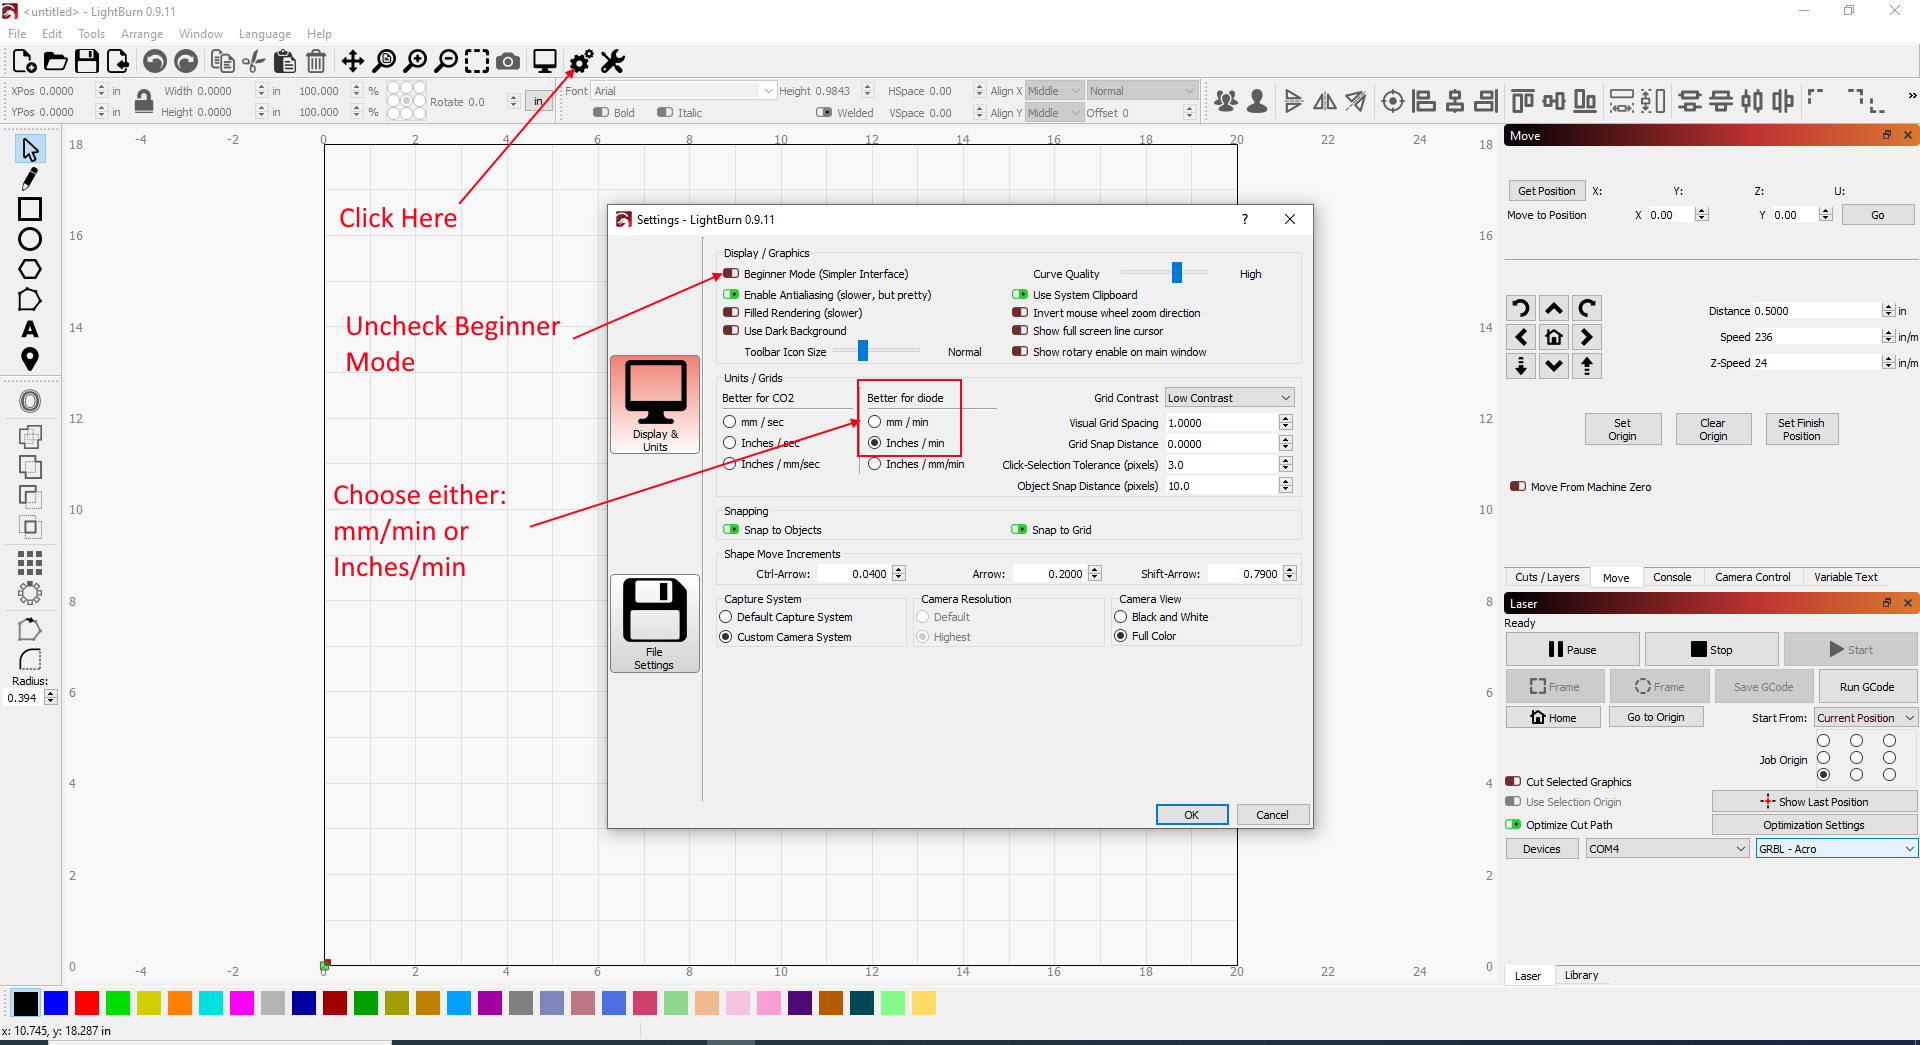
8. Choose your Units and Turn off Beginner Mode
Un-check beginner mode and then choose your units. We normally use inch/min for our speed. Other people use mm/min. I would say at least to use one of these as this is what people normally will be used to when on the forums or for help with us. ****This step is important! If you have the speed set to mm/sec or inch/sec then it will be 60 times too fast!****
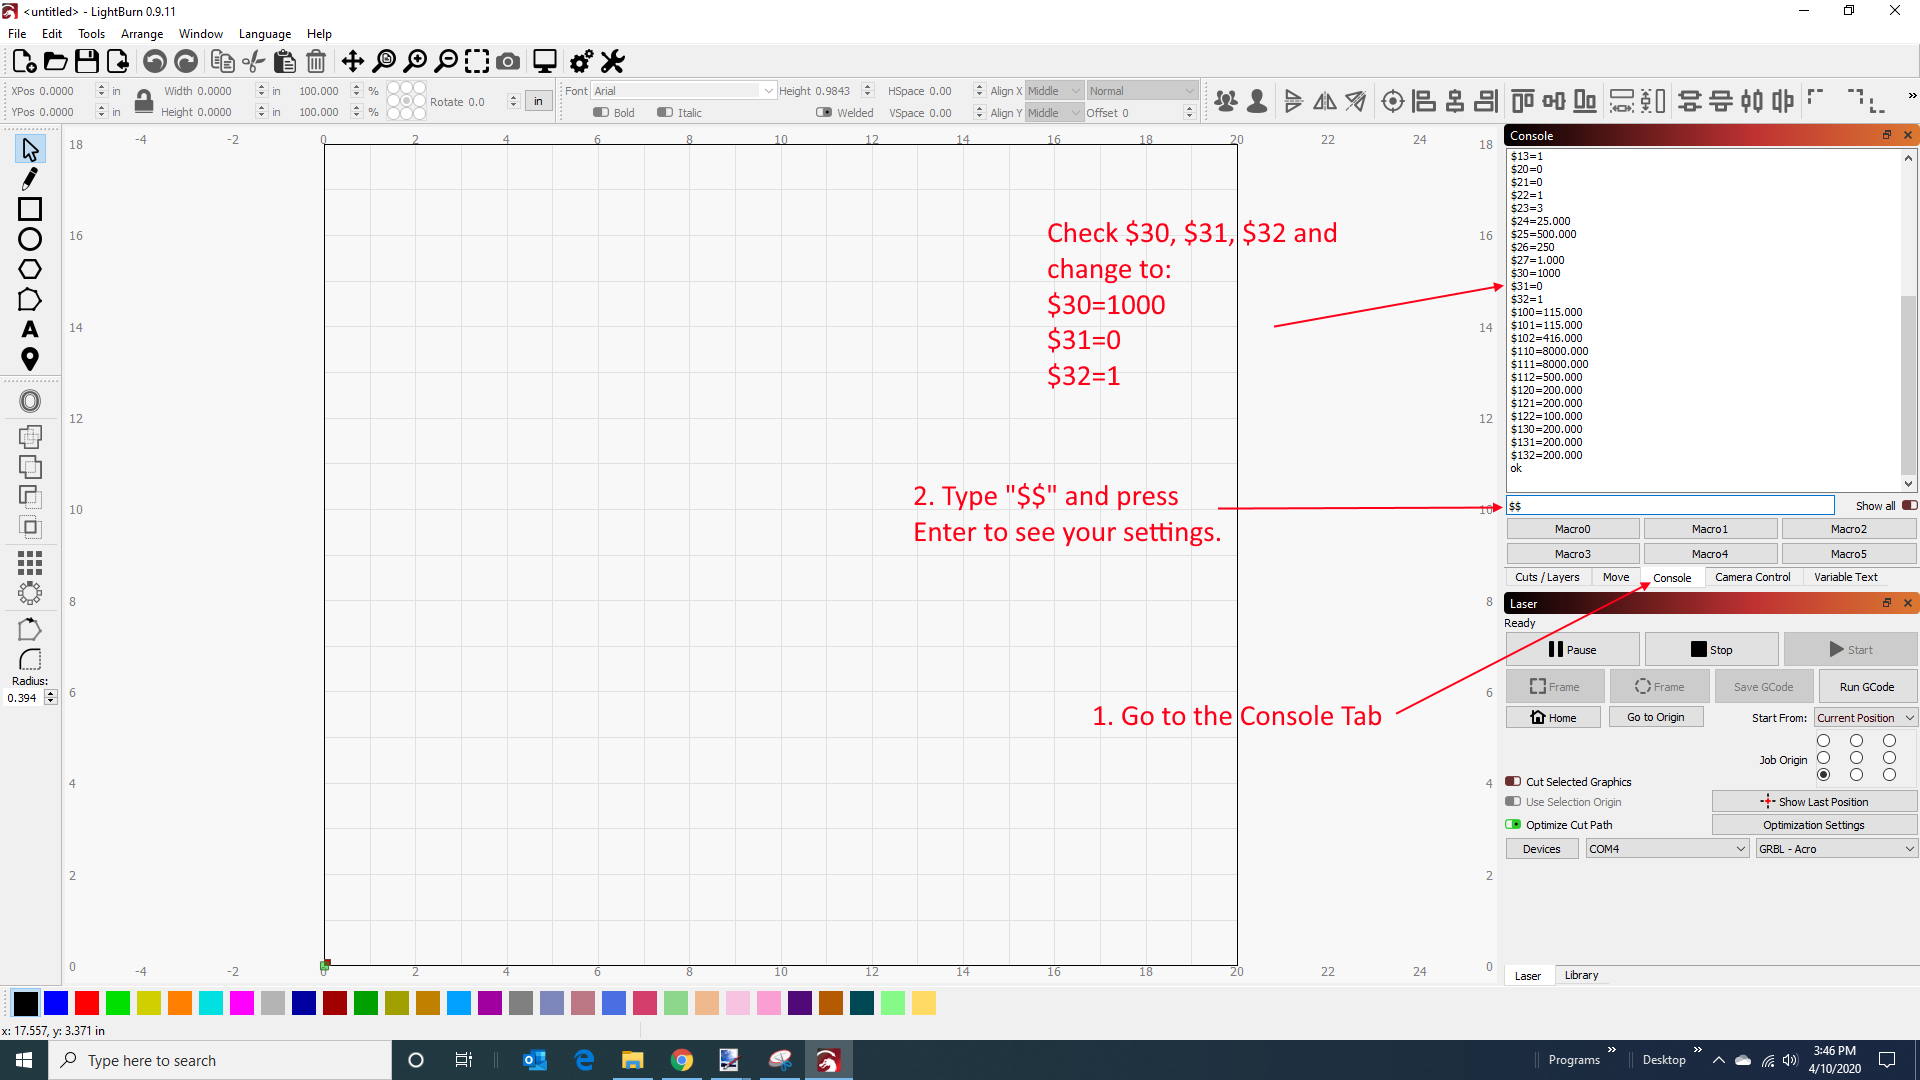
9. Click on the Console window to look at your setting.
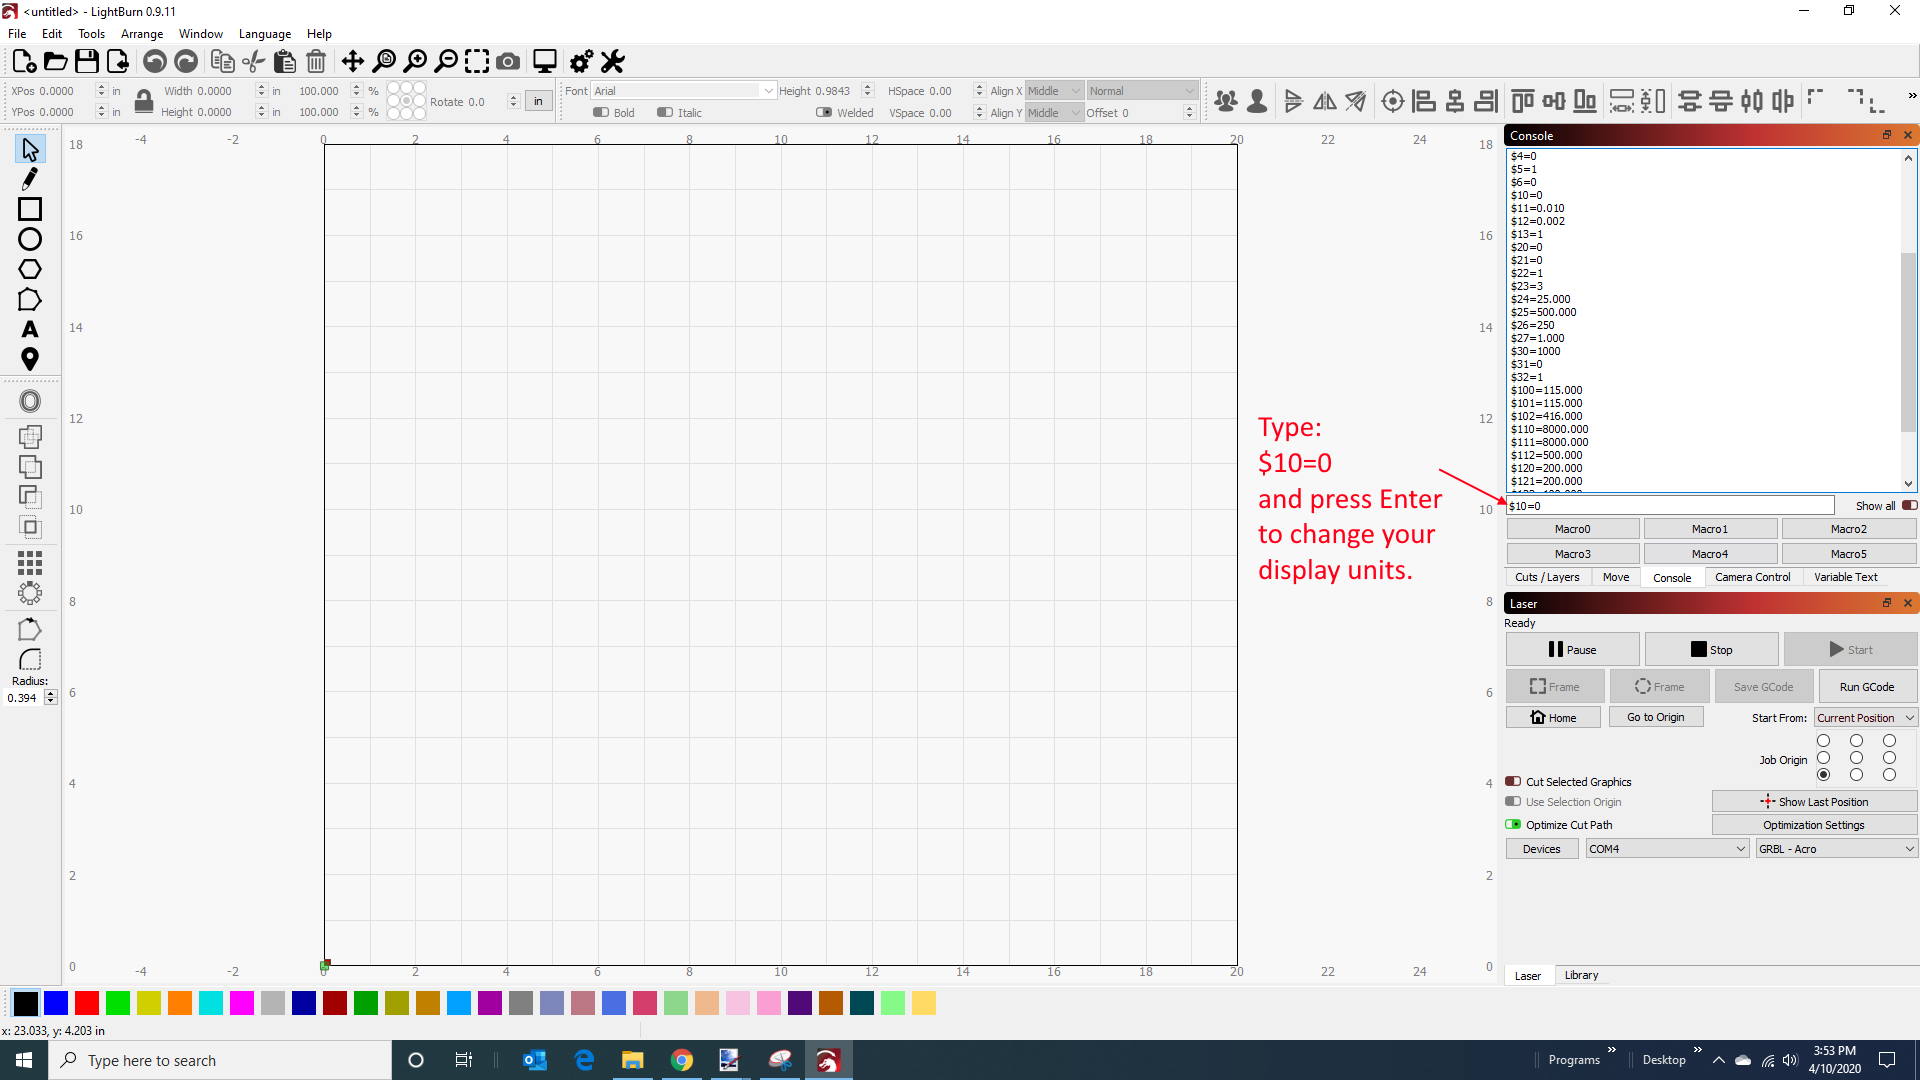
Type in “$$” to see your settings. You might need to scroll down on the right to see them. Check the $30, $31, and $32 values.
Change them to be:
$10=0
$30 = 1000
$31 = 0
$32 = 1
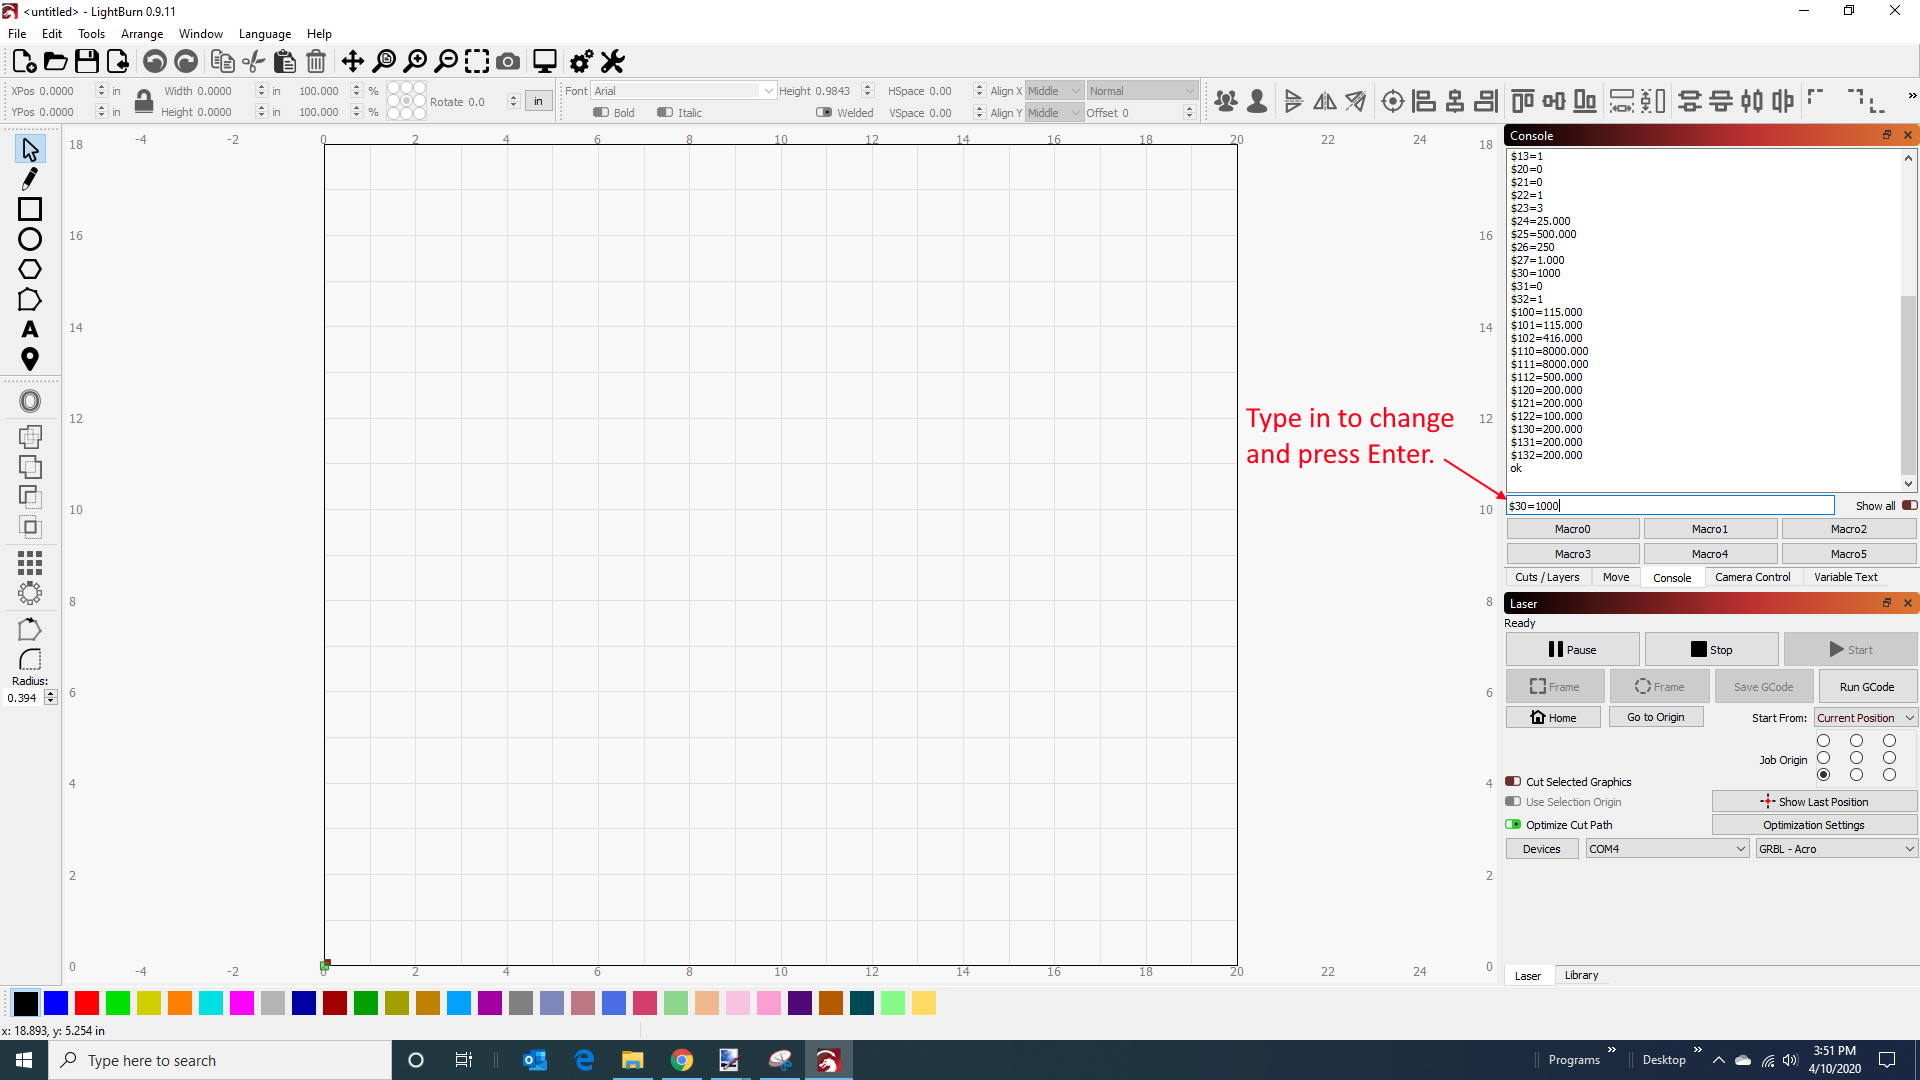
 To change the value, type it in the the same place you typed in the “$$” command. Just type in “$30 = 1000” and press enter to change the value.
Change $10=0. This will set your display units correctly.
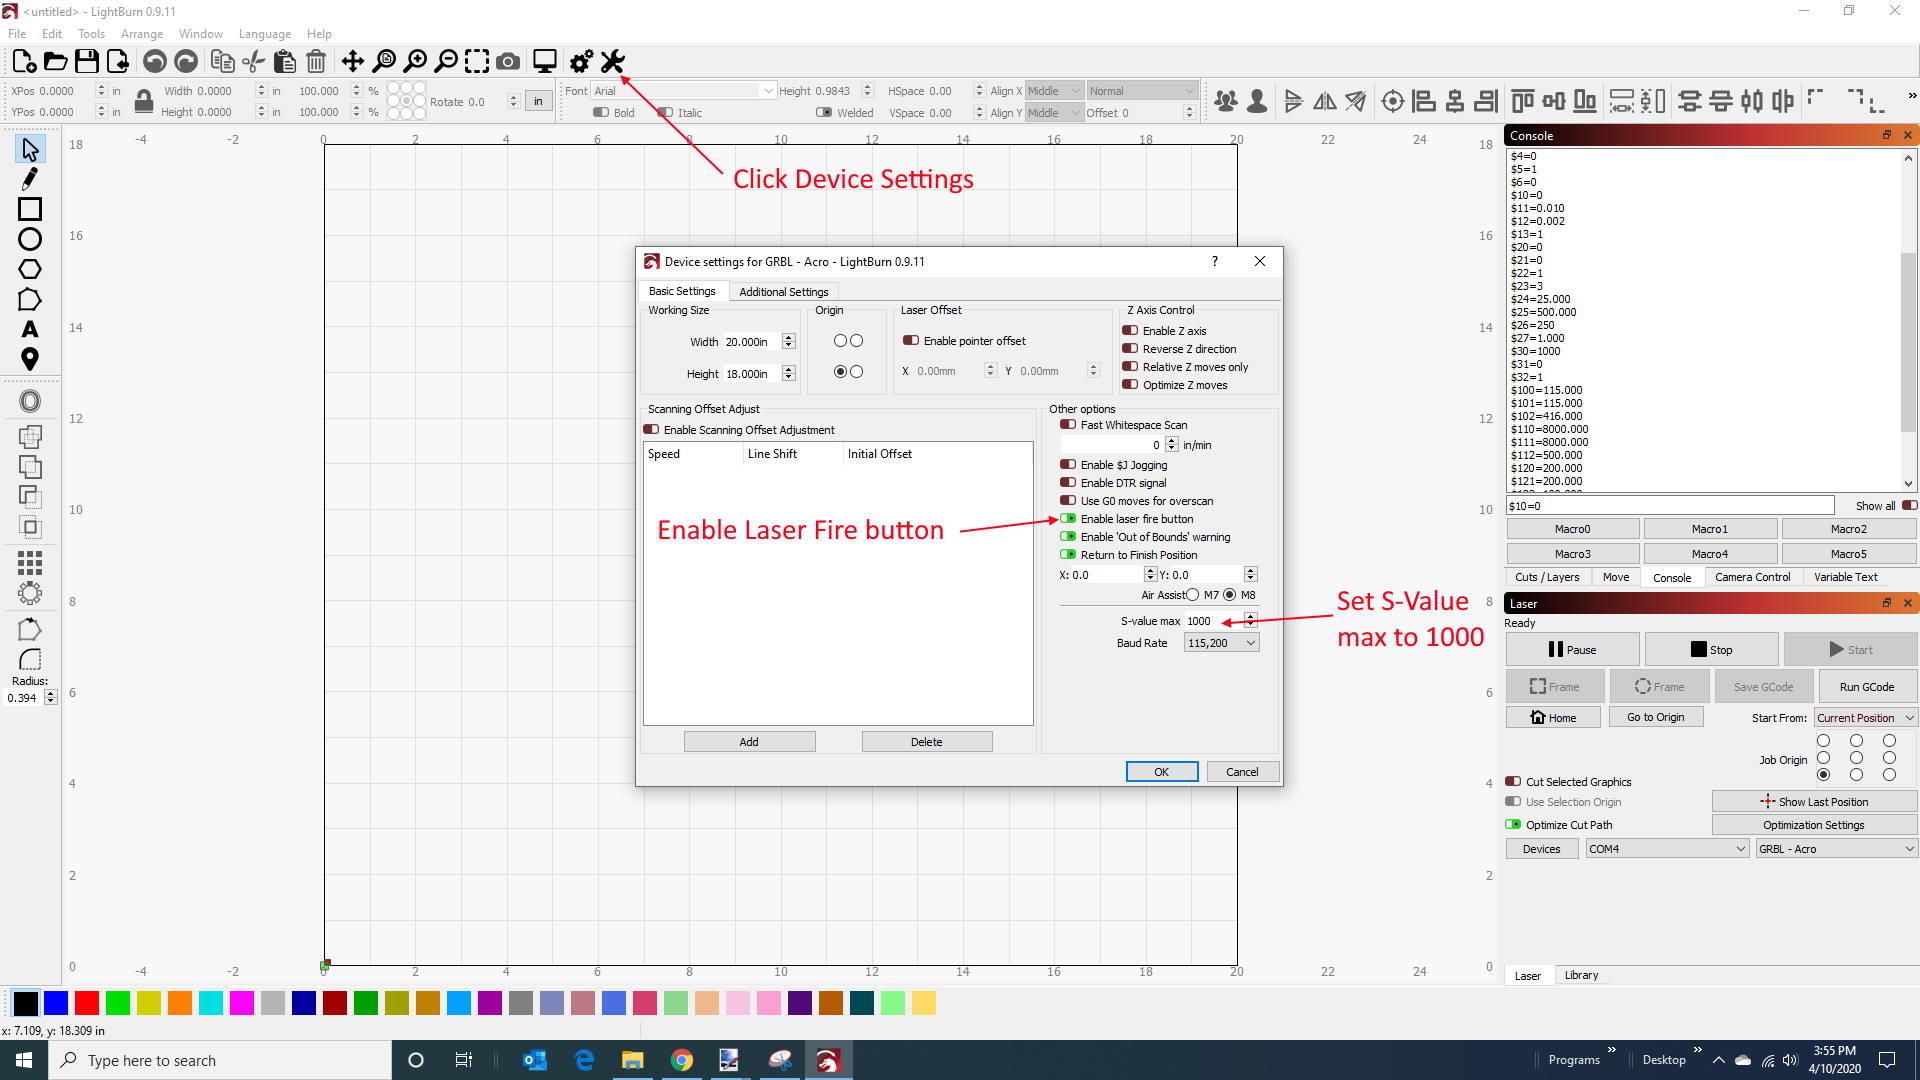
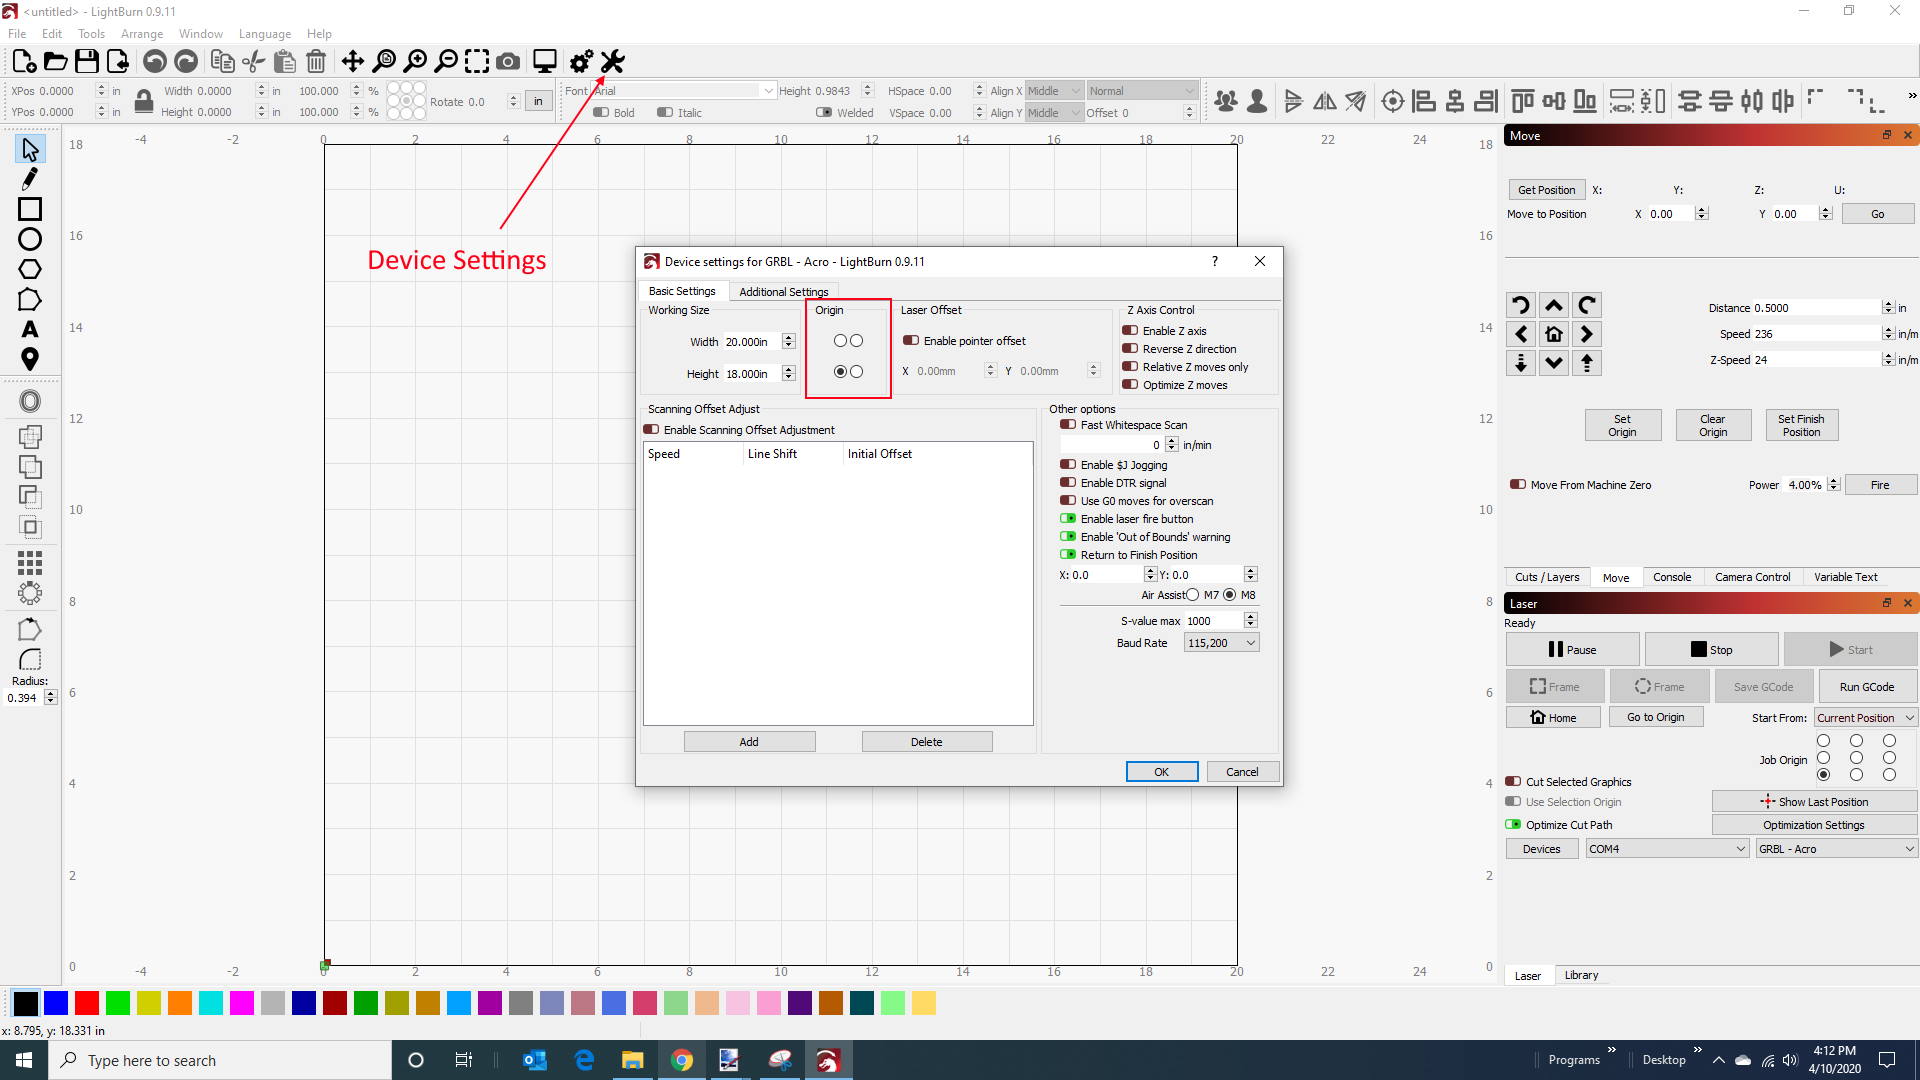
10. Set up you device settings to Enable Laser Fire Button and set your S Value to 1000.
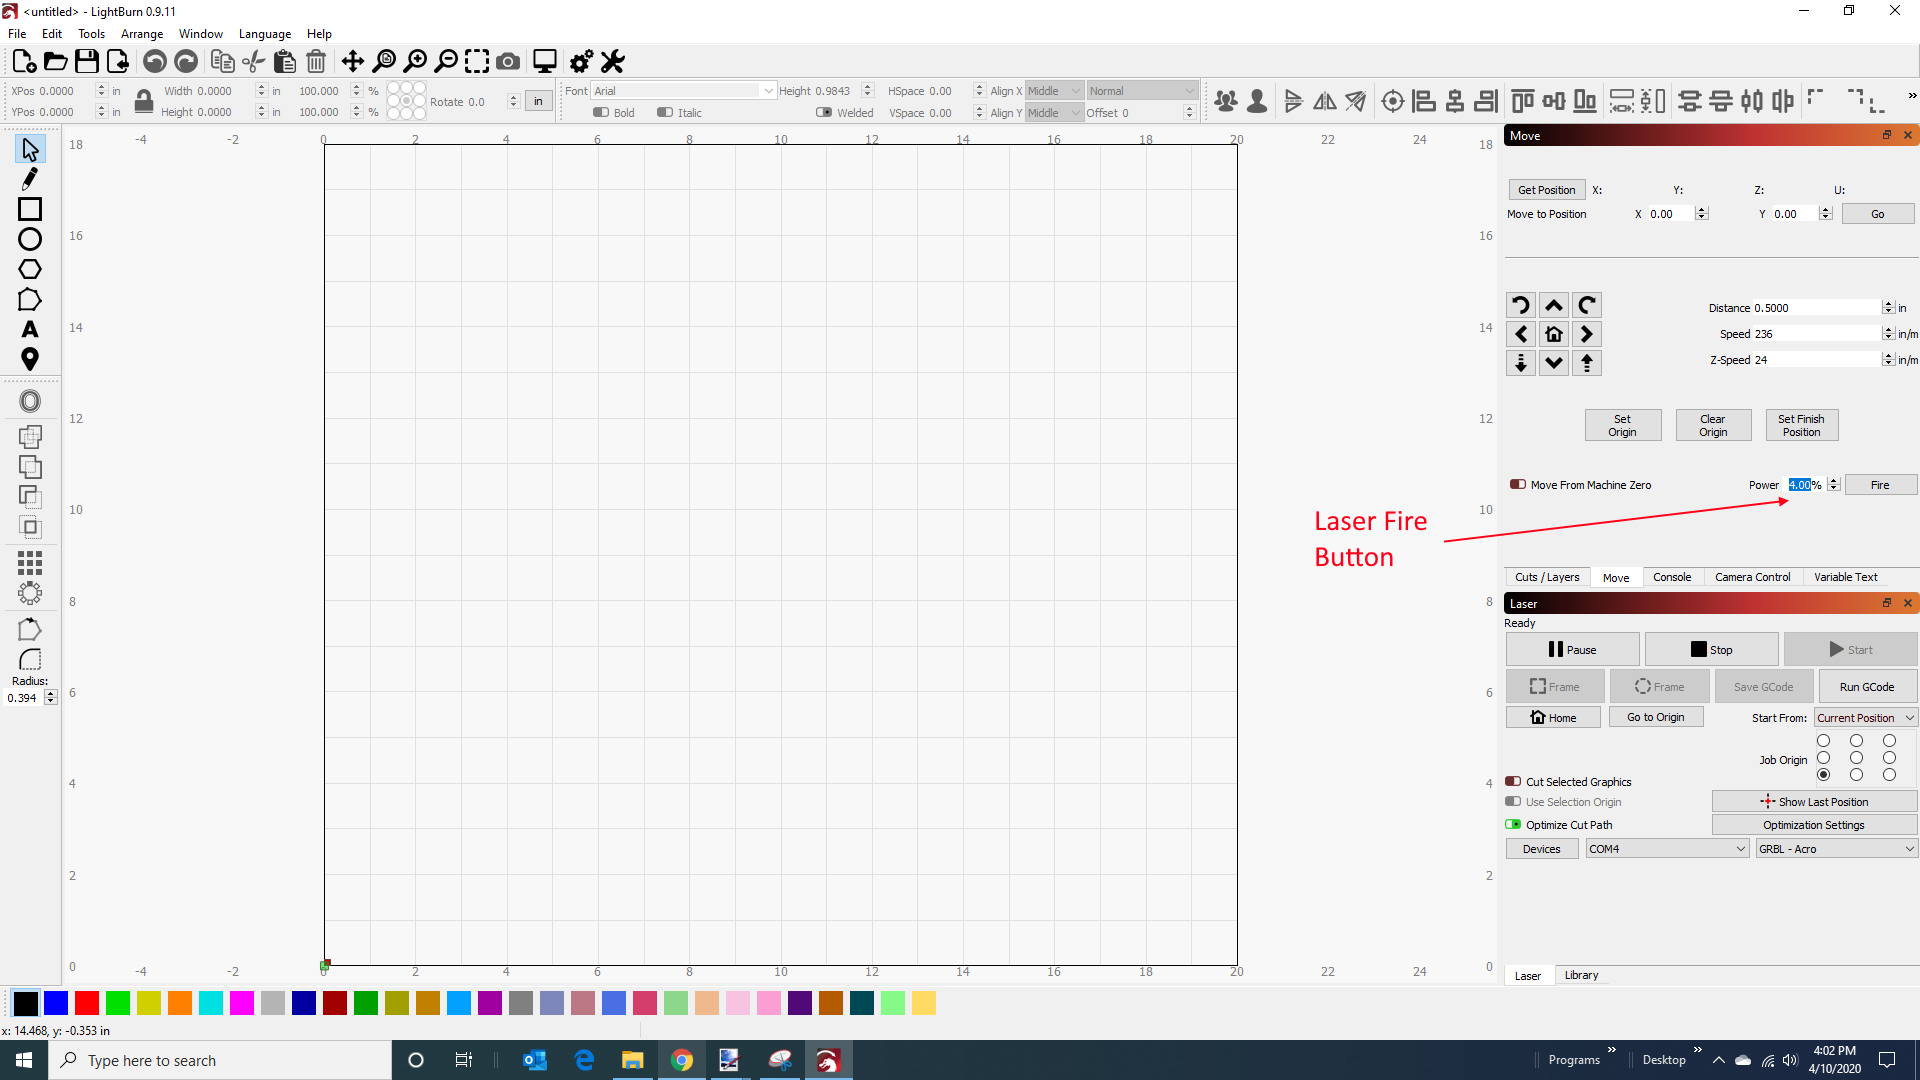
11. Restart the software to see the laser fire button.
This button is good for looking at your position to find where you are in low power and to use for focusing. **You might need to go up to 5% or higher to have this work for your laser.
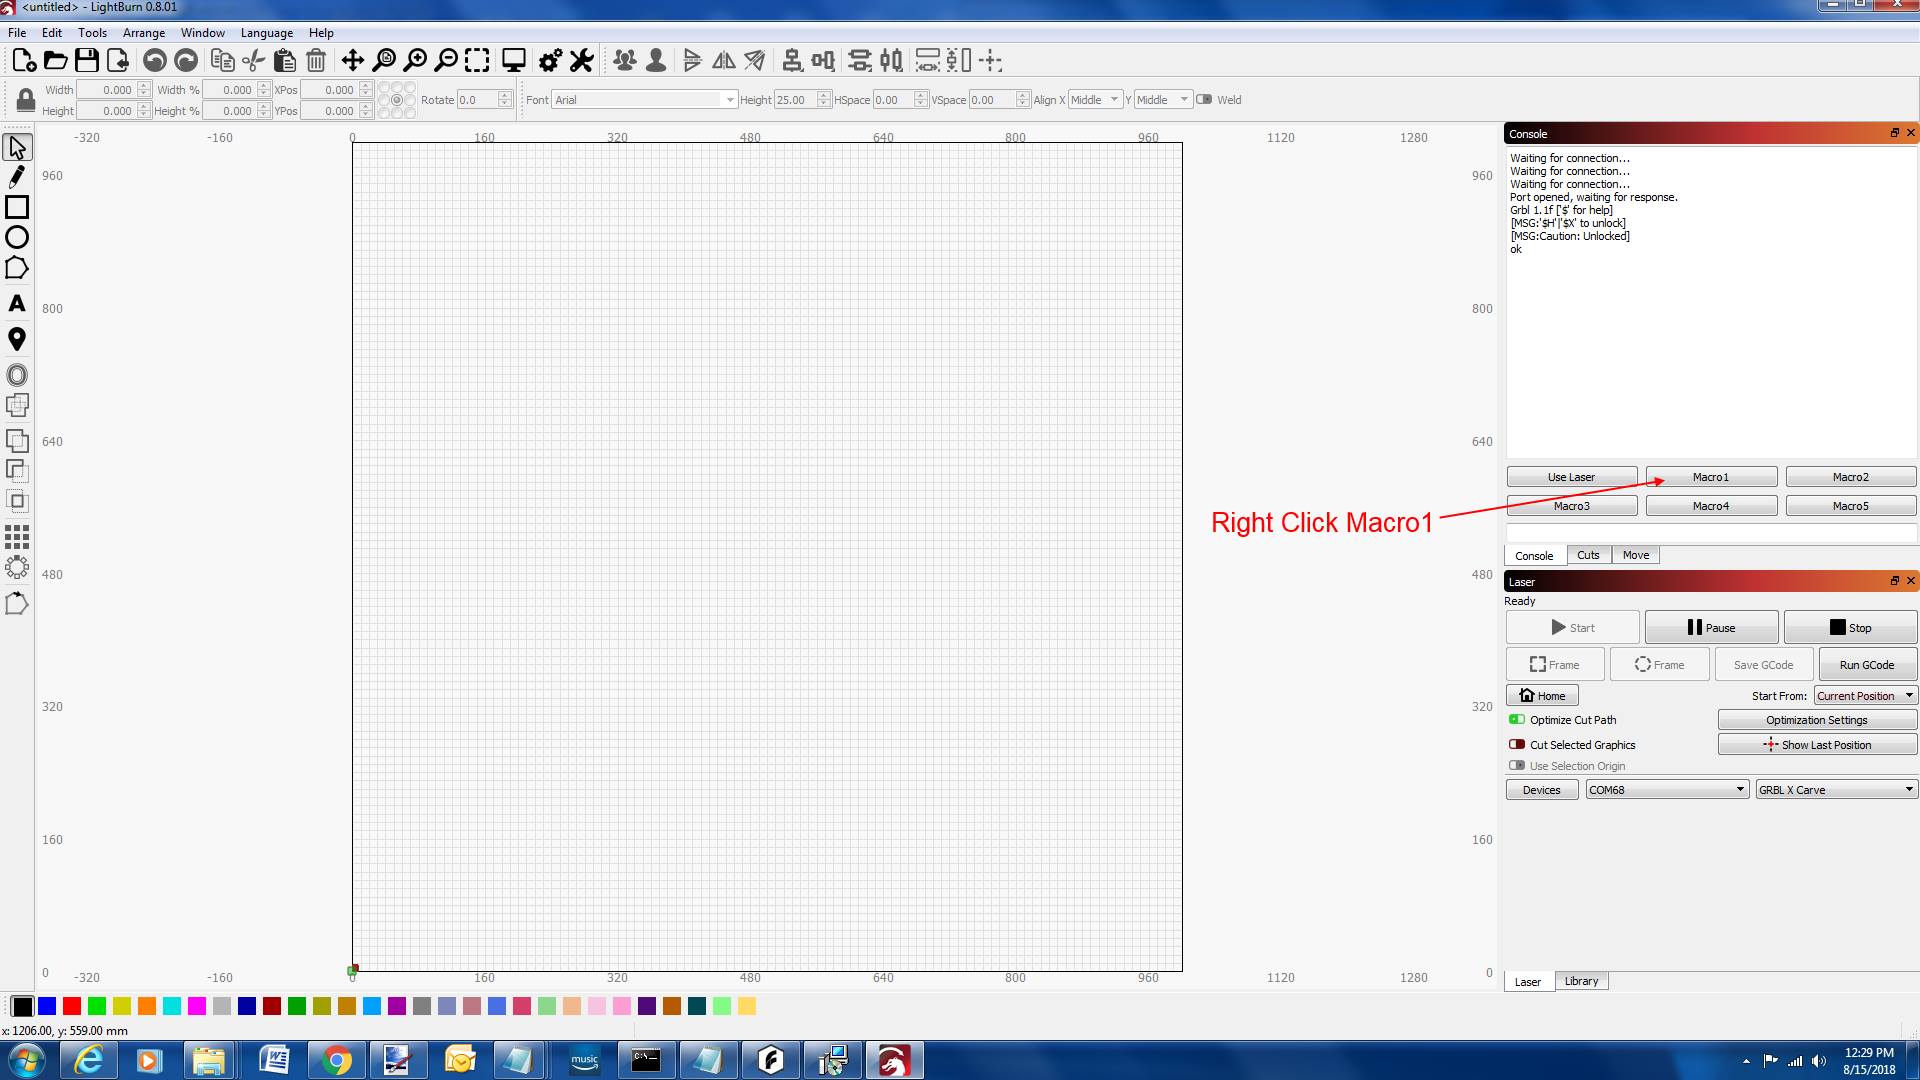
11. Set up the Macro Buttons to Flip the coordinate system.
The shapeoko3 machine uses the 0,0 postion in the far upper right corner. This will make everything upside-down when you engrave, so we need to change this. It will also have the jog buttons backwards. We will make two macro buttons to use for the laser and then to press when you want to exit and use the CNC.

Right click on Macro 0 to open it.
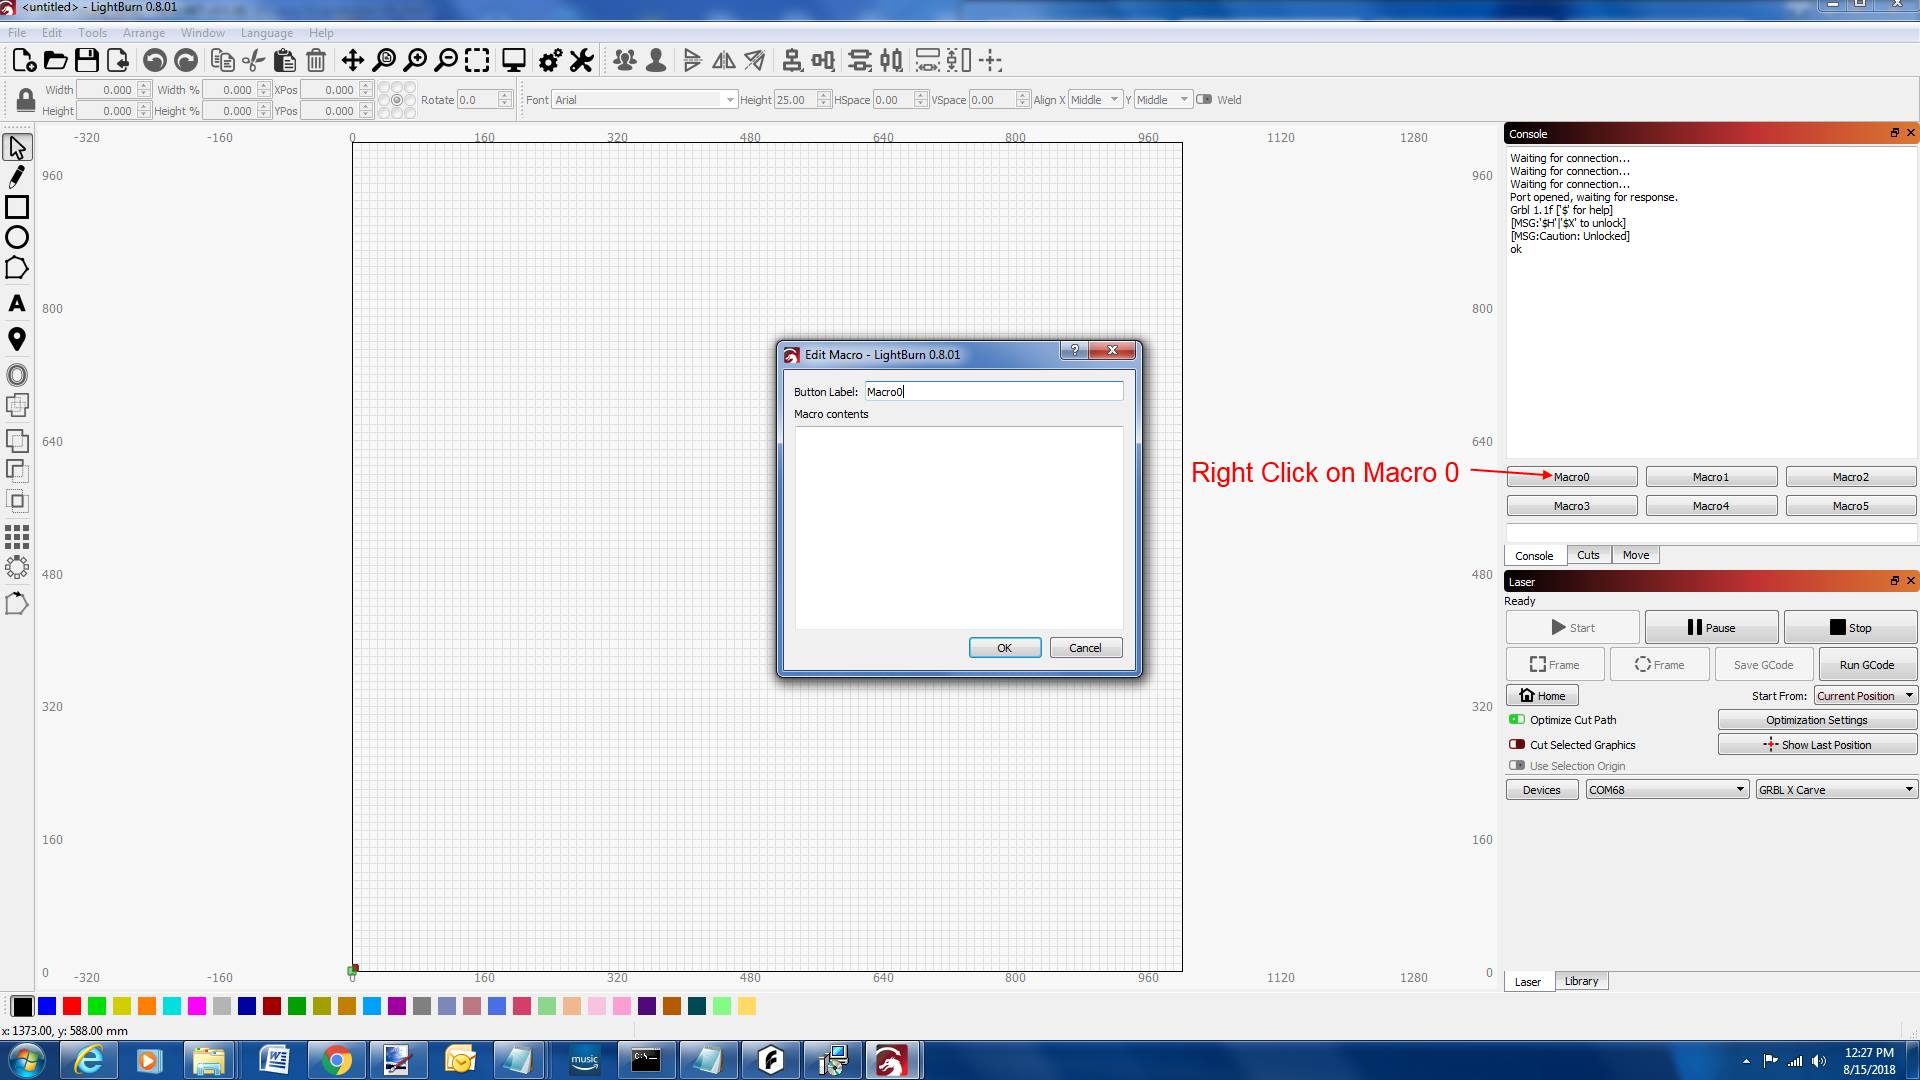
Enter in “Use Laser” in the Label and “G10 L2 P1 X-812 Y-812” in the contents box. Press OK after.
Note: If you have a different work table size that you entered in the device settings, this number needs to be the same here.

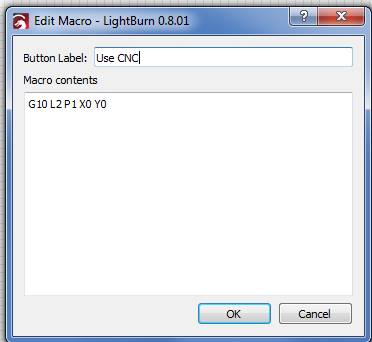
Right Click Macro2.
Enter in “Use CNC” in the Label and “G10 L2 P1 X0 Y0” in the contents box. Press OK after.
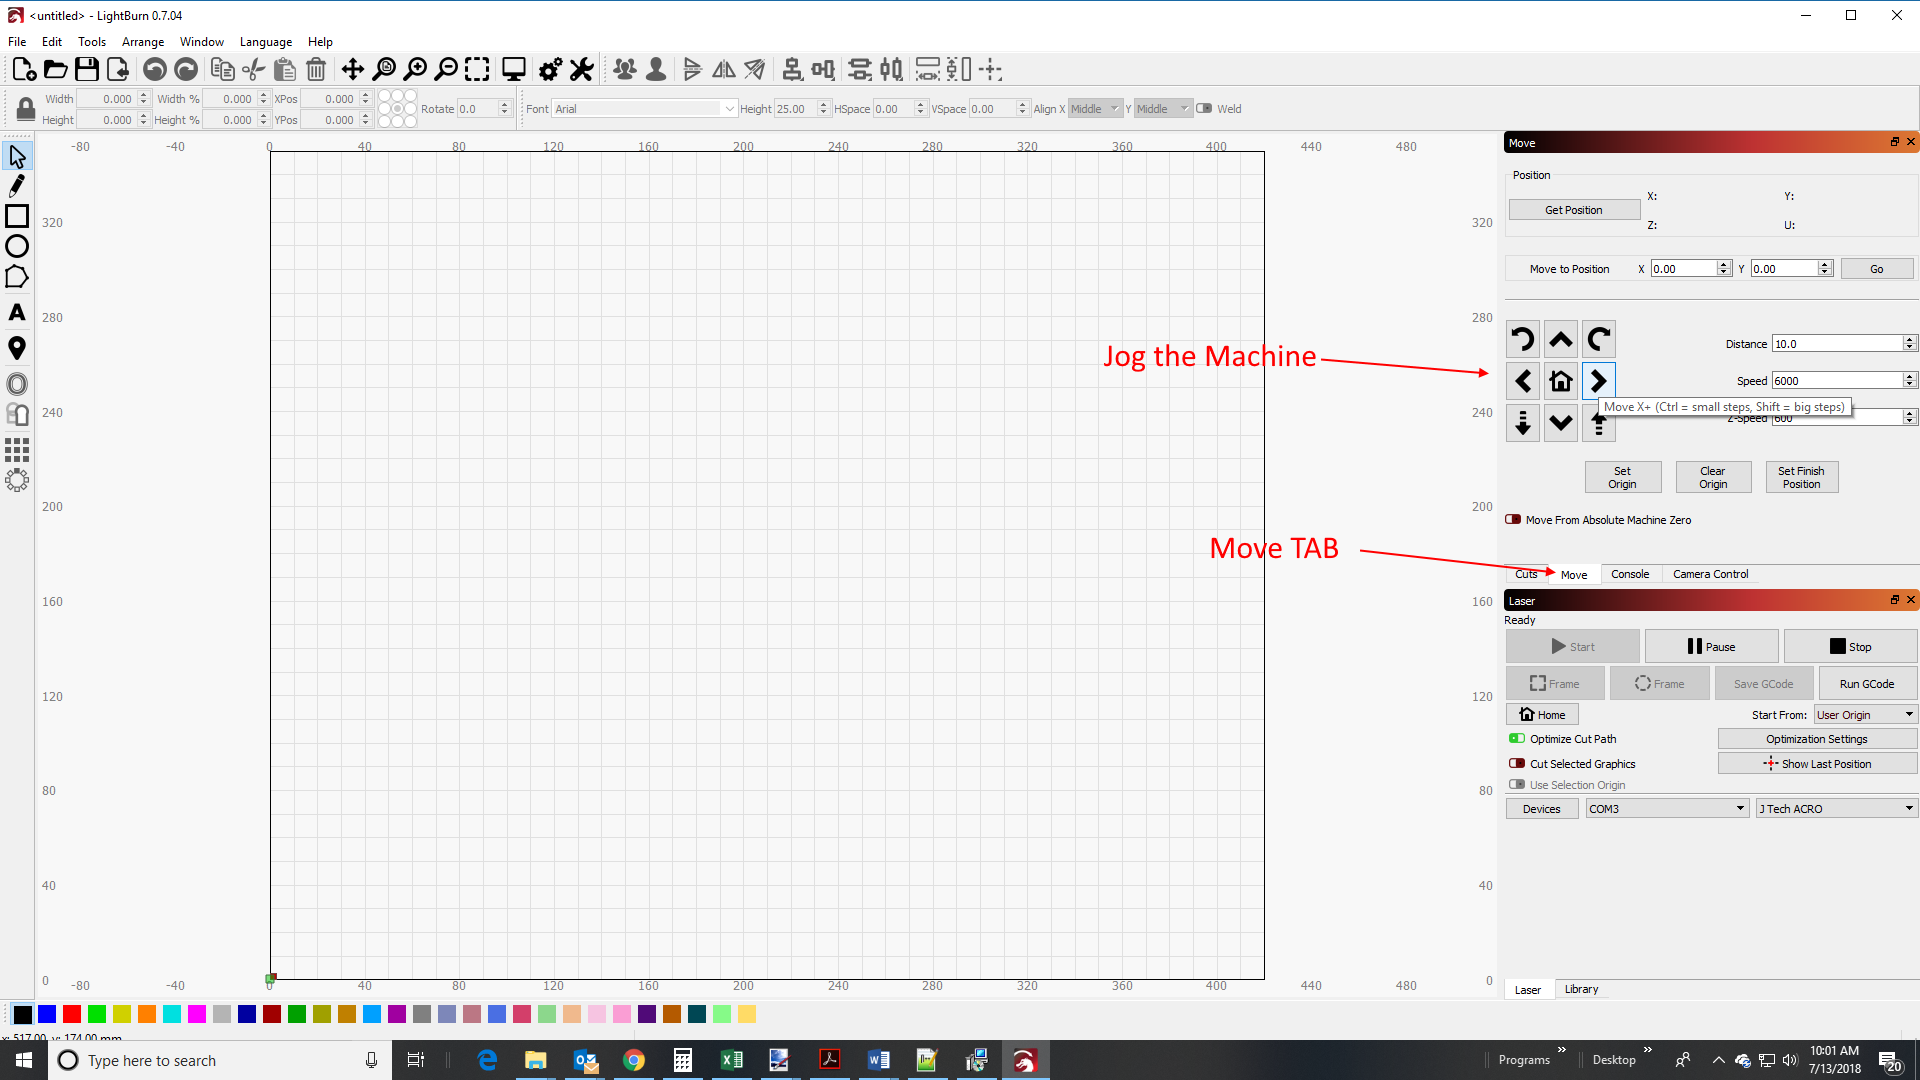
13. Click on the “Use Laser” Macro button. Then, Jog the machine to check the machine now moves correctly.
If it is still backwards, then press the Use Laser button or check to see if you entered it correct.
Make sure your origin is set to the front left for your device settings.
You are now all set up! We are ready to really start using the machine now. Let’s dive into some of the features of the Lightburn software.
Set Up Your Machine – X Carve
Ok, now that you have downloaded Lightburn software, we can get started with the rest of the setup. When you install the Lightburn software, you might see Windows trying to protect you. Click on the bottom “Run Anyway” button to install it. The X Carve has some things you need to change to get it all working, so we will cover it here.
When you first run Lightburn, you should have a quick setup wizard walk you through the setup. Here is what you need to do to get it set up.
There will be a section in the start where lightburn will “attempt to detect” your laser. It will not work for most GRBL machine like the Shapeoko3, so we recommend setting it up manually.
Choose to set up manually:
Choose GRBL from the list:
You need to have GRBL 1.1f installed on your machine to do pictures. You probably have this installed and can tell in the console tab when it connects.
(if you don’t have GRBL 1.1f and don’t want to upgrade, then choose GRBL-M3 (1.1e or earlier) from the list. You will not be able to do pictures though).
2. Choose Serial/USB
3. Name your machine and put in the dimensions.

We have the 1000mm x 1000mm in this example. If you have the smaller machines, then measure out your distance and put it in for your table.
4. Choose your origin and unclick “Auto Home” (unless you want it to home every time…)
5. Click on “Finish” to complete setup

6. Connect to the machine
Click on the bottom right to select your machine from the drop down and click on the COM port to connect it. Make sure the USB cable is attached and the power to the machine is on (plugged in).
7. Check your GRBL Firmware Version
Lightburn works best with the newest version 1.1f (or higher) with dynamic laser mode enabled. When lightburn connects to your machine, you will see in the console your version you are on. If it does not say “Grbl 1.1f” (or higher) then you have the wrong version.
If you have Grbl 1.1f (or higher version), then go to the next step.
If not, then you need to update your firmware. Close down lightburn and start the process. Here is how:
Download GRBL 1.1F Firmware
- Download and extract: 1.1f ( Main Branch Merge – NEW)
If you want to check and see if there is an even newer version, then go to the main GRBL page here in the release section.
Now that you have your firmware downloaded and have extracted the .hex file, we will walk through the rest of the process.
Load Your Firmware
For MAC: Download Hex Uploader
For PC: X loader is a cool program that makes it easy to load new firmware to your controller. You can download it here:
After you download the file, extract it and run the application. You should see a dialog box like the following:
Browse for the GRBL “.hex” file. Choose “Uno (ATmega328) in the Device drop down. Select your COM port and put the Baud Rate at 115200.
Can’t figure out your COM port for your machine? Here are some videos to help:
Finding COM Ports in Windows 10
Finding COM Ports in Windows 7
Press the “Upload” button. It should say “uploading” for no more than a minute and then it will say “completed” and the size of the file uploaded. If it runs forever, you have either the wrong device chosen, the wrong COM port, or the wrong Baud Rate.
You now have the new version of firmware on your machine. Start lightburn up again and go to the next step.
8. Choose your Units and Turn off Beginner Mode
Un-check beginner mode and then choose your units. We normally use inch/min for our speed. Other people use mm/min. I would say at least to use one of these as this is what people normally will be used to when on the forums or for help with us. ****This step is important! If you have the speed set to mm/sec or inch/sec then it will be 60 times too fast!****
9. Click on the Console window to look at your setting.
Type in “$$” to see your settings. You might need to scroll down on the right to see them. Check the $30, $31, and $32 values.
Change them to be:
$10=0
$30 = 1000
$31 = 0
$32 = 1
To change the value, type it in the the same place you typed in the “$$” command. Just type in “$30 = 1000” and press enter to change the value.
Change $10=0. This will set your display units correctly.
10. Set up you device settings to Enable Laser Fire Button and set your S Value to 1000.
11. Restart the software to see the laser fire button.
This button is good for looking at your position to find where you are in low power and to use for focusing. **You might need to go up to 5% or higher to have this work for your laser.
12. Jog the machine to make sure your directions are correct.
13. Make sure your origin is set to the front left for your device settings.
You are now all set up! We are ready to really start using the machine now. Let’s dive into some of the features of the Lightburn software.
Using Lightburn Software
We will walk through a quick engrave just to get started and then we will run it on the machine.
1. Click on the Letter Tool and write “Hello World”
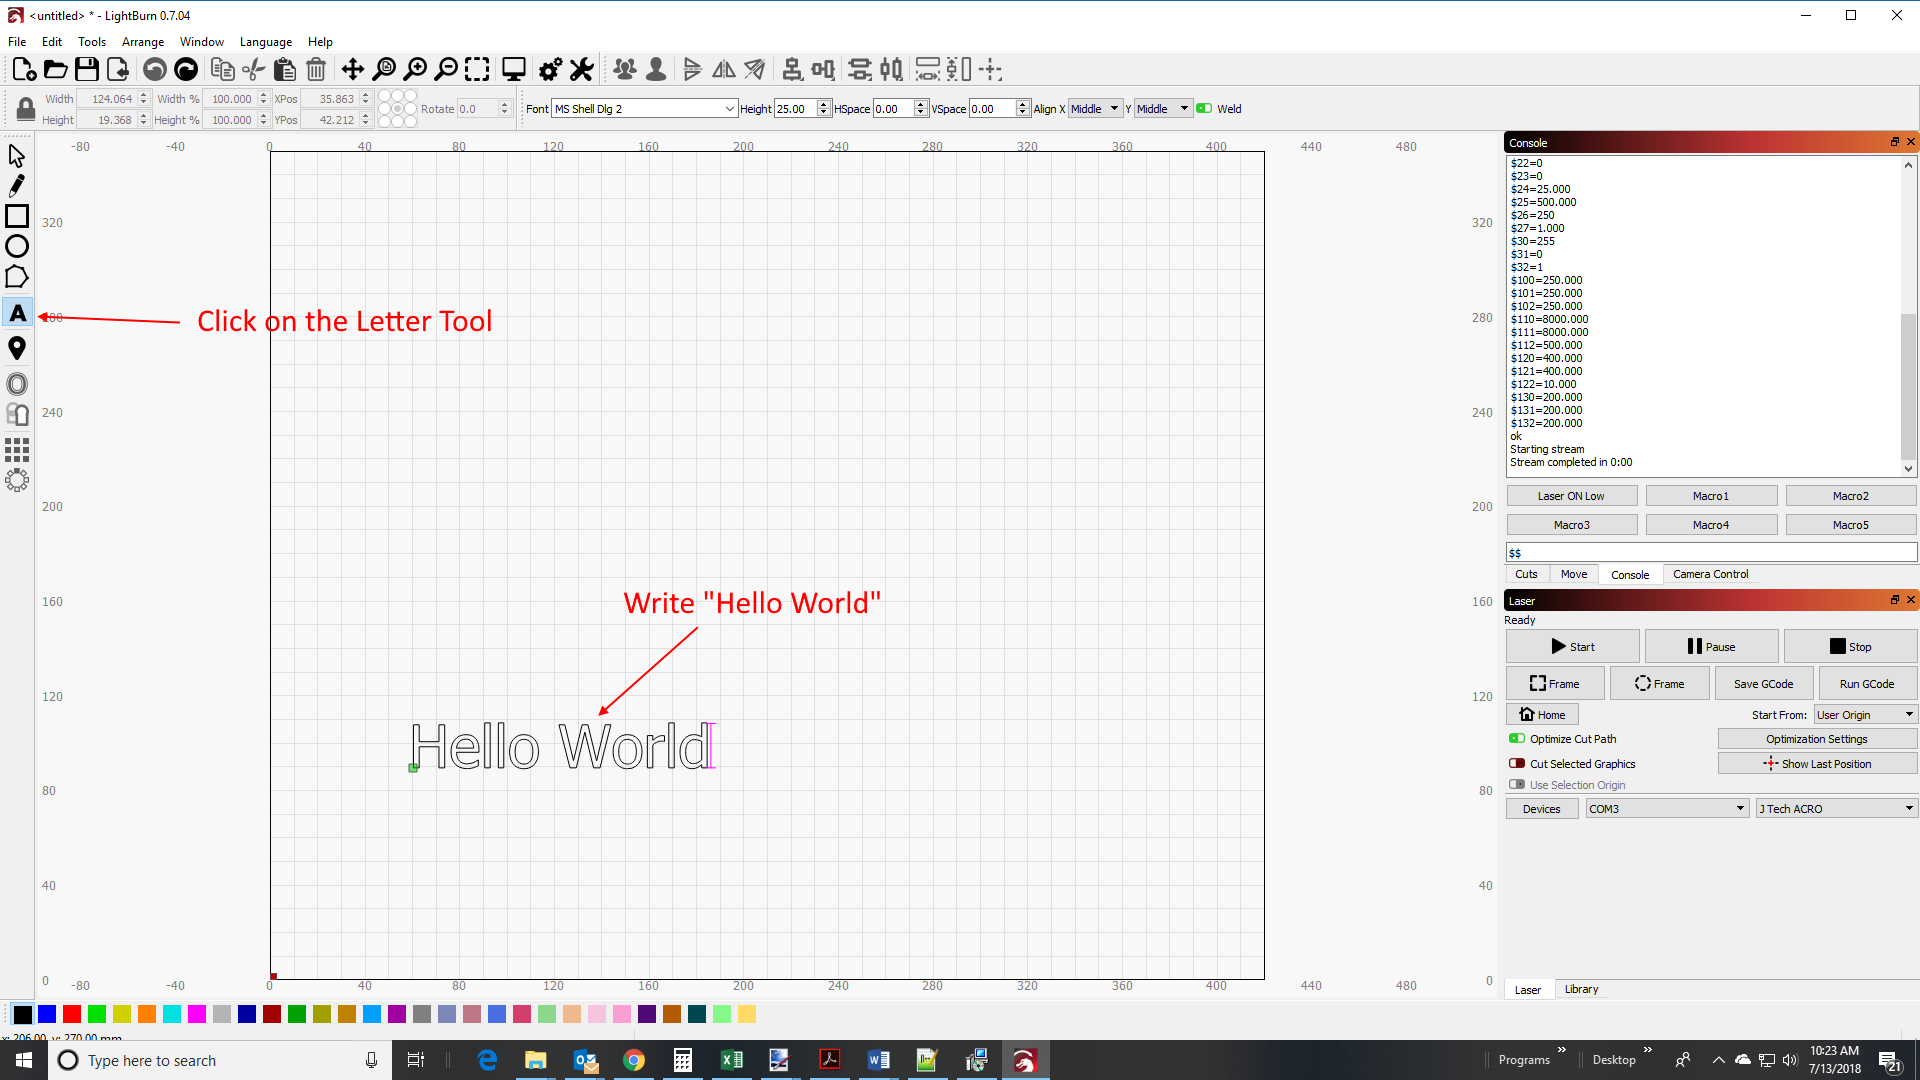
Notice the origin (little greet dot) is on the bottom left. This is where it will start the engraving from.
2. Set the Cut Power and Speed
Click on the arrow tool. You can highlight the text and move it around if you want. Click on the CUTS tab on the right and notice there is a black layer for the text.
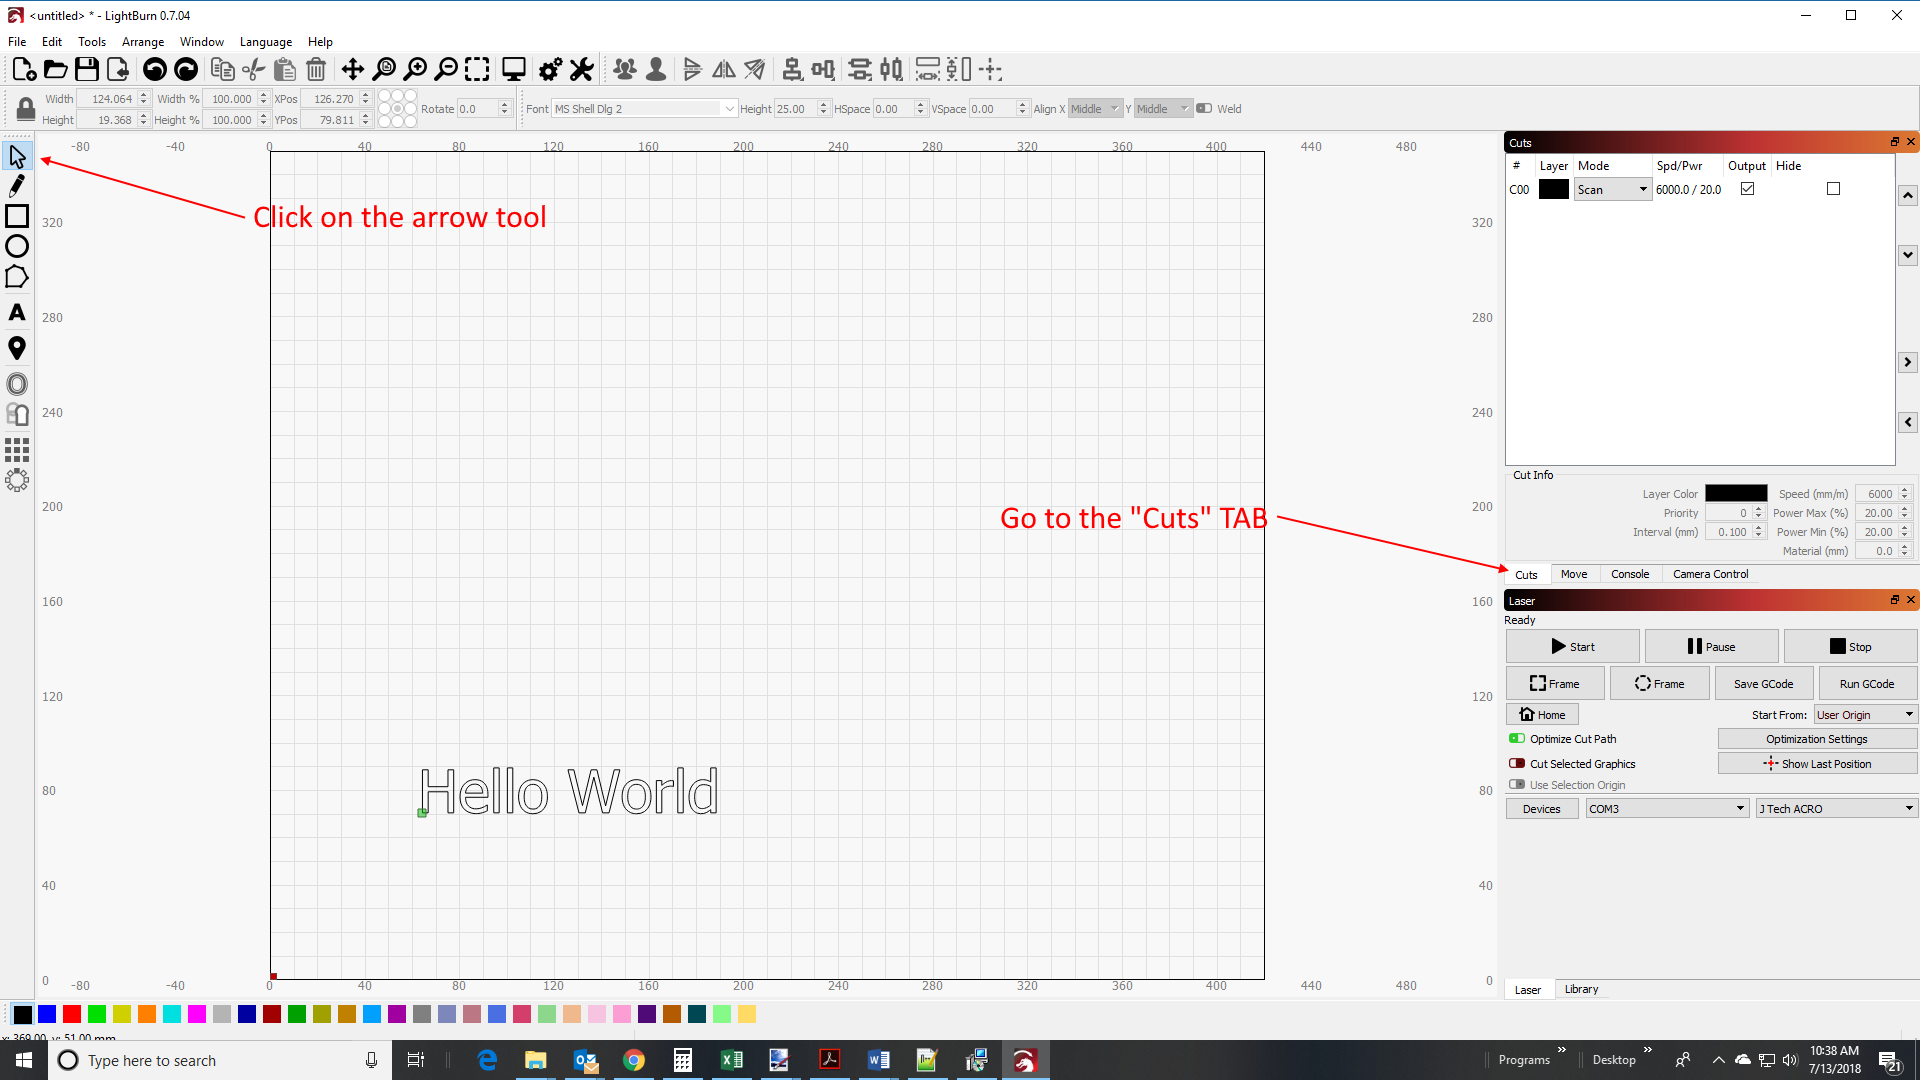
Change the Speed to 100 inch/min and the power to 100%. If you use mm/min, set it to a larger number.

3. Set the Start position
In the move tab, jog the machine to your desired position to start the engrave. If you have a shrouded laser, then set the Z height so the shroud is 1/8″ above the work surface. We are using the start from current position, so it will start at this location.

4. Run the machine
Set the start from “current position” in the laser tab. If you chose the bottom left corner of the letters in the last step, then make sure you have enough travel space on your table for the engraving.
Press “Start” to run your job.

Your machine should start running and complete the engraving of the “Hello Word”.
Note: If you don’t see some of the screen, like the “start from” button, then you are in beginner mode. Change it to “off” in the settings.
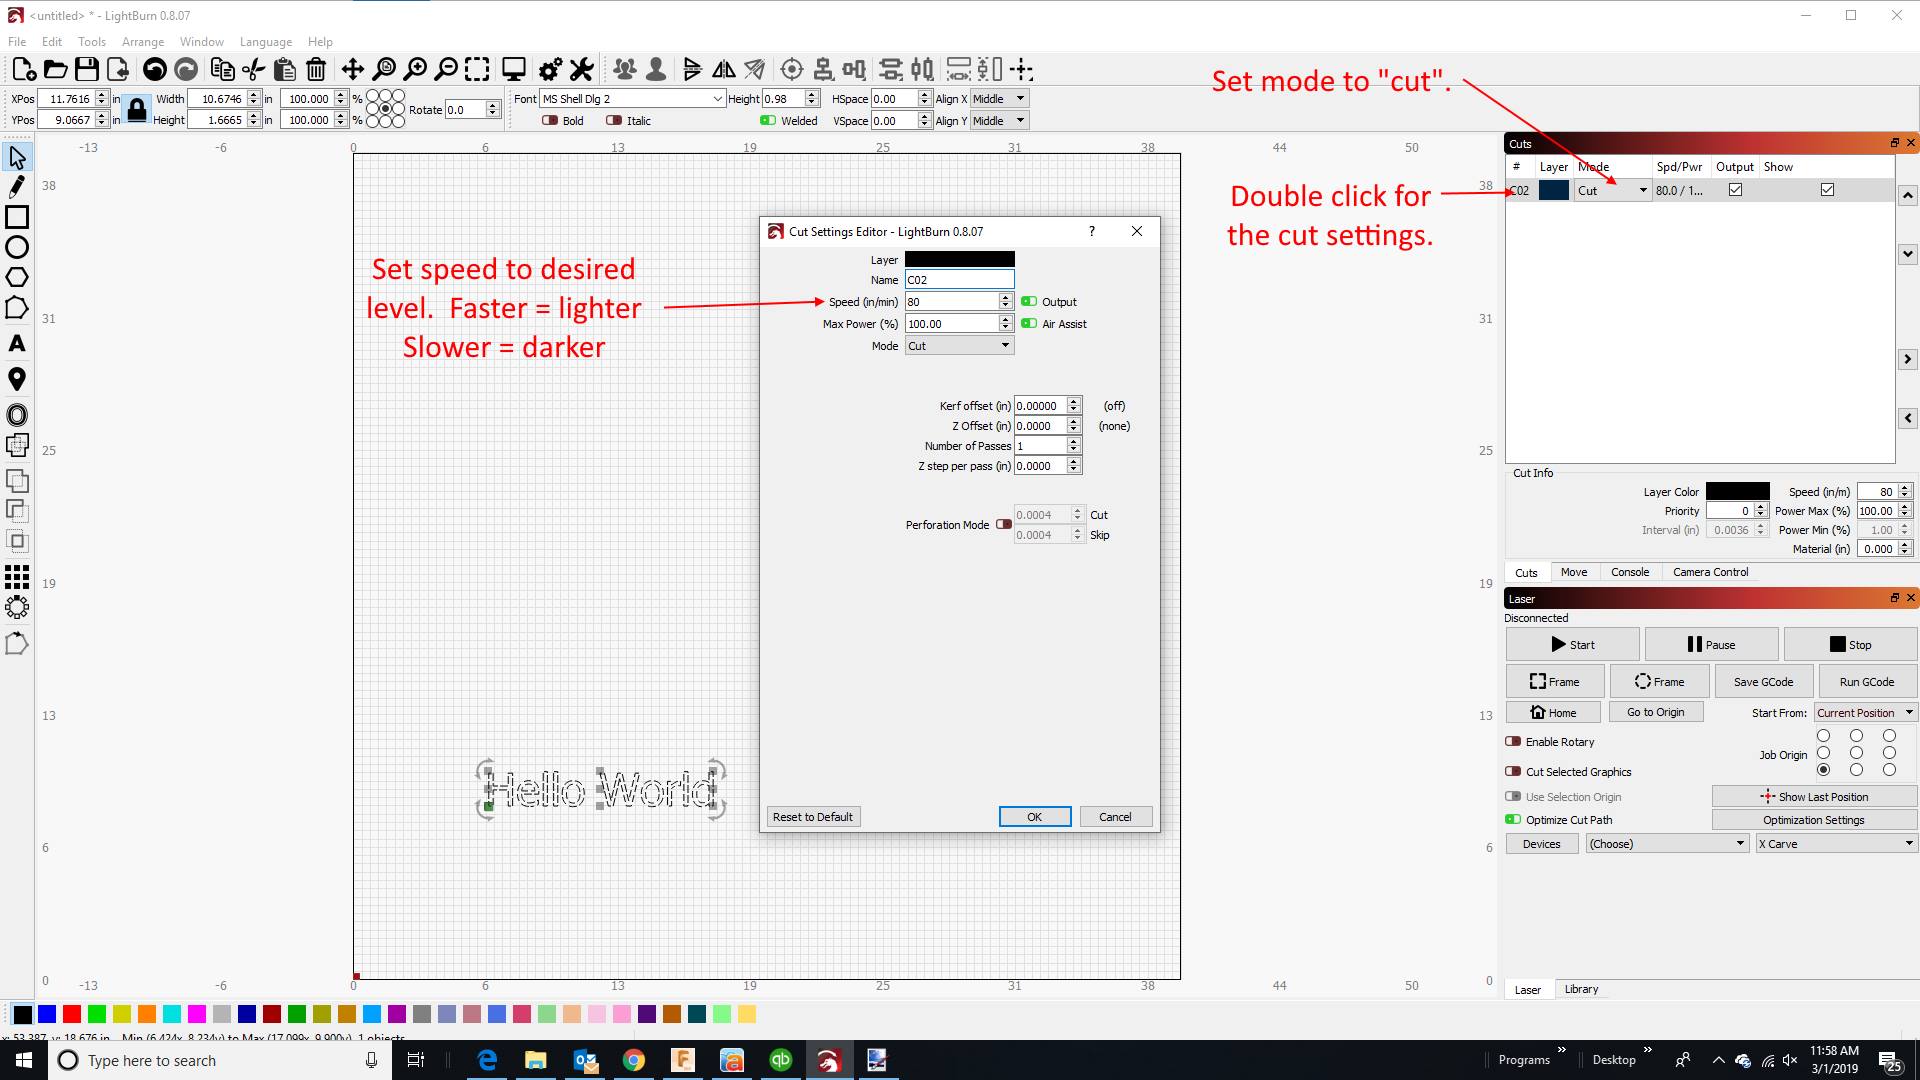
Typical Settings for the J Tech Lasers
The basic operations of any device can be categorized in one of two ways: Cut and Scan. These two options combined with variations in power and speed can achieve a variety of results.
Settings will vary from machine to machine and across different materials. It is recommended to test your settings on a scrap piece of the same material as your final work piece before your final run.
To the right of the cut window you will see 4 arrows. The up and down arrows allow you to change the order of the highlighted cut or scan layer, and the right and left arrows allow you to copy cut or scan settings into the cache, and write those cached settings into a cut or scan layer. Useful for copying settings from one layer to another.
Here are some typical settings for wood for the different modes on the cut tab.
Cut (outline engrave)
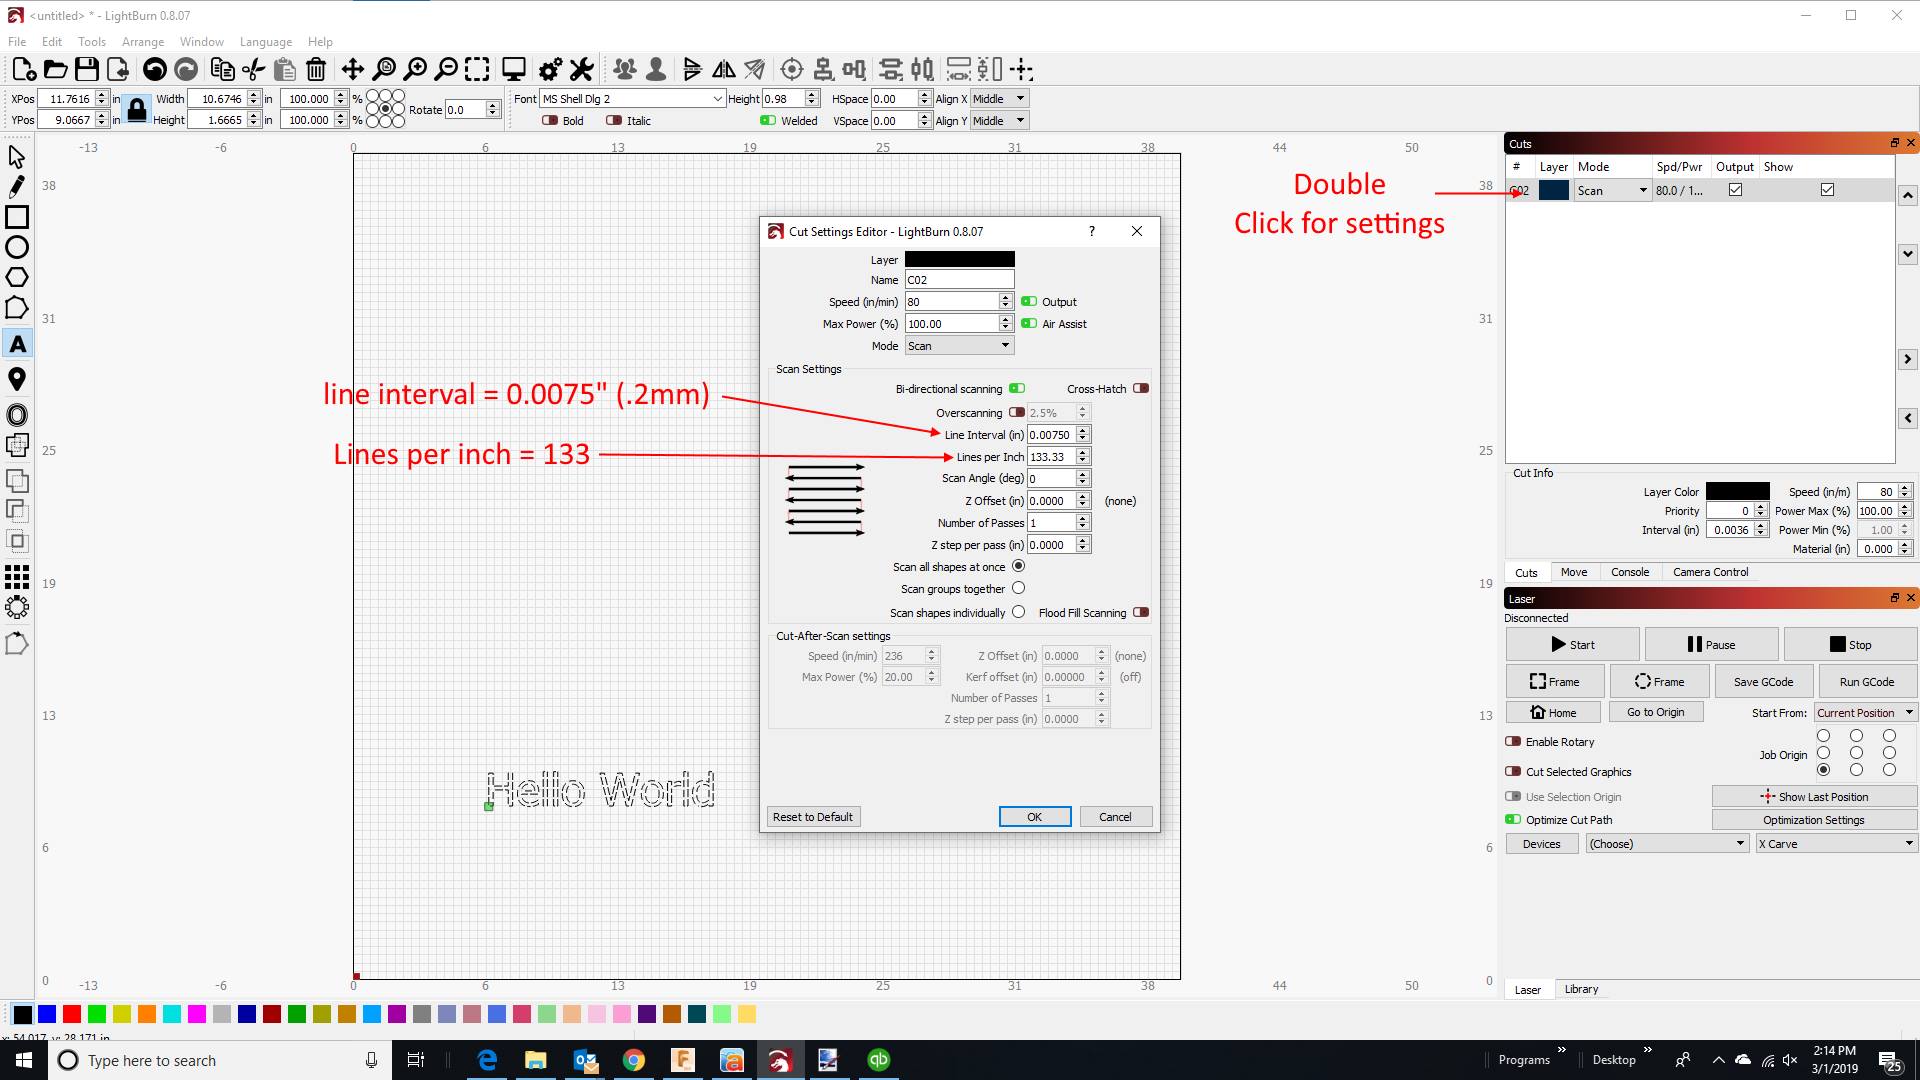
Scan (raster)
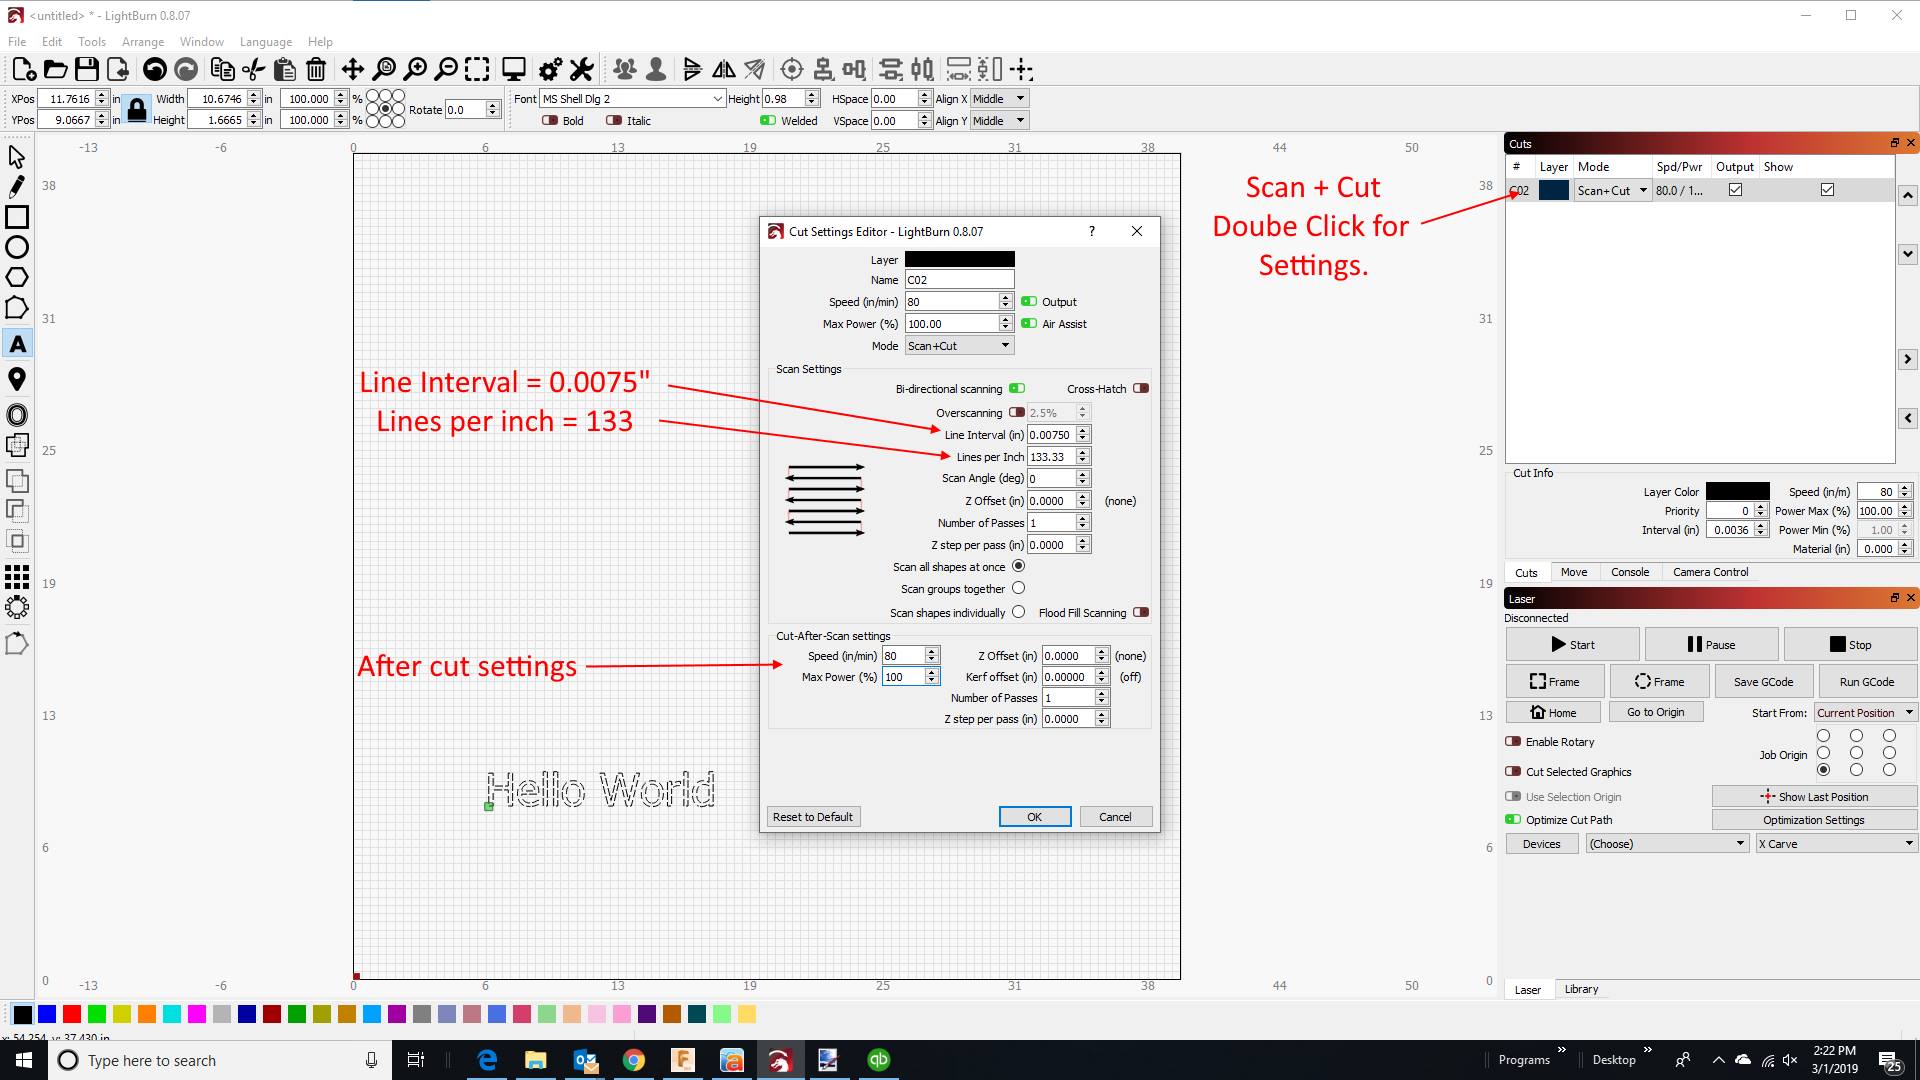
Cut and Scan (raster, then outline)
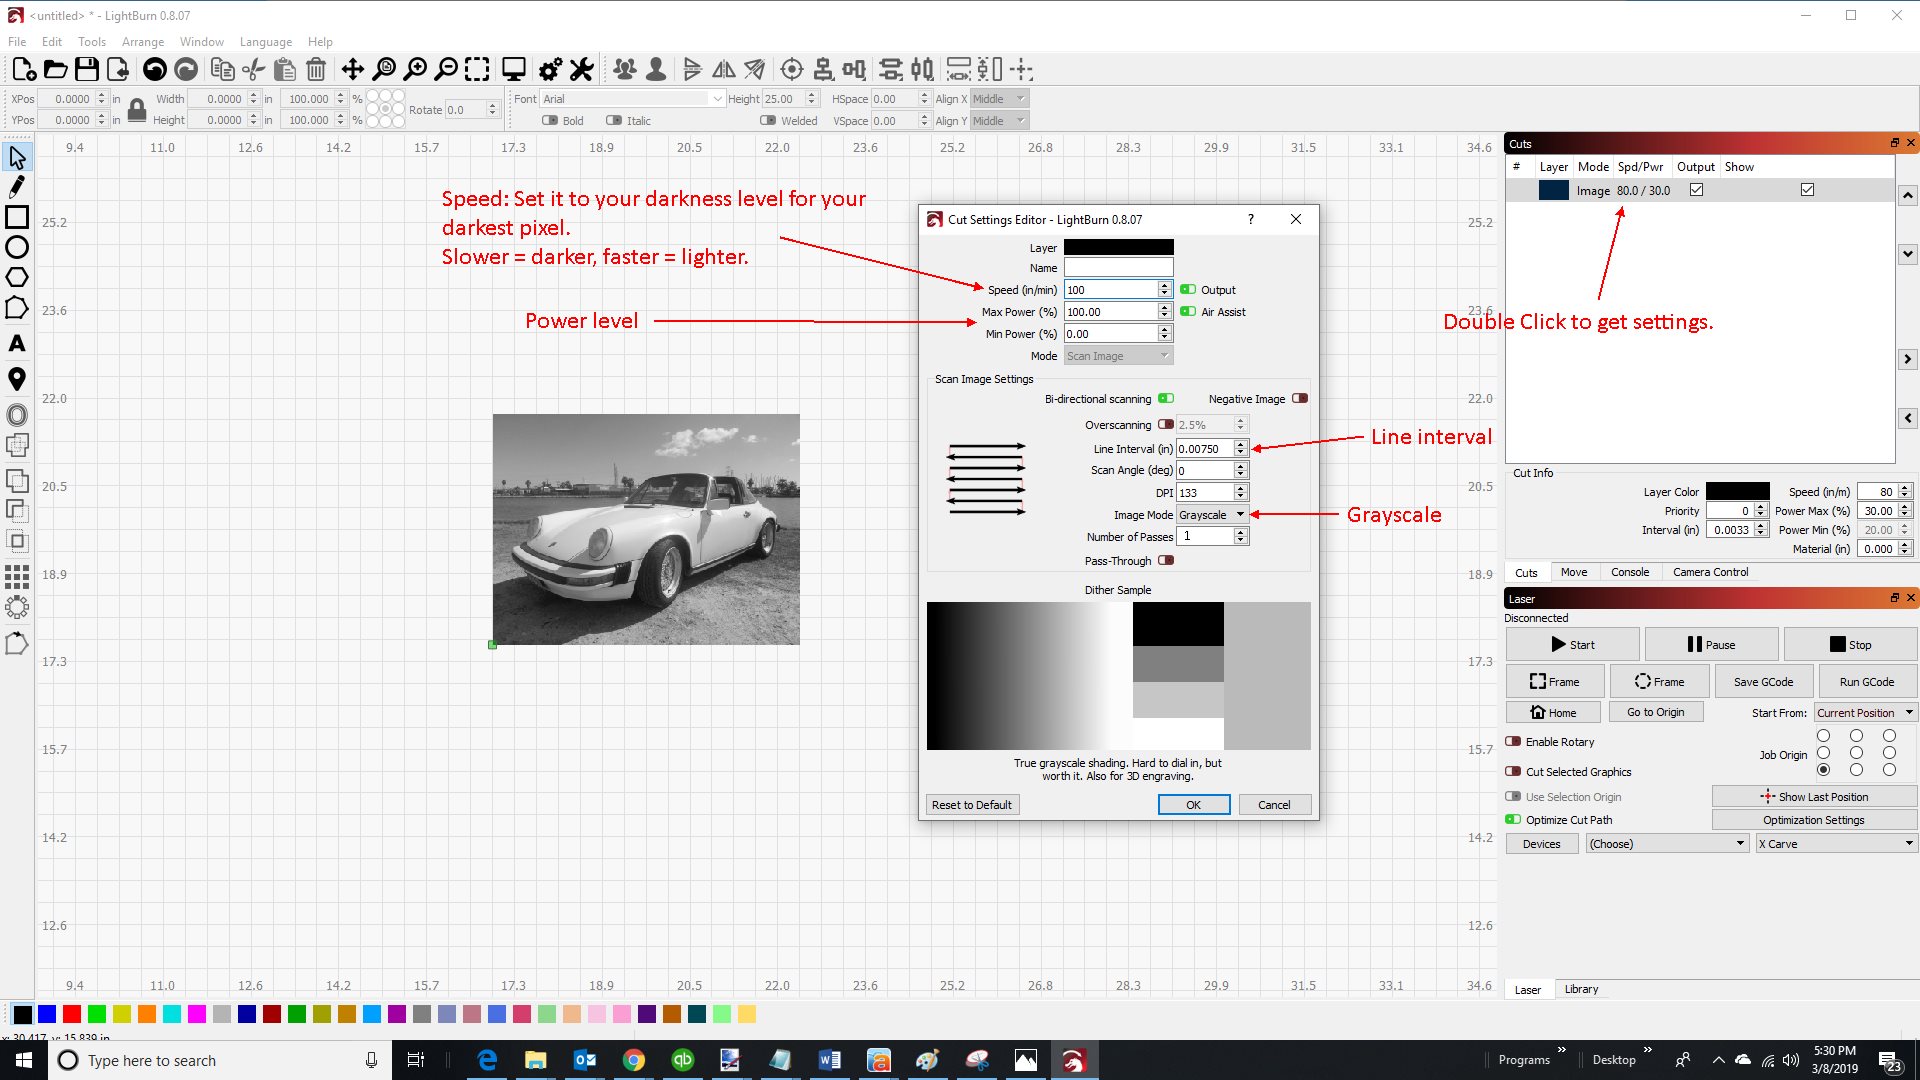
Picture Engraving Settings:
To learn how to do some more really cool things with your machine, follow the video tutorials in the next section.
Tutorials
These tutorials will walk you through the user interface and many of the features of lightburn software.
Tutorial #1: User interface and feature walk through
Tutorial #2: Cut settings
LightBurn Basics #1: Importing, selection, grouping, movement
LightBurn Basics #2: Text features and Offsetting
LightBurn Basics #3: Image Trace and Weld
Documentation
You can find the ligthburn documentation here: LightBurn Documentation
will this software work on cutting wood or engraving as well as the laser system
The laser will cut wood that is not super thick and dense. The thinner and less dense you get, the easier it will be to cut. You can cut 1/4″ plywood, but it will take longer than the router on your machine would take, so it is best to use router for plywood cutouts. Things like balsa wood, basswood, cardboard, foam, veneers, and other thin and light items cut very well where the router can’t do a good job.
I love this however I use a sainsmart laser my biggest issue in using lightburn is when I go to run it and I have put in the size it tends to go beyond that point and I have to keep moving the image to get to align
In using Lightburn whenever I type my wood size and apply image to it, I have it in center of the piece but when I run it is way off. What is the best way in making sure the work is center with the size board you are using
Can you use a webcam with the shapeoko and light burn?
As everyone knows, I am a jack of all trades. One of my hobbies is laser carving. Last night my laser went tits up. I called jtechphotonics.com today and explained my problem. Not only did they troubleshoot the problem, but they told me how to fix what was causing the problem on the driver board and even offered to overnight a new laser to me.
This is by no means a paid promotion, but I give credit where credit is due. In my dealings with them, they have been highly professional and respectful and open to suggestions. They are a Texas owned and operated company. If you are looking for a hobby laser or more, look at them. They have my seal of approval.