


We use Universal G Code sender on many of our GRBL machines in the shop. If you have an X Carve or a Shapeoko 3, you will not be able to run your machine in Easel or Carbide Motion without a delay on the laser ON/OFF command. The easiest way to get around this is to use Lightburn or Universal G Code sender to run your machine.
We will show you how to both download and install it on your machine as well as run it. Let’s get started!
Downloading Universal-G-Code-Sender
Using Universal-G-Code-Sender
1.Verify that your Java is up to date (or download current java version)
Please note that the latest version of universal-G-code-sender requires Java 7 or higher. While earlier versions of Universal-G-Code-Sender can be ran on Java 6, Java 7 or higher is recommended.
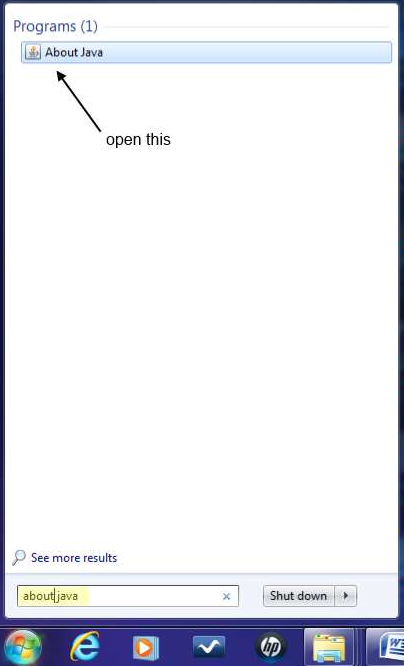
To verify that your java version is up to date open your windows start menu and search “About Java”
NOTE: If no results appear it is likely that you do not have java installed. You should download Java using the link displayed below next to Java’s download page.
Once the window has opened verify that your current java is up to date.
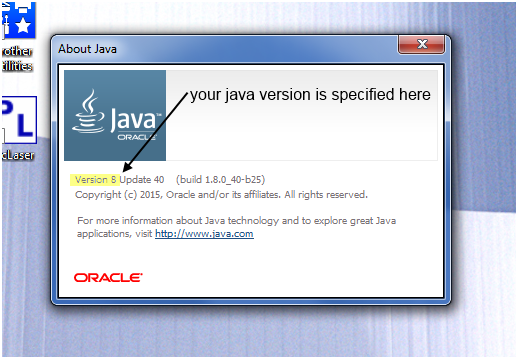
If your version is java 7 or higher you’re ready to install Universal-G-Code-sender. If not you must first download java to your computer. The free downloadable file for Java can be found at the link listed below.
Java’s Download Page: https://java.com/en/download/
2. Downloading Universal-G-Code-Sender.
The free downloadable file for universal G-code sender can be found at the link listed below.
Universal-G-Code-Sender‘s Download Page: https://github.com/winder/Universal-G-Code-Sender
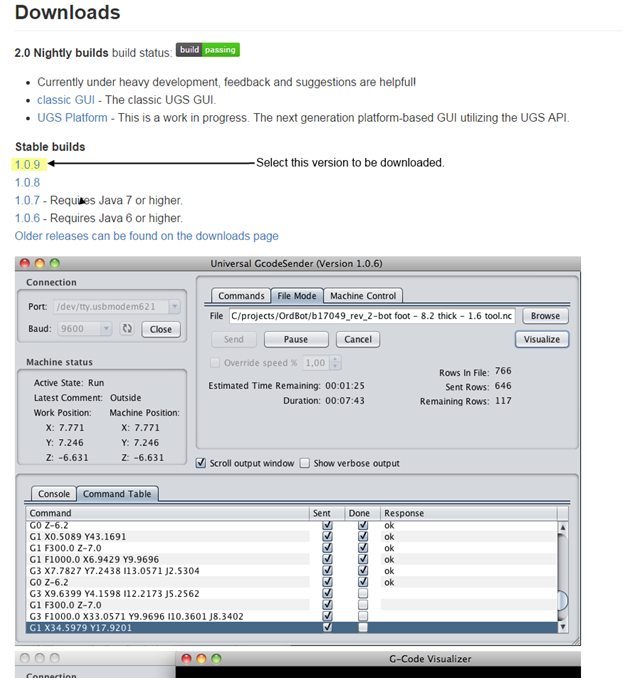
You will not be able to run this software without first having Java installed on your computer (see previous step). Once you’ve opened the page containing the download for universal G-code sender scroll down “stable builds” and select version 1.0.9 to be downloaded.
Opening the file:
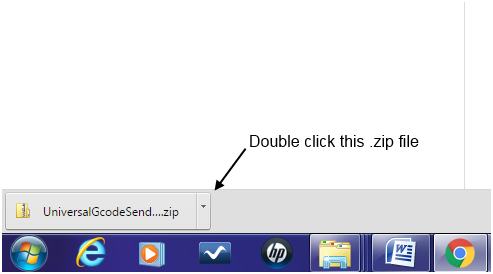
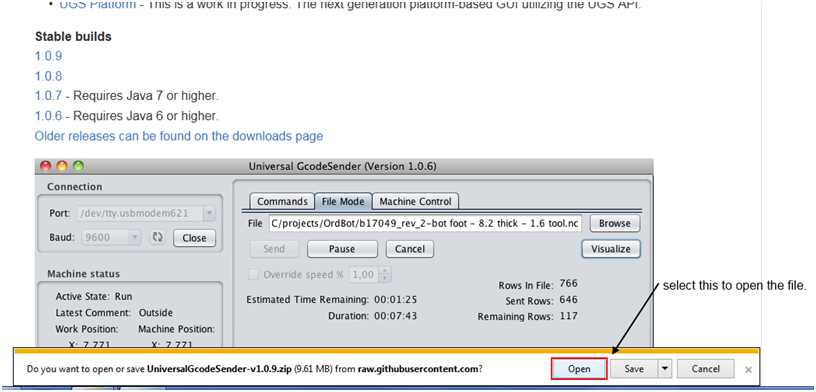
If you are using chrome as your browser the zip file will appear at the bottom of the page. Select this file to be opened.
If you are using Internet Explorer the process is very much the same, but the browser displays the file differently. Select and open the file.
Once you have opened the zip file on your computer you must then extract the files by clicking “Extract all”.
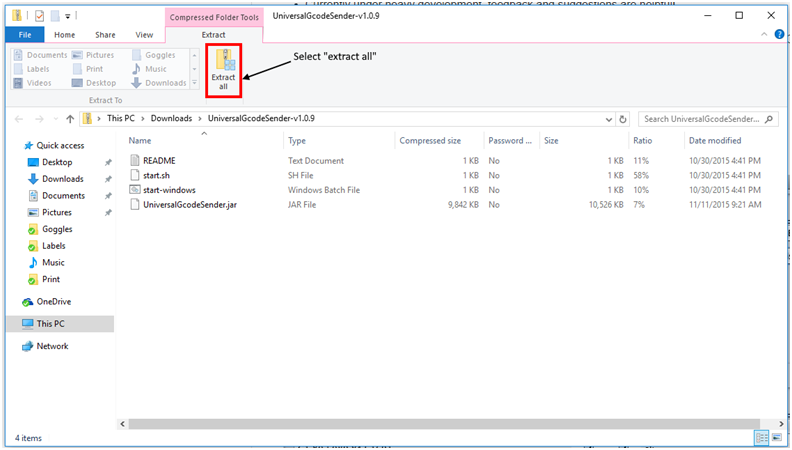
As shown below Windows 7 will have a slightly different page layout than windows 10. Select “Extract all files” for the file to be extracted to your computer.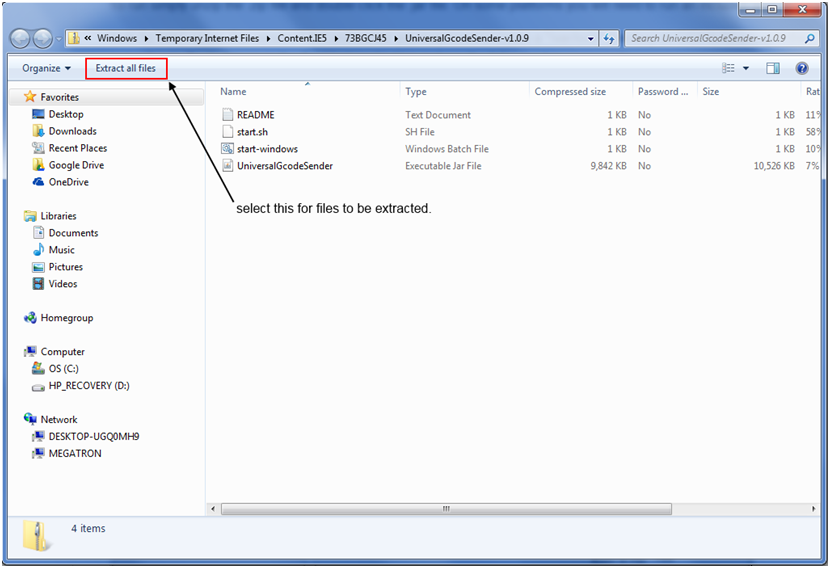
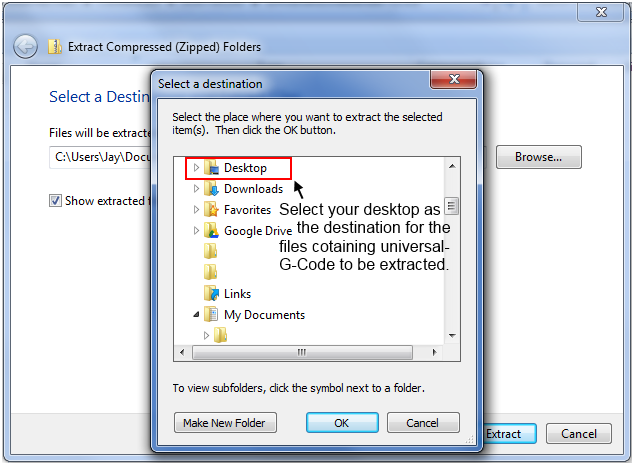
Before the file can be Extracted to your computer you must first select a destination for it. It is convenient for the file to be placed on the desktop for ease of access.
Select browse to open your computers library.
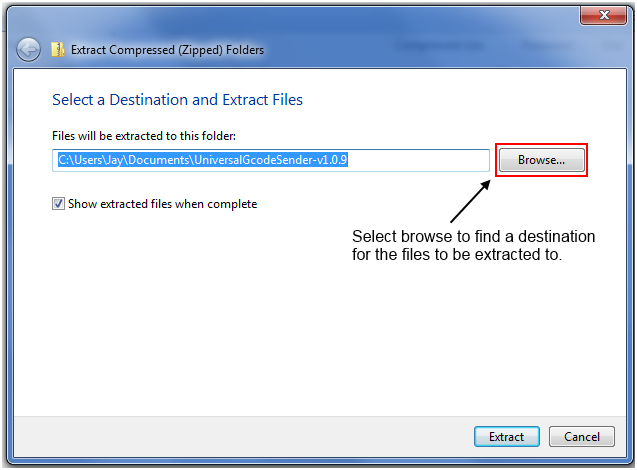
Select your desktop as the destination for you files to be extracted. By doing this your file (universal-G-code sender) will appear as a clickable icon on your desktop.
Once the proper destination has been selected you may place the files by clicking “Extract”.

Now that the files have been extracted to your desktop successfully you may close out your previous windows.
3. Using Universal-G-Code-Sender
UGS (Universal-G-Code-Sender) is an application used to send commands from your computer to your machine. In this tutorial we will discuss the basics of UGS necessary for the operation of your machine.
IMPORTANT: While UGS is an excellent means of sending commands to your machine it is not meant to create G-code or turn images into commands that your machine will understand and replicate. Creating the G-code (a language in which people tell computerized machine tools how to make something) can be done using software such as Inkscape, Laser Etch, Pic Laser, etcetera. Once the G-code has been created it may then be sent to your machine using UGS.
To begin using Universal-G-Code-Sender you must first open the application by double clicking its icon on your desktop. If you do not have UGS see download instructions.
![]()
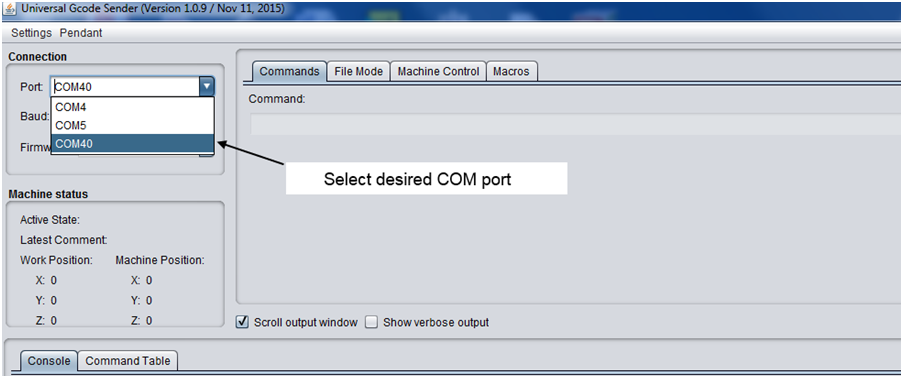
Once the window has opened select the com port for your machine. This is the communication interface for your machine and your computer.
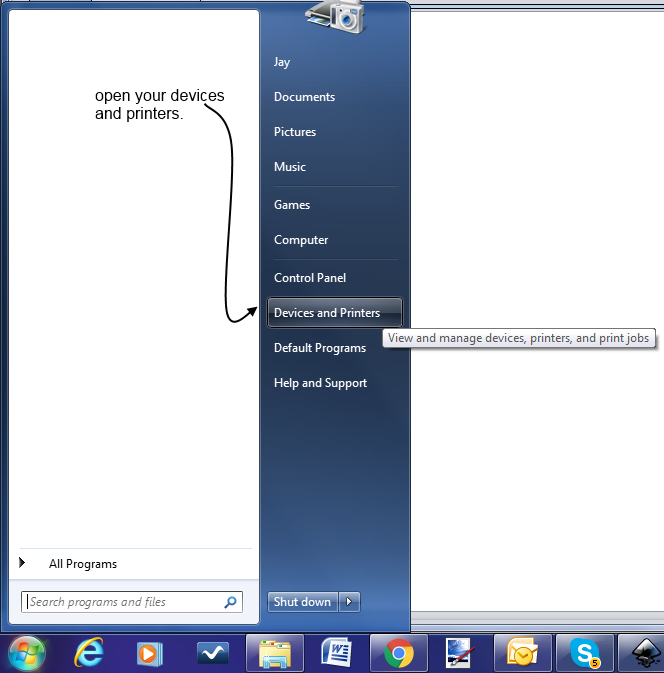
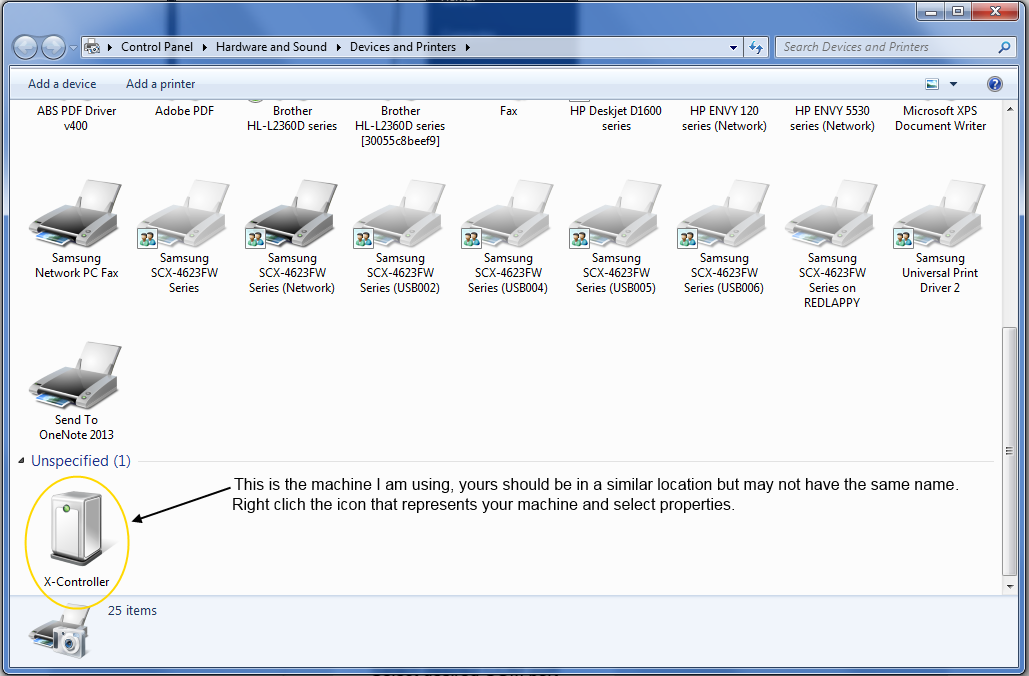
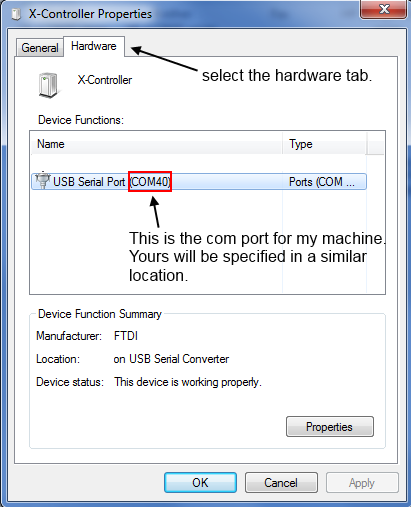
To find the desired com port for your machine select Windows “start” then select “devices and printers”. Right click the image representing your device and select “properties” on properties select the “hardware” tab and your devices COM port will be listed under “device functions” (COM#)
Scroll through your devices and identify the icon that represents your machine.
Once you’ve opened the properties window you can identify which com port is used to communicate with your machine.
As shown below we are selecting the com port that corresponds with our machine.
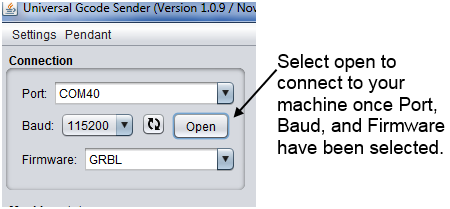
For our purposes the firmware should be set to GRBL and the baud rate should be 115200.

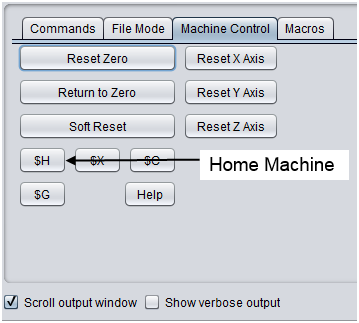
In the tabs select “machine control” to open the manual control interface.
WARNING: when your machine is told to “home” it will travel in every axis until it has reached an end stop. Be certain that your end stops are functioning and be prepared to turn off your machine quickly to avoid damaging any hardware.
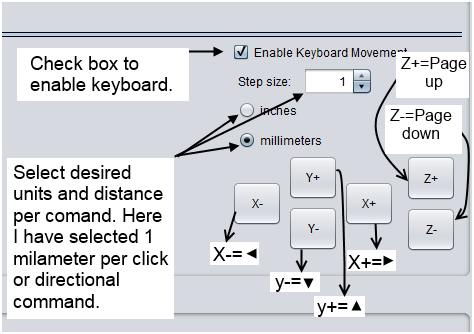
Below is the UGS machine control tab. Once you have checked the box labeled “Enable Keyboard Movement” you will be able to jog (move machine using manual operation) your machine in each axis using the corresponding keyboard commands.
Note: If you do not have limit switches on your machine, then just press the “$X” button to remove the lock on the machine and put the status to green.
Manual Jogging:
Note: While changing the step size and units in this interface will affect commands that are sent manually, this will not change the way that jobs are ran on the machine.
The picture below displays the manual controls for you machine and the keyboard commands that can be used in place of clicking these commands.
Now that we have discussed simple jogging commands and homing your machine you should be able to place the tool wherever you choose.
You will need to adjust the Z axis so that your laser tool is positioned above the material you wish to engrave or cut at the correct distance for your laser. The lasers come Pre Focused from the base of the heatsink to the work surface:
1W 405nm Laser : 3″
2W 445nm Laser: 3″
2.8W 445nm Laser: 3″
3.8W 445nm Laser: 1.5″
If you have moved the lens or want it lower focus, then follow the instructions located here:
Note: When focusing you will need to turn your laser on using the “command” tab. In the newer versions of GRBL (1.0C, 1.1F) you will need to put your machine into the correct mode for the laser to turn on. There are now two modes in the new version of GRBL:
Spindle Mode: ($32 = 0) Motion will pause for every spindle state change. Default Max RPM value ($30 = 12000)
Laser Mode: ($32 = 1) Motion will not pause for spindle state change on G1 commands. Default Max RPM value should be ($30 = 255)
If you press “$$” you will see your settings. Make sure you have the following:
$30 = 255
$31 = 0
$32 = 1
If you don’t have this, then change them by sending the correct value, like “$30 = 255”.
Depending on which mode you are in you may need to give a “G1 F4000” command to put the machine into the G1 mode of operation. In laser mode this is the only way to send a command to turn the laser on. When you jog in UGS it will use the G0 command to move the machine and thus the laser will not turn on in this mode. Setting it to G1 with a feedrate (we chose 4000 in this case) will allow for you to then send the next command to turn it on. You can then send “M03 S10” to turn it on in low power. Make sure you have it in laser mode and your max RPM value is 255 for this to work.
An easy trick is to put in a macro under the “Macros” tab. We put in two macros. One to turn on the laser in low power and one to turn it off. In the Macros tab put in:
- G1 F4000 M03 S10
- M05
You will now have two buttons to turn on and off the laser. Click the first one to turn the laser on low power. Click the second to turn it off.
For more information on the new version of GRBL and laser mode, check it out here: https://github.com/gnea/grbl/wiki/Grbl-v1.1-Laser-Mode
After your Z axis has been adjusted to the proper position you may begin jogging the X and Y axis of your machine to the desired location. The location of your X and Y axis is up to your discretion, just make sure that your gantry is free of obstruction and has ample room on the job table to perform your desired task. Once a suitable position has been found you may set your machines Zero location.
Note: While a machines home position is its position in regards to its end stops the Zero location is the starting point for the machine to perform a task.
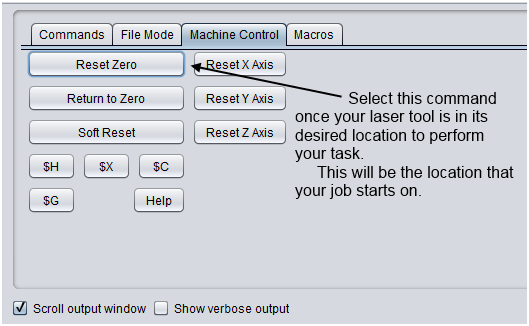
When you have set your machines Zero location your X, Y, and Z axis should read zero if no movement from this position has been made. By selecting return to zero your machines gantry will return to this exact location from wherever it is on the job table.
Now that your machine has been zeroed it is time to perform a job using your machine.
Creating a Folder for your G-code
Now we will create a file location for your G-code. This will be the location that you will save all of your G-code for use with your machine.
IMPORTANT: Without a file location you will not be able to store G-code files that you have created for your machine or send G-code files to your machine. Every job that your machine performs is a G-code file. A G-code file is a set of directional commands for each axis as well as spindle (or laser) on/off and power control (for RPMs of you spindle or watt output of your laser) commands.
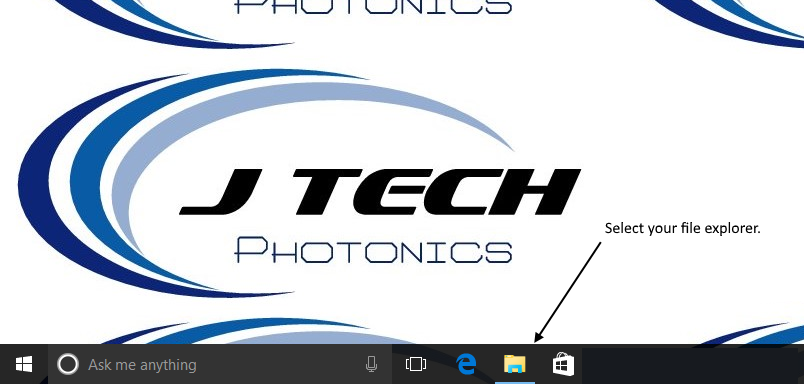
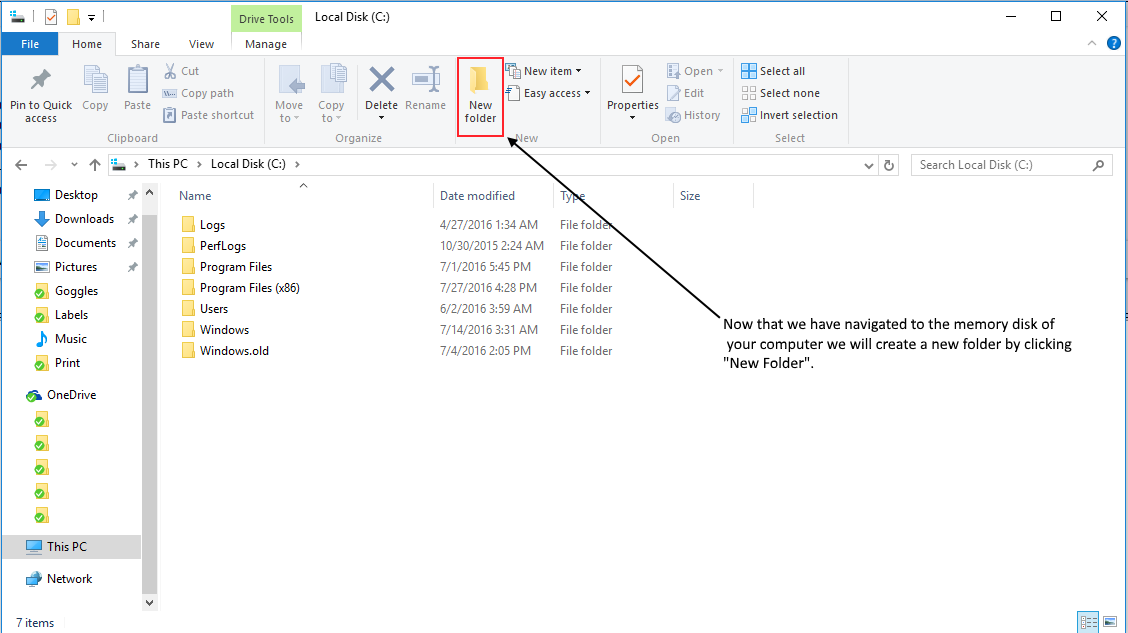
By selecting the file explorer or library you will be opening a vast list of files or storage areas. To be certain that you are creating a File that is accessible on your computer we will first select “Computer” “My Computer” “This PC” or whichever has a picture of a computer on it (not with a globe). Once you have located your computers local storage area we will select a device to create a folder on. Remember this location! For the folder we created I’ve selected “This PC” and local disk (C:)
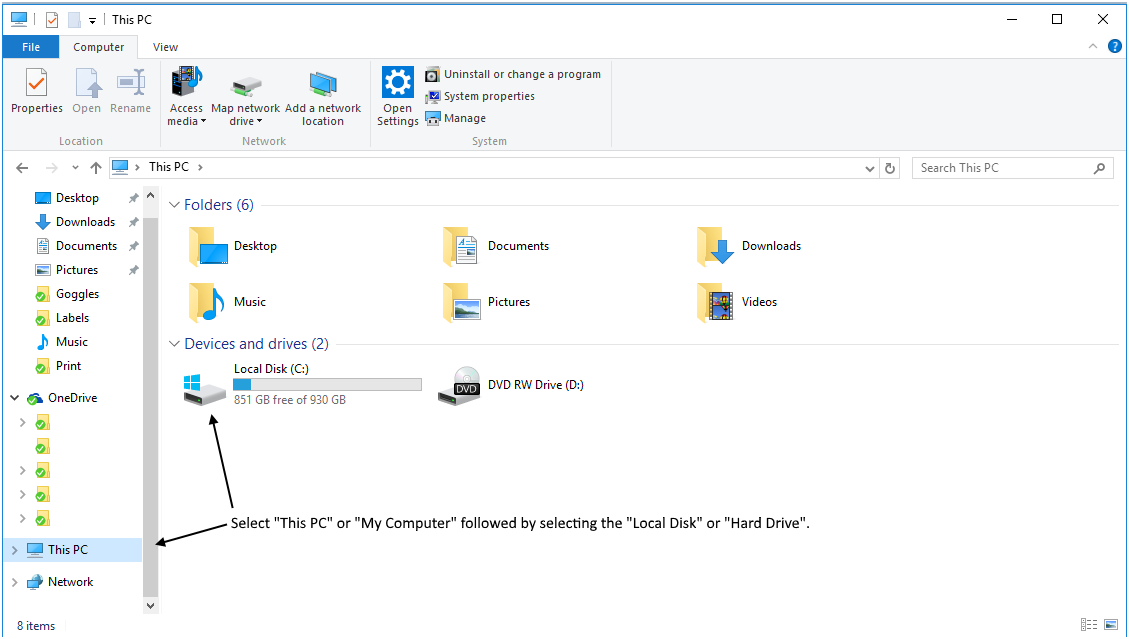
By doing this you are creating a location to store your G-code files.
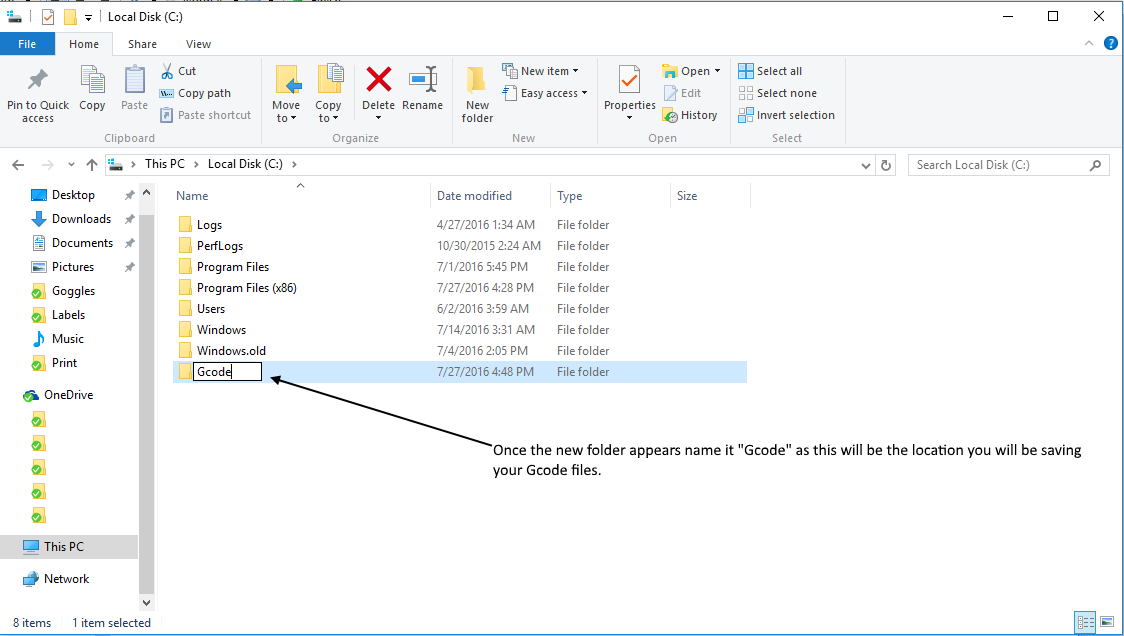
Since this will be the location that we store our G-code files we will name this folder “Gcode” and click elsewhere on the screen to deselect the folder. You now have an empty folder on your computer to place G-code files for later use.
We have prepared a simple G-code file for your machine using Inkscape. A detailed instruction tutorial on using inkscape is located here:
For this tutorial you can click on this file:
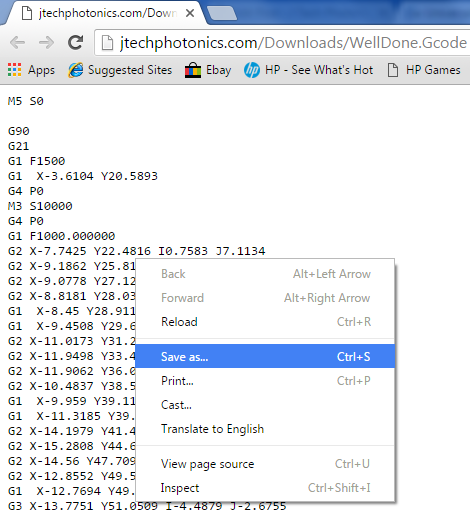
This link will open a page displaying a G-code file. This is the coded commands that will be sent to your machine.
Once the page has been opened, right click the document shown and select “save as…”
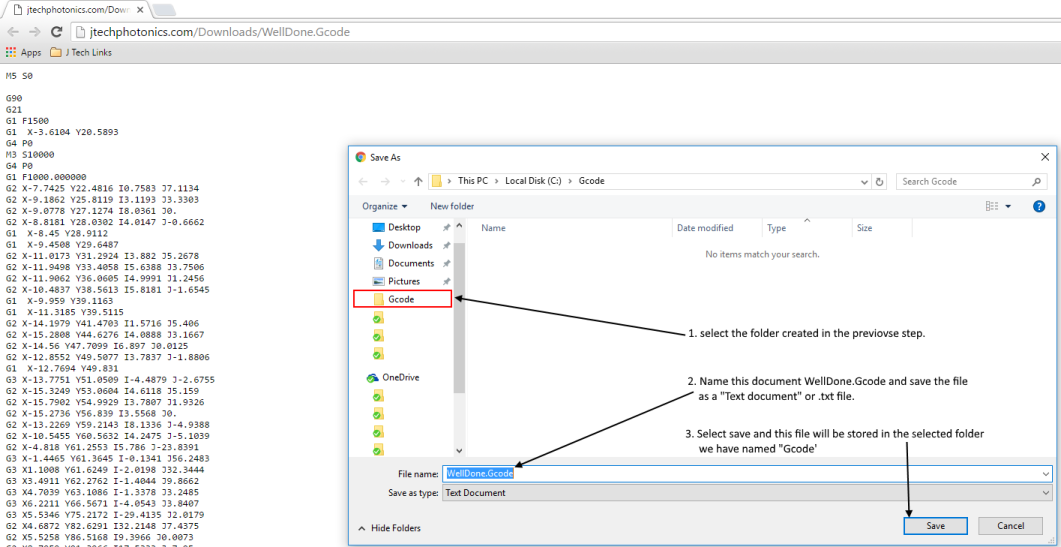
Save the file from the page in the “Gcode” folder we previously created
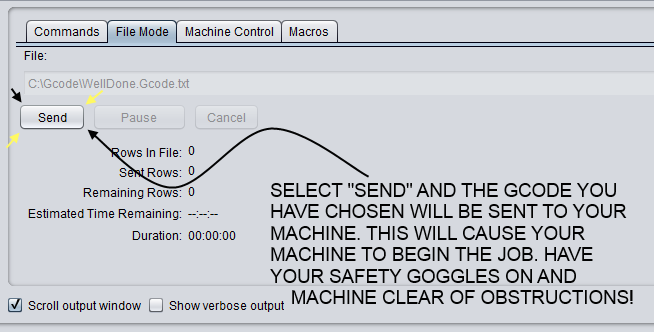
After opening UGS connecting your machine and preparing it for a job as shown previously you may access file mode on UGS by clicking the tab as shown below.

Once in file mode you will select browse to search your computer for the file saved in the “Gcode” folder we have created
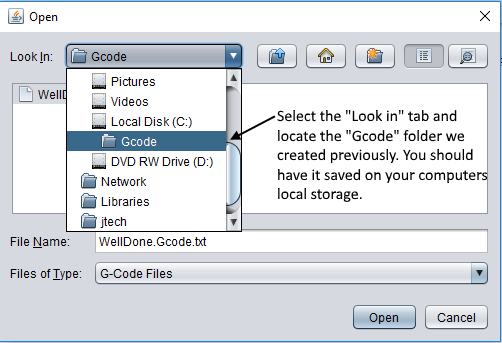
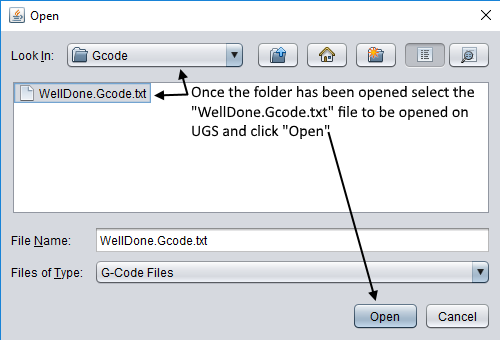
Select the “WellDone.Gcode.txt” file that you saved in the “Gcode” folder and Open it.
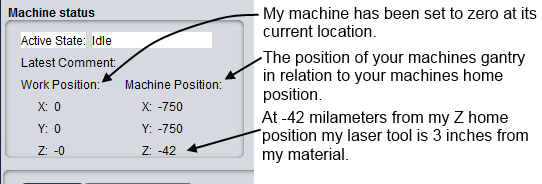
Once the file has been opened on UGS and your machines zero has been set with the laser tool three inches above the material you wish to engrave you may send the file.
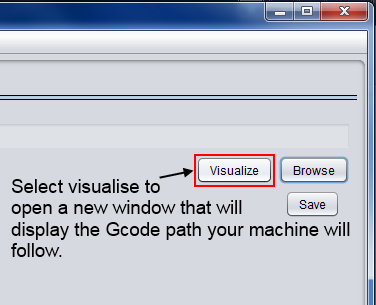
Select visualize to view the G-code that will be sent to your machine.
Warning: When the file is sent to you machine and the laser driver is switched to pwm mode ready to receive commands the laser will turn on. please wear your safety goggles while operating the laser. Direct exposure to the beam can blind you in an instant!
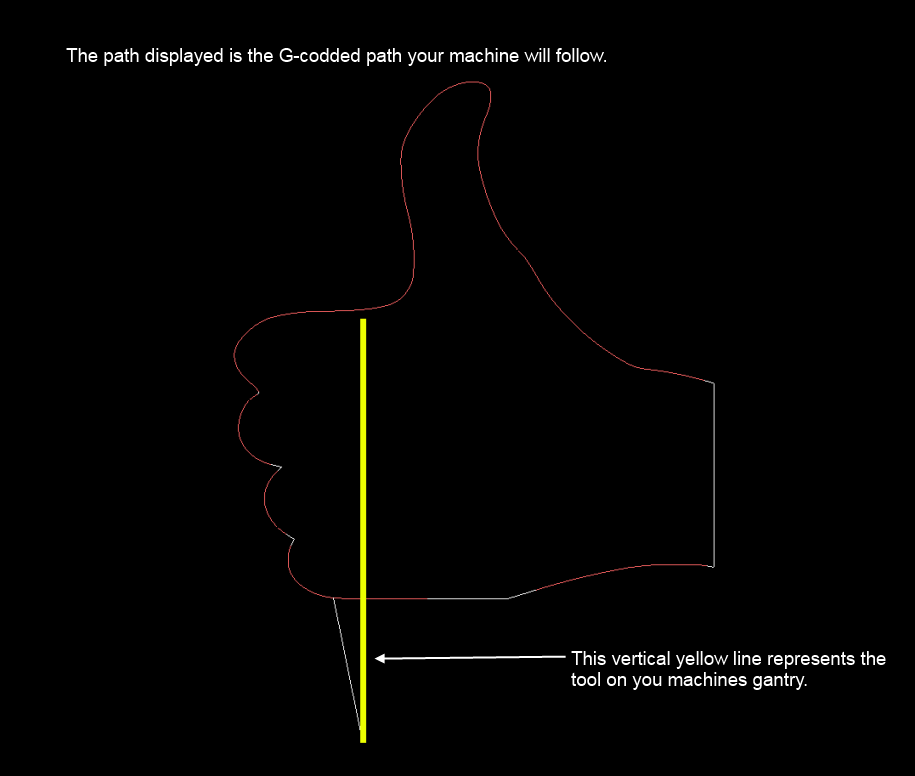
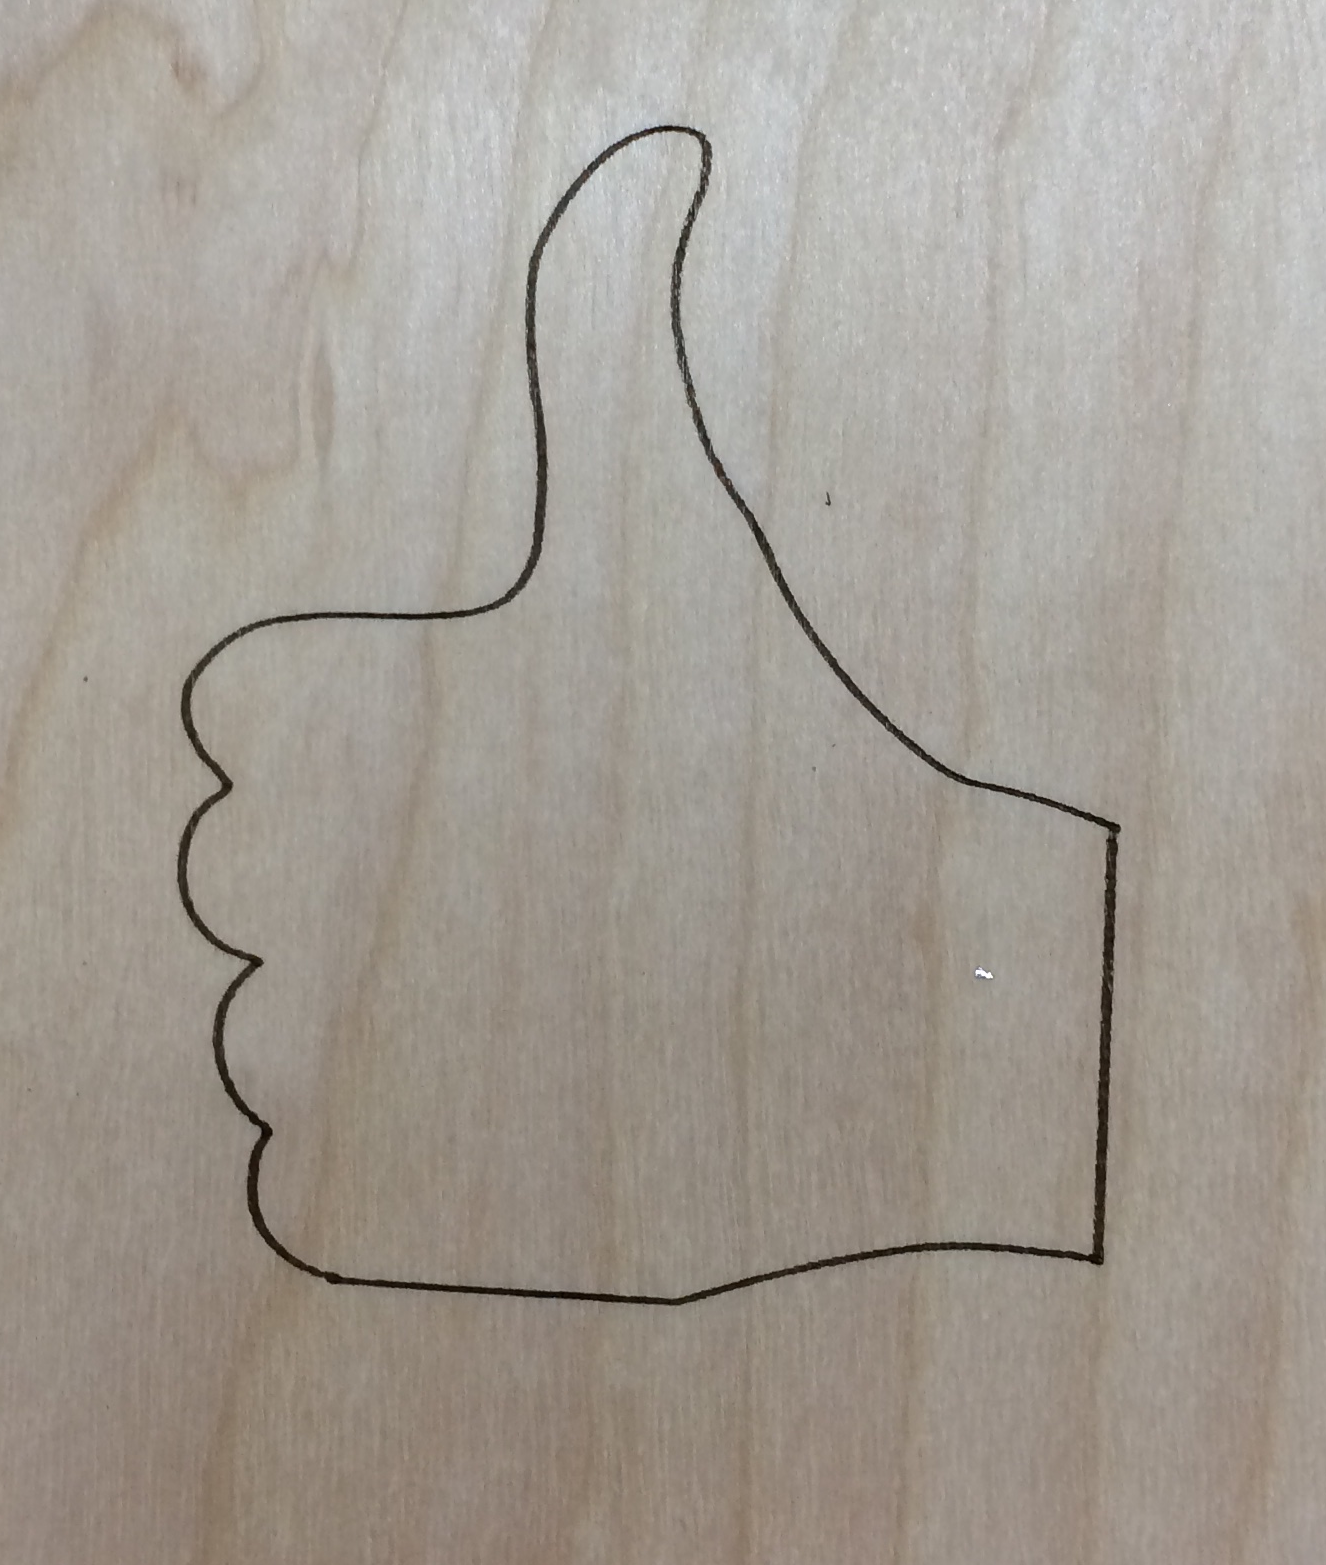
If everything was done as instructed your machine should have engraved a thumbs up much like the one shown below!
Although I have router spindle rather than a laser, it made no difference; this article was clear and concise in showing the basics of UGS. Thank you.
En joyed your vedio. I am having many problems getting my GCS to run my steppers. At present I am trying to jog the X Y Z axes. I get the message “GRBEL is ot finished downloading”. Can you help me? Thank you
Make sure you have the correct COM port selected and the correct baud rate. Try increasing the baud rate until you don’t get the message anymore.
Hello. I do not have limits switches yet. Is that why when i try to plot, the steppers go wild and fast as if my drawing mesures 4 feet x 4 feet instead of 6″x6″ ? How can i tell Universalcodesender that my tray mesures 8″x8″ ?
I was wondering if UGS should work on Windows 10. Before, I used UGS on windows 8 and it is really a fantastic program. I bought a new pc however (Acer Aspire E-17 with core i7) and now everything except the Visualize button works fine.
The message I get is that it is not able to find the OpenGL driver: “Can’t find the name of Intel ICD OpenGL driver”.
It seems that it is trying to get its opengl for core i5, this is what I can see when I launch the java jar file from a command window: it shows a number of error messages referring to corei5 libraries that it cannot find. Please help, because I really treasure this ingenious UGS program!
My 1500×1500 OOZnest has been working great for the past 6 months. Today, a weird little gremlin popped up on my Universal Gcode Sender screen. When I open up the command window, I get many lines of non-stop, repeating question marks. I’ve tried rebooting the software, rebooting the computer, disconnecting and reconnecting the USB cable from the computer to the Xpro board, resetting the commands and re-entering all the settings as indicated in the OOZnest manual. I also dumped the UGS and reloaded it on my computer but I still get the repeating lines of question marks. They stop repeating as soon as I close the commands tab on UGS.
I opened up the machine controls tab and entered 10 mm x,y, and z movements and they seem to operate the gantry controls properly, but I’m hesitant to do any cutting with this gremlin lurking around in my machine. I’ve attached a screen capture. Any suggestions would be greatly appreciated.
[
Thanx for your tutorial,
but i have a problem,…
it just crashes immediately after connect
i have java installed on 64bit windows 10
Is possible save a current work gcode file to continue in next day ??
UGS will not connect, says port is busy. what now, can’t find trouble shooting anywhere.
I have a 3018 Pro and my grbl code $30 $31 $32 are missing from the firmware settings. so i cant seem to add it to or import to ugs. Everything else works. Just the spindle wont work and laser will come on only manually. the cnc board is not Arduino that i know of .
Do you know were i can get a copy. Everywhere shows Arduino flash. can you please help me.
Thanks in advance.