

Using the Inkscape Laser Tool Plug-In
You can get the newest version of the Inkscape tool at our Github website here or in the Download link below:

Download Newest Version
This version of the laser tool works with current stable version 1.4.2 of Inkscape (as of 7-10-2025).
Legacy Versions of the Plugin can be found here:
Overview
The new plug-in allows for multiple commands for laser on and off for all the different versions of printers as well as the ability for multiple passes for cutting. Here is a description of the features of the plug-in.
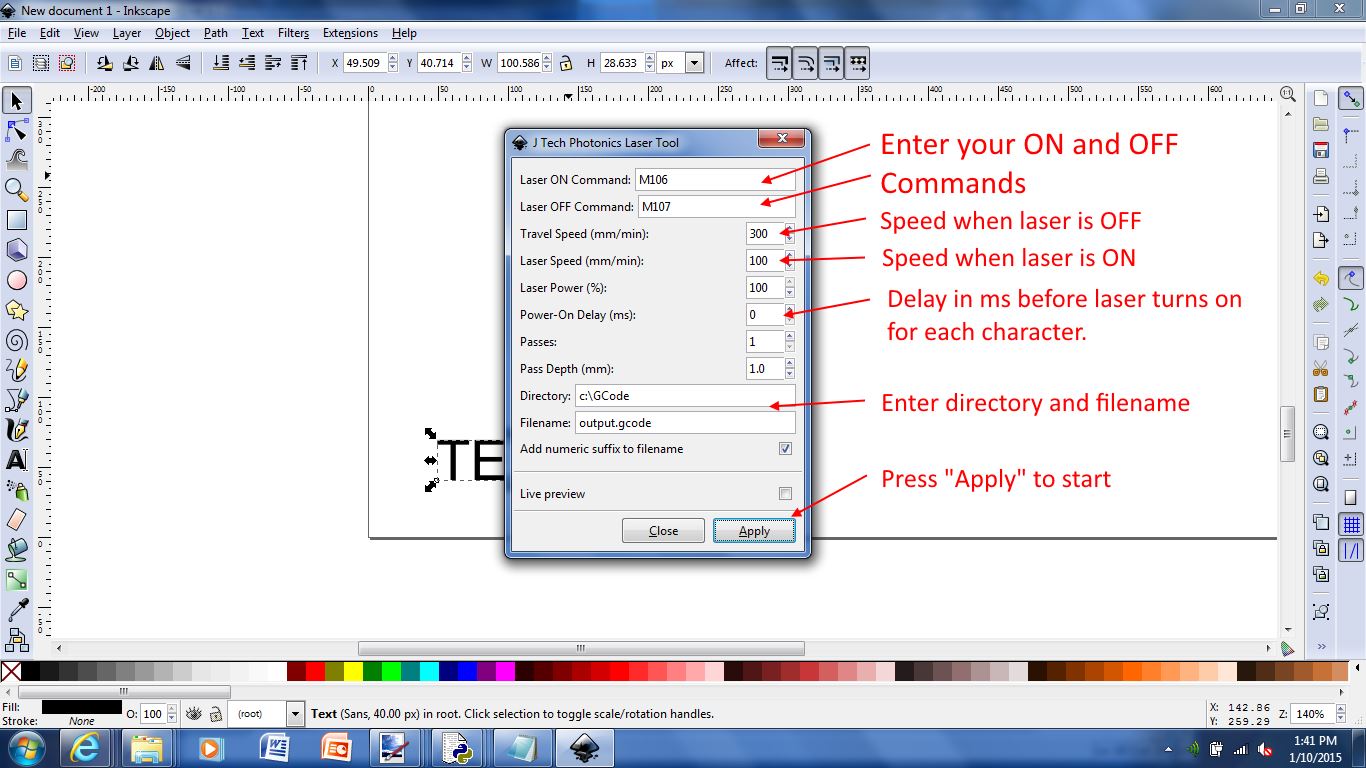
Important Settings Tab
- Unit of Measurement: Choose either mm or inches. Default page in Inkscape is mm.
- Travel Speed: The speed of the machine when the laser is OFF in mm/min.
- Cutting Speed: The speed of the machine when the laser is ON in mm/min.
- Passes: If cutting, this will repeat the entire path by the number of passes. If engraving leave as 1.
- Pass Depth: This will move Z axis down by this amount for each pass. For example, 3mm piece of material with 3 passes might use 1mm per pass to cut all the way through.
- Output Directory: Directory to store the G Code File.
- Filename: Name for the output file.
- Add Numeric Suffix to Filename: Allows you to use the same filename for multiple files by adding a number to it.
- Live preview: Shows the output drawing live when you make changes to the plugin settings. If you check this it might make the plugin slower.

Advanced Settings Tab
- Tool Power Command: This is the command to turn on your laser. If you are using a CNC machine firmware, then use M3 S1000 for full power. 50% power would be M3 S500. If you are using a 3D printer firmware, then it would be M106 S255 for full power.
- Tool Off Command: For CNC machines it is either M5 or S0. For 3D printers, it is M107.
- Dwell Time Before Moving: In some cases for cutting you want to sit for a short time before moving to heat up the material. This is the time in ms.
- Debug Settings: This is the scale and width for the drawing that appears after you hit apply.

Custom Header and Footer Tab
- Header/Footer Filepath: This allows you to make a customer header and footer to include extra gcode. It is not necessary in most cases.
- Set Z Axis Position/Start Position: Selecting this will enable the Z to be set at start. Put in the absolute position you want it to be.
- Move to Origin When Done: This will move the laser back to 0,0 when completed.
- Turn Laser Off Before a Job: This makes sure the laser is off at the beginning of the file.
- Turn Laser Off After a Job: This will make sure the laser command for Off is at the end of the file.

Coordinate System Tab
- Machine Origin: Selects where the 0,0 starting position will be located. Choose bottom left, center, or top left.
- Invert Y Axis: This will invert the direction of the Y Axis.
- Bed Width/Length: Make this the size of your machine bed. We normally match this to the sheet size in Inkscape.
- Gcode X/Y Offset: This will offset the output G Code by this setting. Offsets are always calculated from the top left of the sheet.
- Gcode Scaling Factor: Scales the size of the output by this number.

Tutorial
This tutorial will go over how to create drawings and text in inkscape and then create the G Code file needed to run on your 3D printer or CNC machine. We will cover a couple of common items that you can do in inkscape and then use with your laser. Most of these examples can still work with the newer versions, there might be some things that are not exactly the same as these tutorials. We will make new videos for the updated plugin to fill the example space here in the future.
Drawing Text for cutting/engraving
Drawing Objects for cutting/engraving
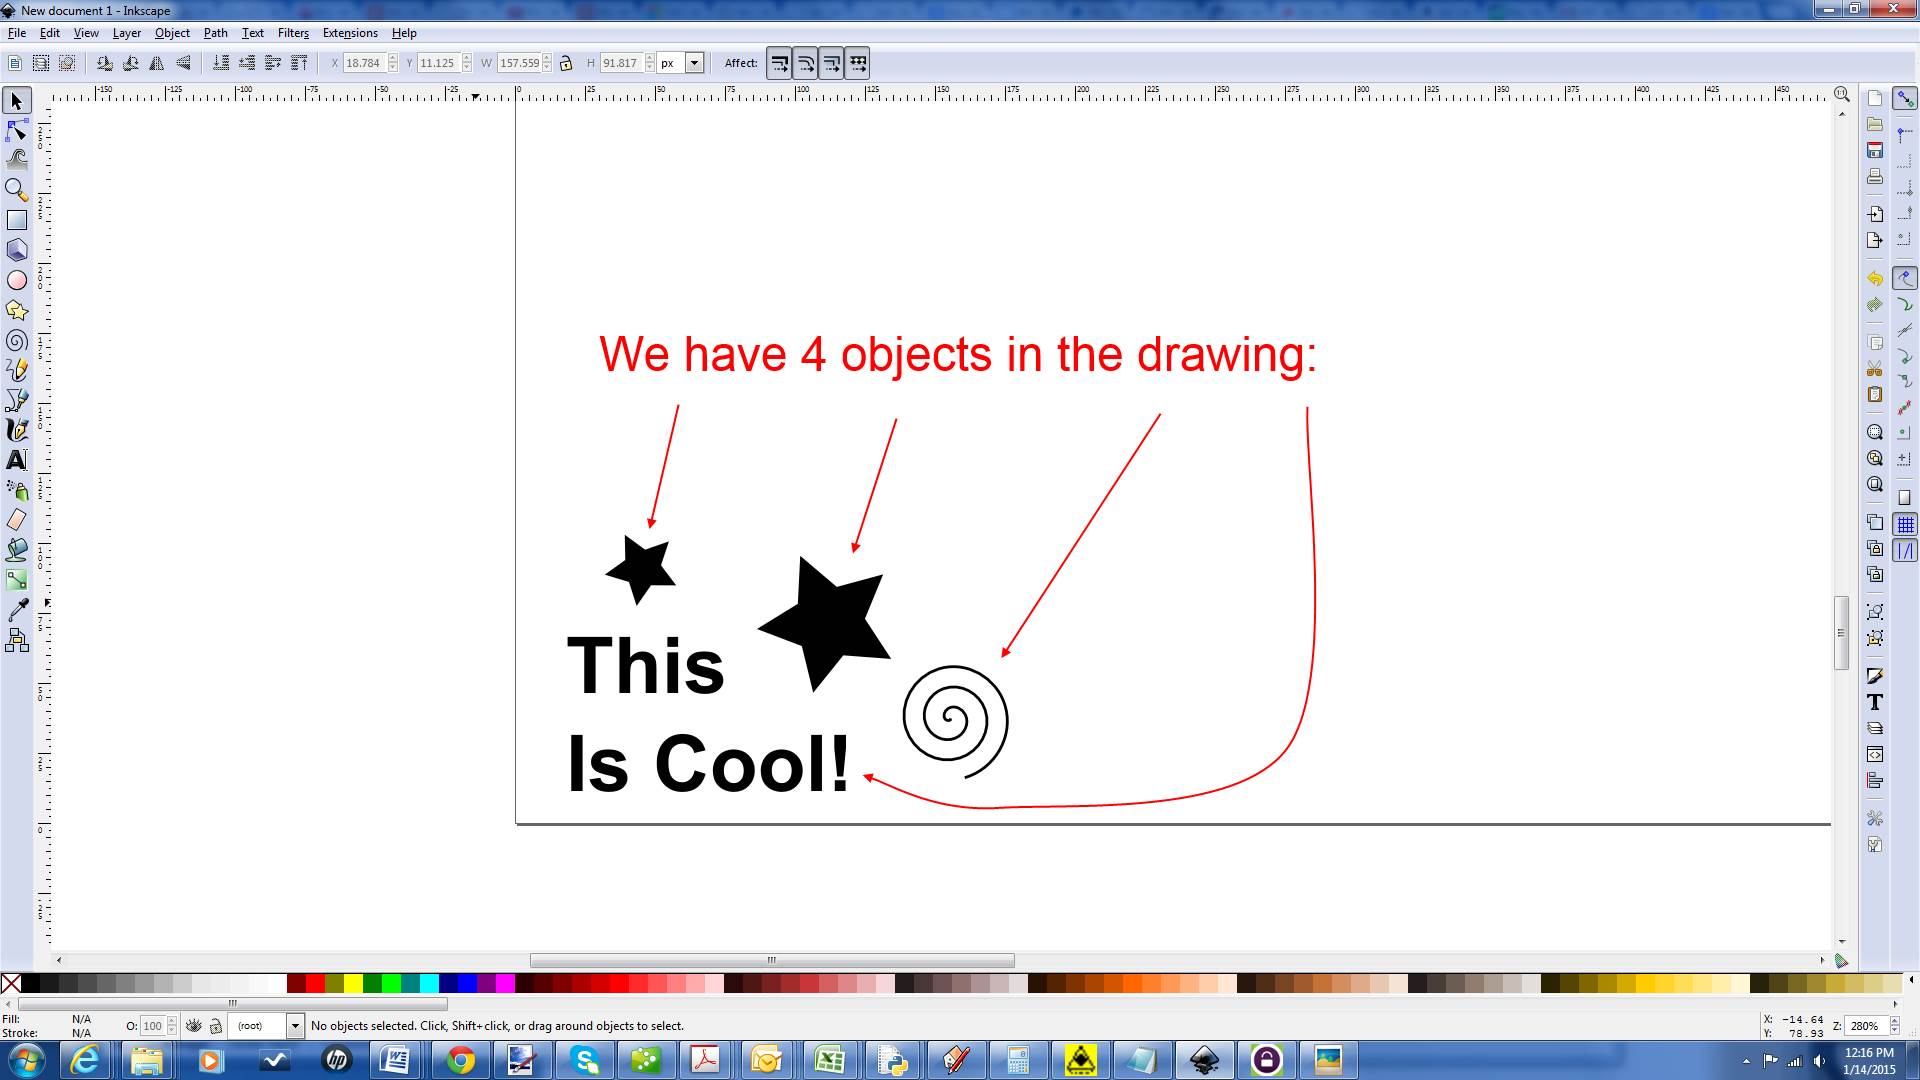
Drawing Multiple Objects for cutting/engraving
Importing Pictures or Images for cutting/engraving
Creating C Gode for Engraving and Cutting on the Same Drawing
Legacy 0.92 Laser Plugin Version Overview
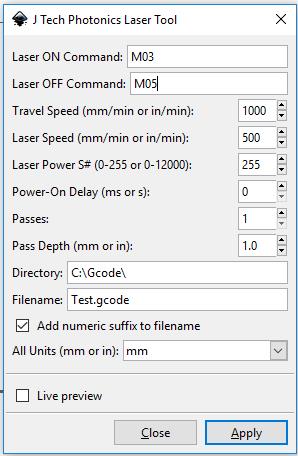
- Unit of Measurement: Choose either mm or inches. Default of Inkscape is mm.
- Laser ON Command: The command for turning ON the laser. For example, M03 or M106.
- Laser OFF Command: The command for turning OFF the laser. For example, M05 or M107.
- Travel Speed: The speed of the machine when the laser is OFF in mm/min.
- Cutting Speed: The speed of the machine when the laser is ON in mm/min.
- Laser Power: If you have PWM control, then you can adjust this. For J Tech firmware and most 3D printers use a number between 0 and 255 (255 being full power). For GRBL 0.9 and 1 standard, use a number between 0 and 12000 (12000 being full power). If you don’t have PWM, keep at max power (either 255 or 12000).
- Power On Delay: This will turn on the laser and wait to move until the delay is complete. It is used to heat up the material and initiate the burning process. Delay in ms for 3D printers and seconds for GRBL.
- Passes: If cutting, this will repeat the entire path by the number of passes. If engraving leave as 1.
- Pass Depth: This will move Z axis down by this amount for each pass. For example, 3mm piece of material with 3 passes might use 1mm per pass to cut all the way through.
- Directory: The directory to store the file.
- Filename: Name of the file.
- Add numeric suffix to filename: Adds a number to the name in case there already is a file with the same name in the directory.
- All Units: Change the units to either mm or inches. This will make everything in inches or mm.
- Live preview: Shows the path being generated.
- Apply: Click to run the converter.
*We change the look of the plugin sometimes, so the pictures of the plugin might be slightly different. This overview section will always have the newest plugin explanations.
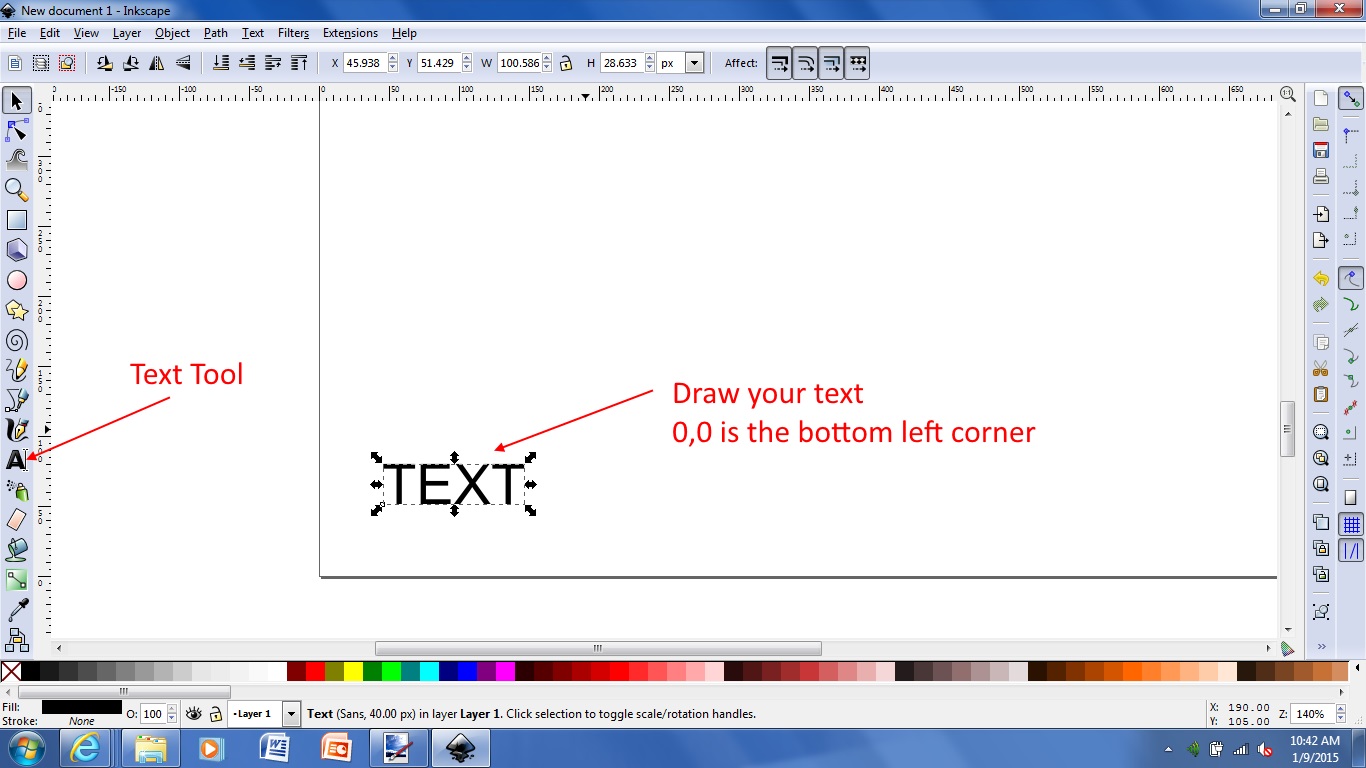
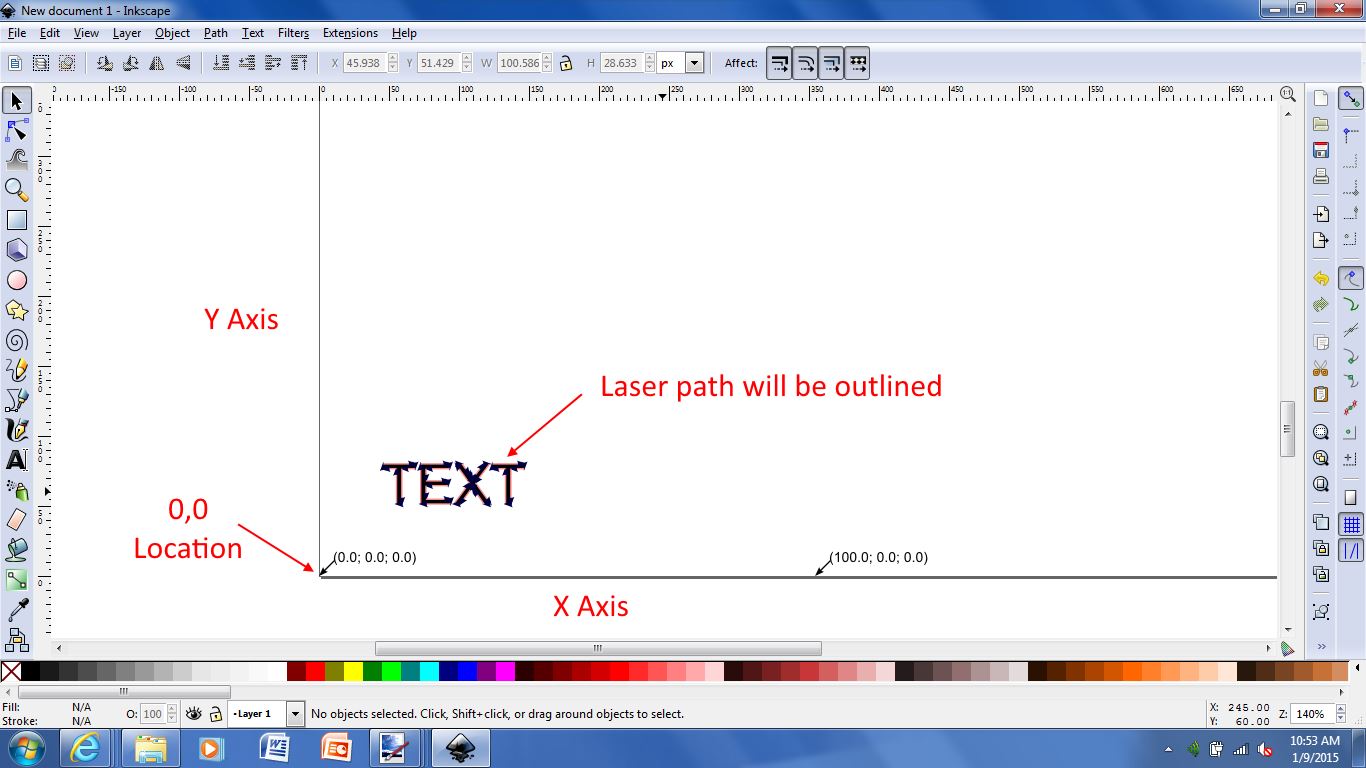
Drawing Text
Engraving text into materials is a very common need for the laser upgrade. Here is how to accomplish this.
Step 1: Use the TEXT tool in inkscape to draw your text. The bottom left corner is you 0,0 location of you machine.
Step 2: You need to convert the object into a path. All items drawn in inkscape are a vector object. You can convert them into a “path” that will actually “draw” the object. The laser then takes this path to generate the G Code.
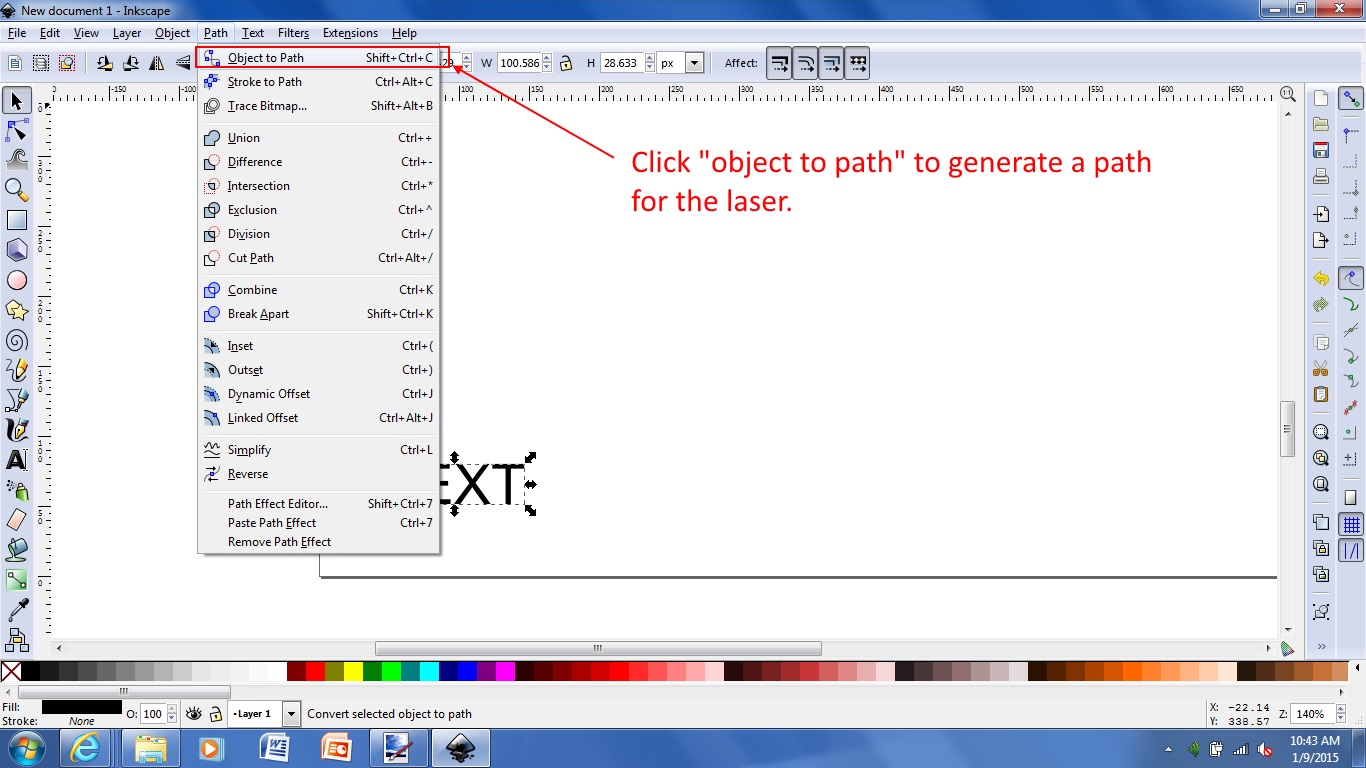
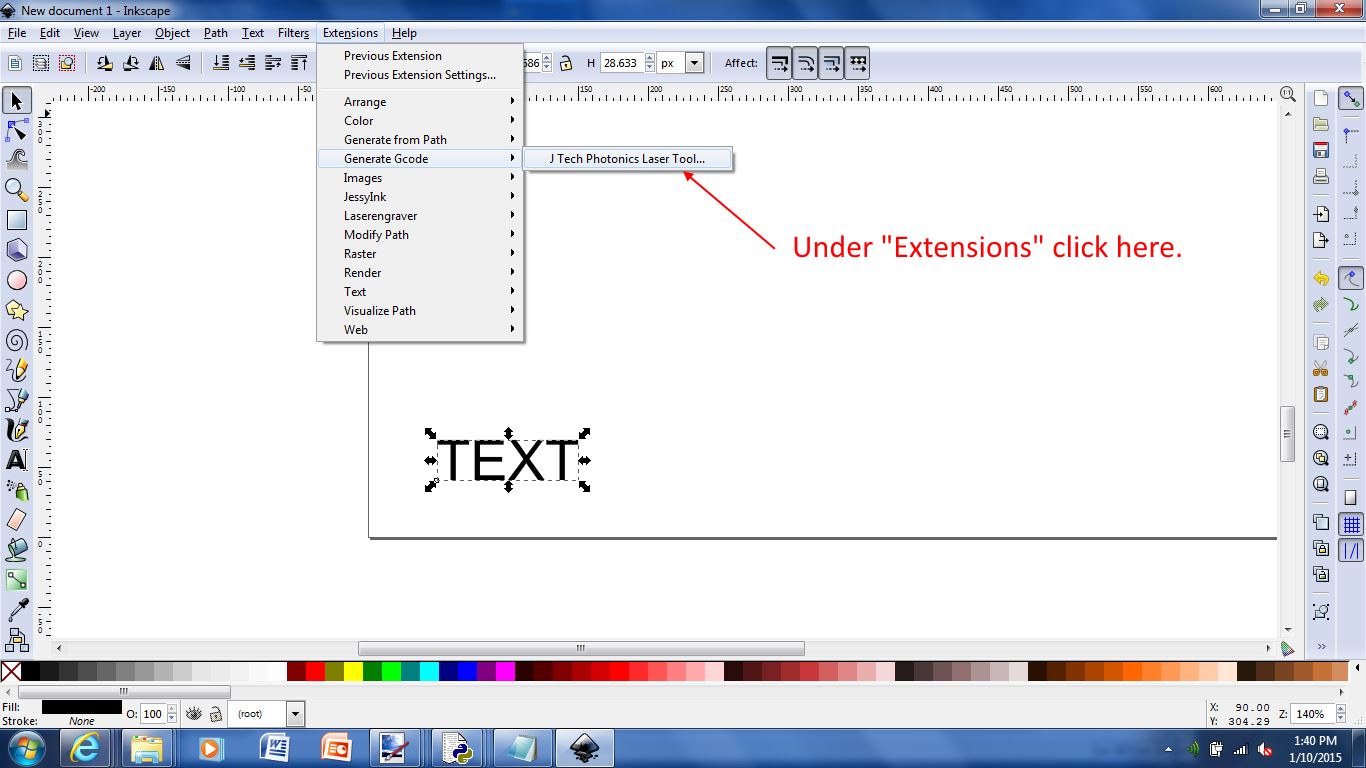
Step 3: Under “Extensions” click on “Generate G Code” and “J Tech Photonics Laser Tool.
Step 4: Fill out the Laser Tool Dialog. For more information on the specific items click here.
Step 5: When finished filling out the form, click APPLY to start.

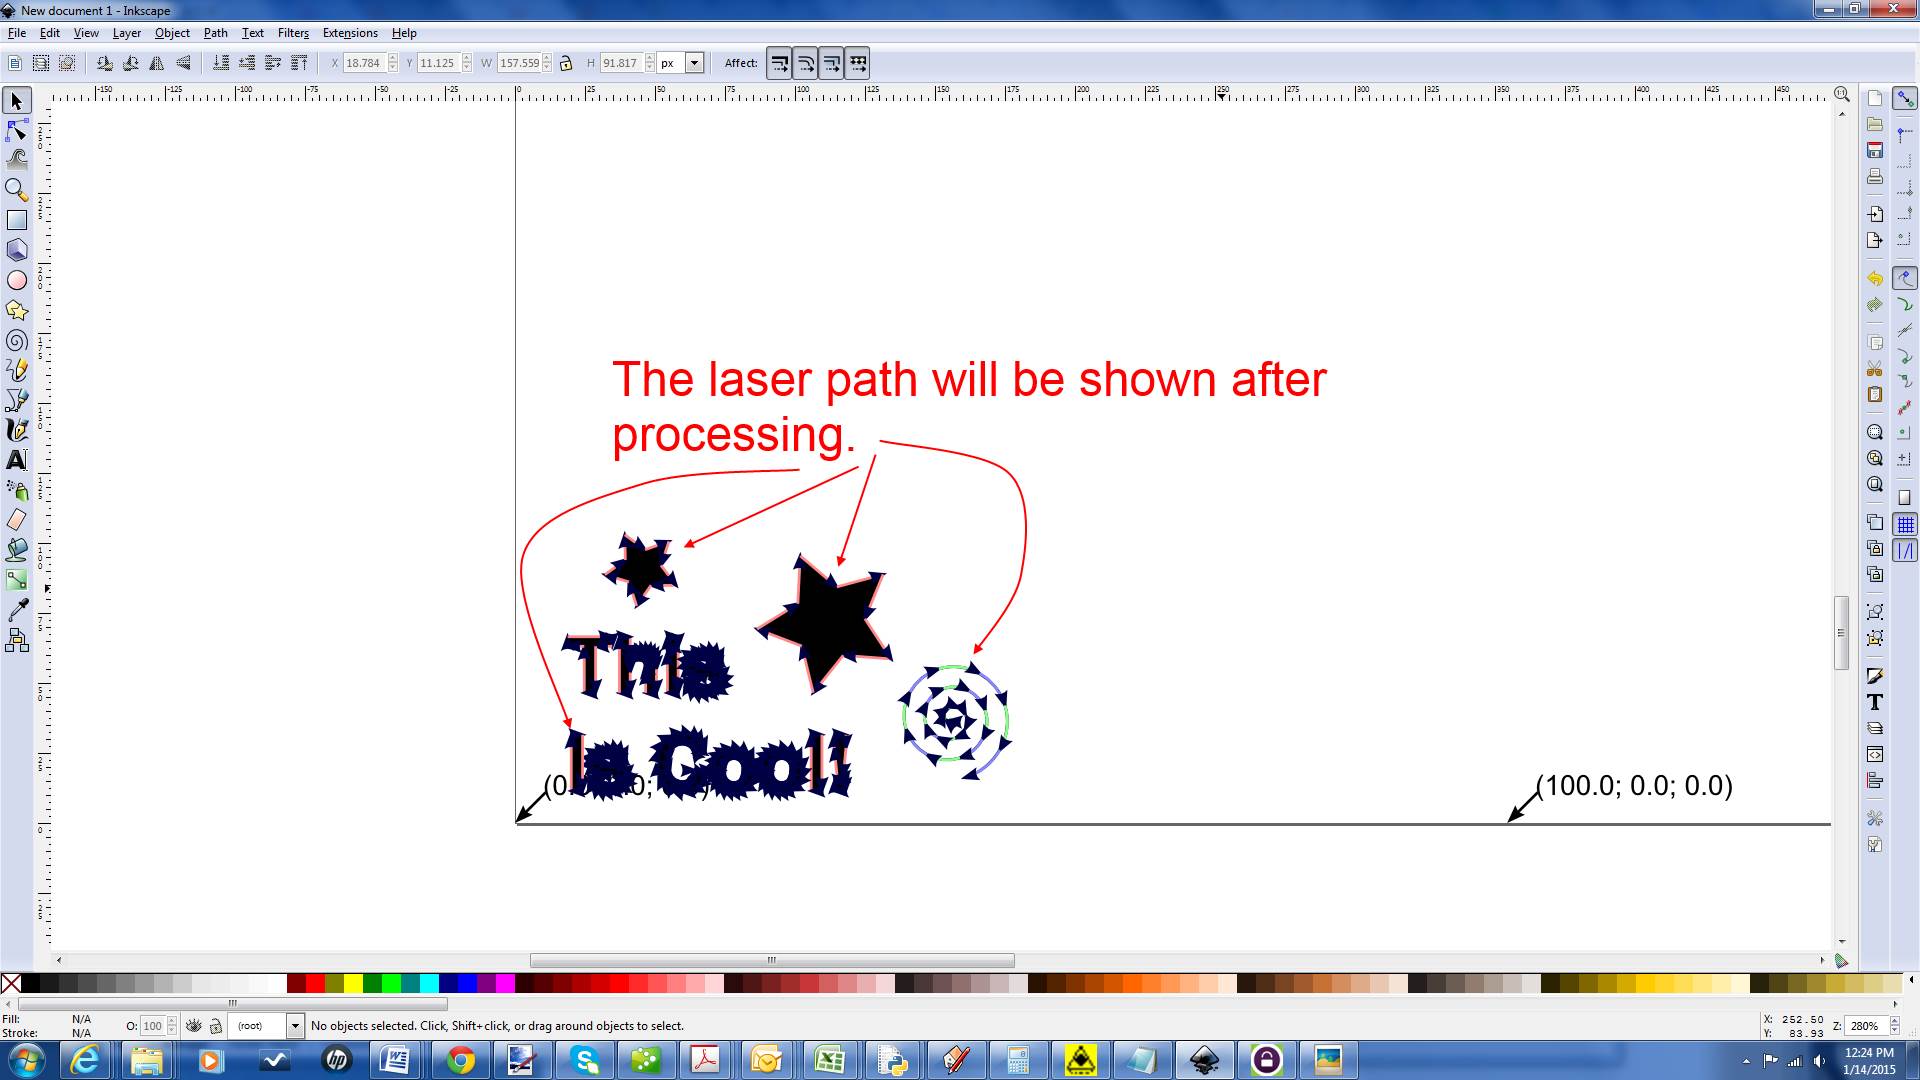
Step 6: The laser path will be outlined and the code will be generated in the location provided in the tool.
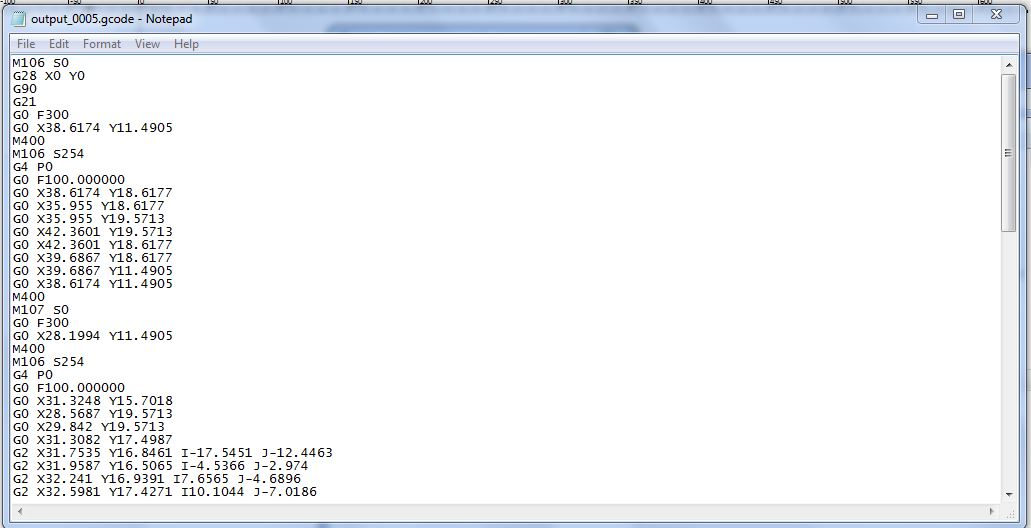
Here is an example of the G Code file produced.
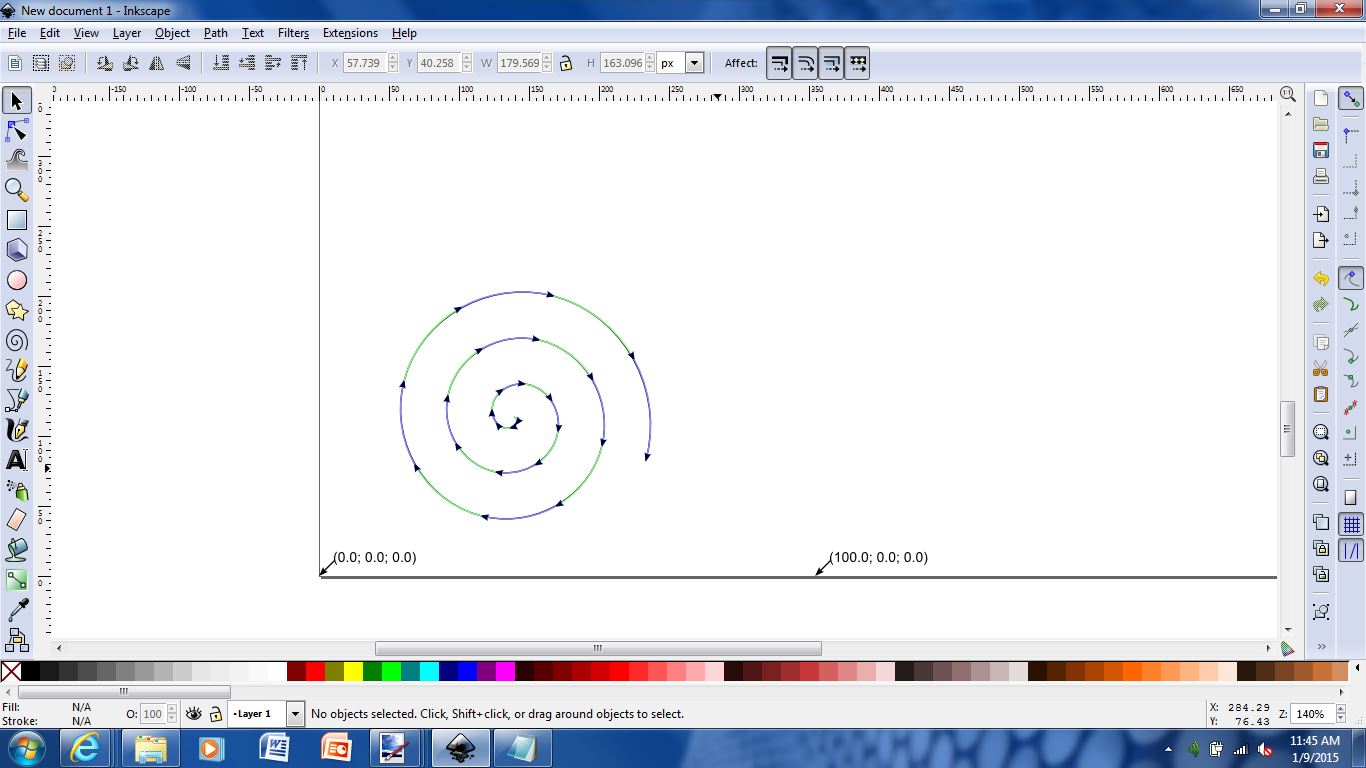
Drawing Other Objects
Similar to the text, you can draw anything you want with the other tools. Just at the end when you want to convert it to G Code for the laser. Here is an example of a swirl:
Drawing Multiple Objects
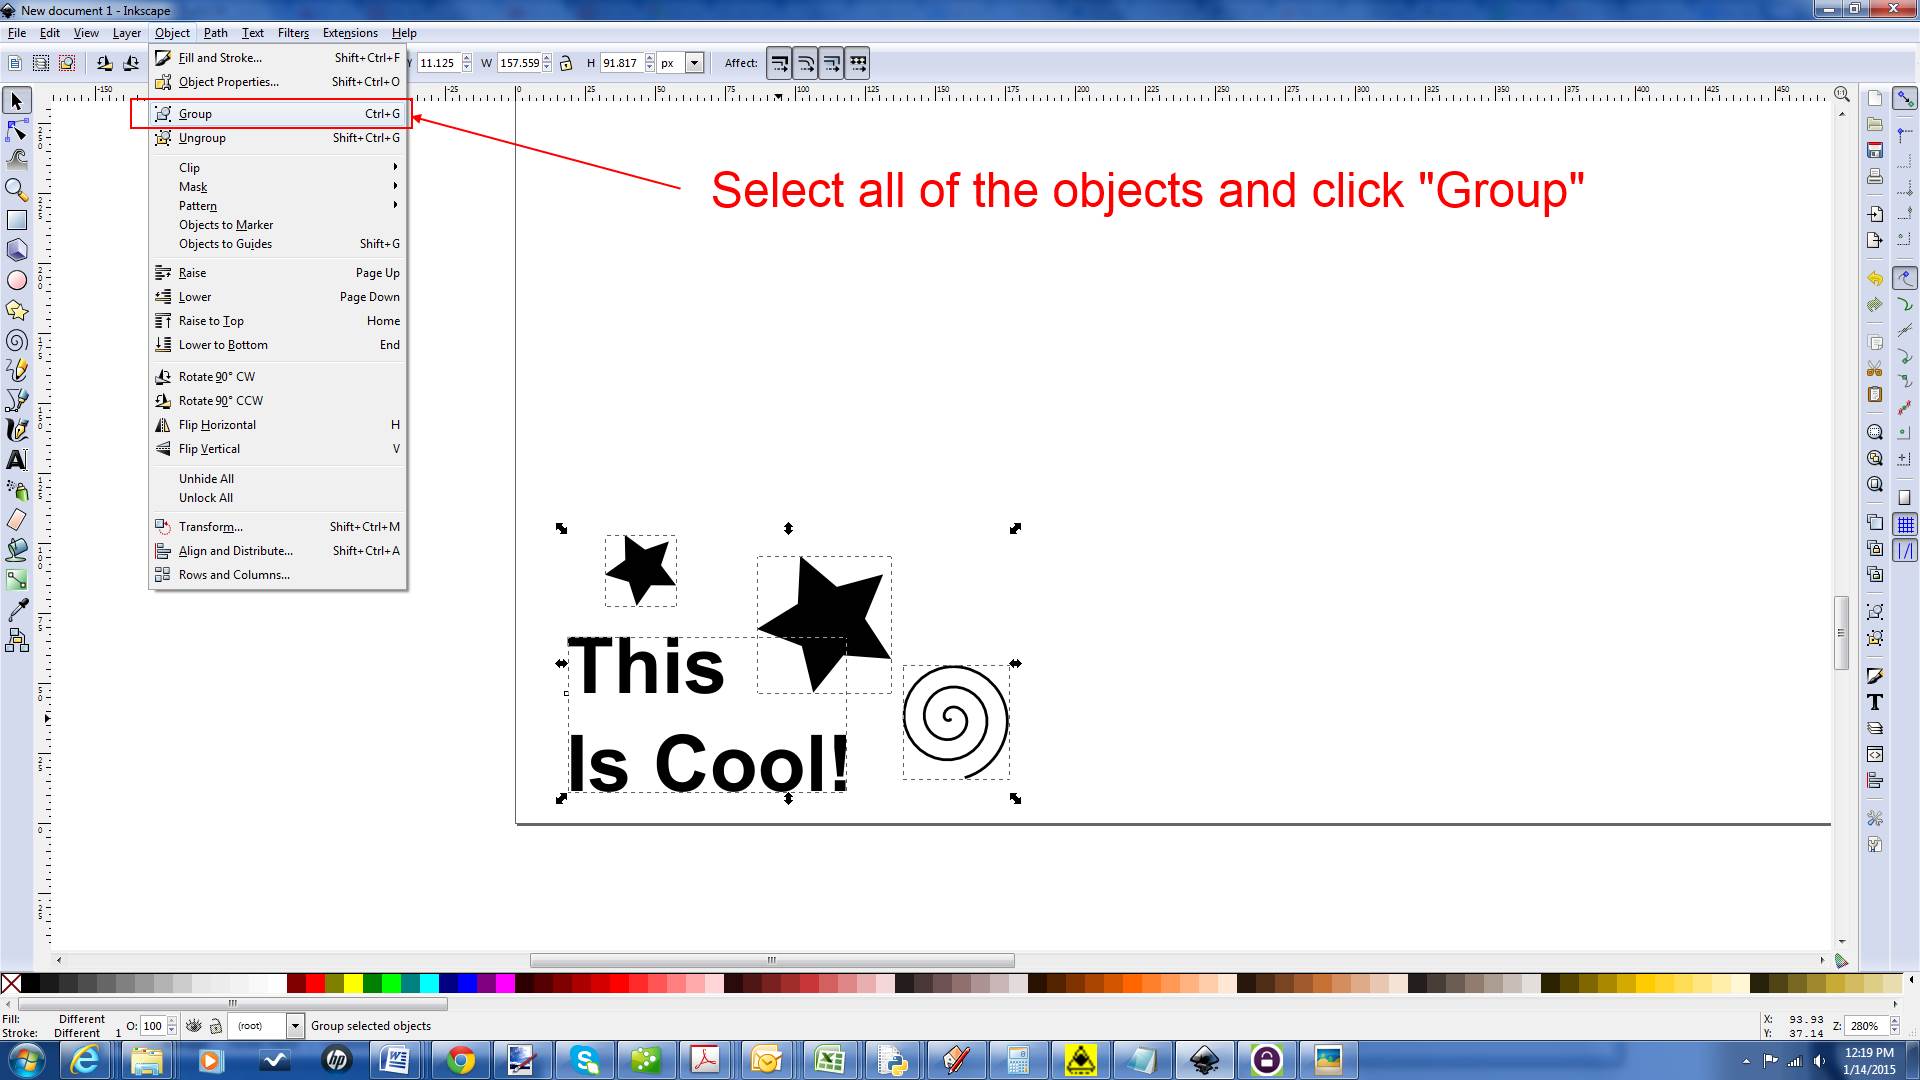
In order to draw multiple objects in the same toolpath, you must first group all of the objects and convert to path before generating. Here is an example:
Step 1: Draw your separate objects.
Step 2: Group your objects.
Step 3: Turn them all into a path.

Step 4: Start the Laser Tool converter.
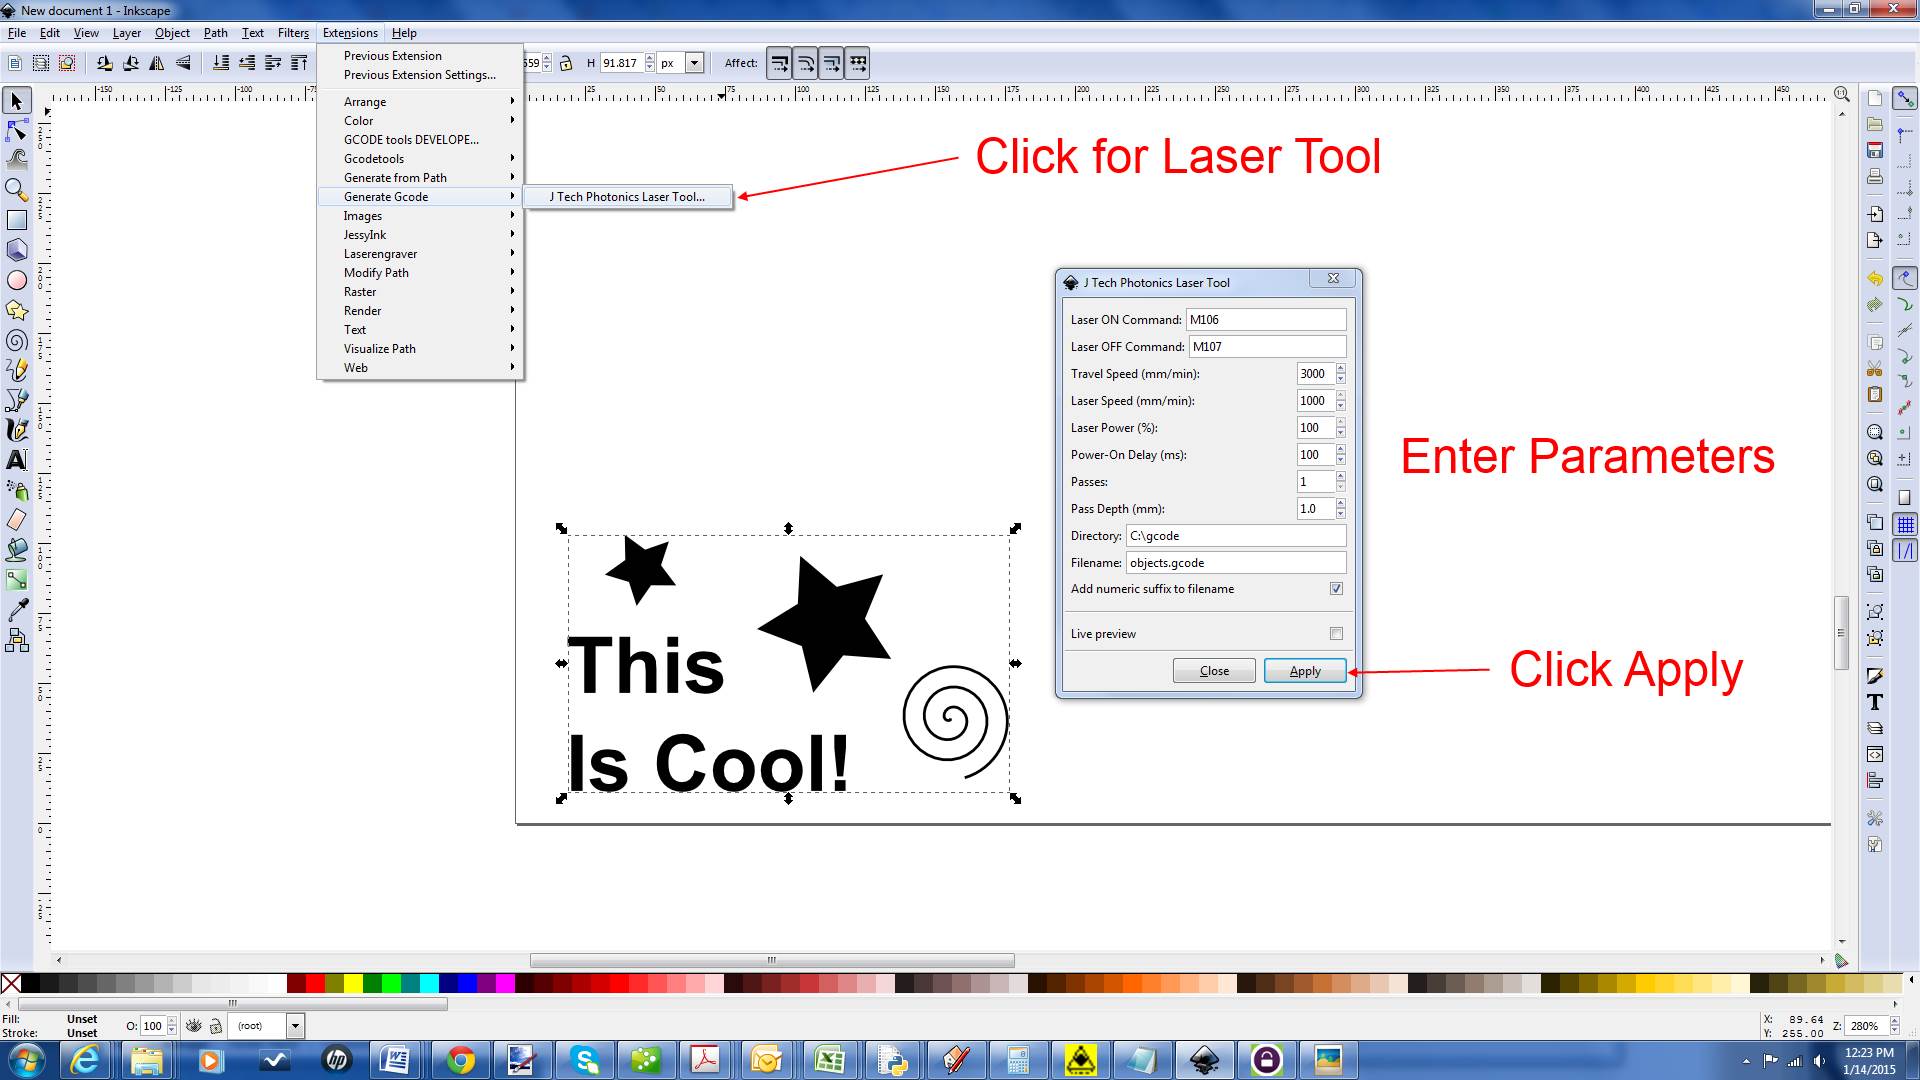
Step 5: Press Apply and run the converter.
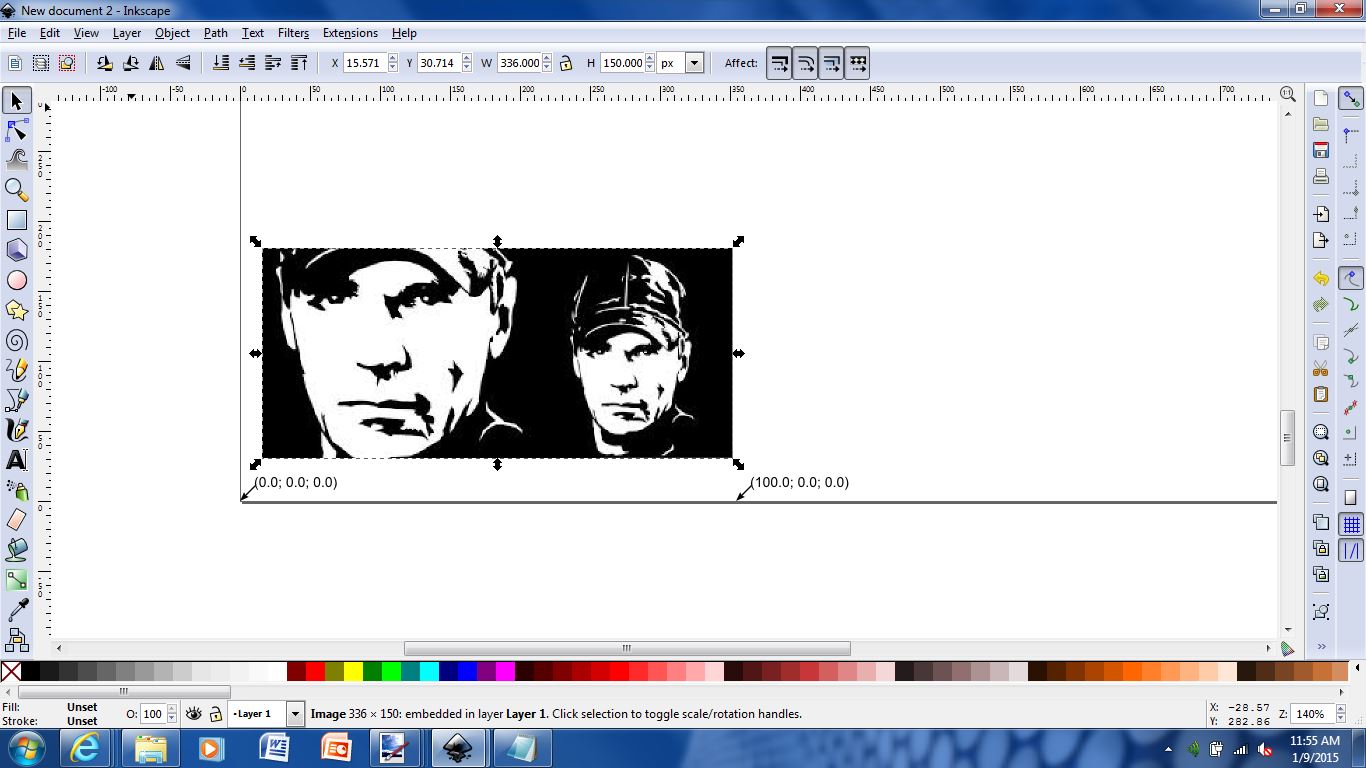
Importing Black and White Pictures
A cool thing to engrave are black and white “high contrast” images that only have two colors. Here are the steps to engrave them.
Step 1: Import your image on “file -> Import”. Note it is two colors.
Step 2: Trace the outline of the image to get the path for the laser.

Step 3: Using edge detection, update the image and press “OK” to apply the changes.
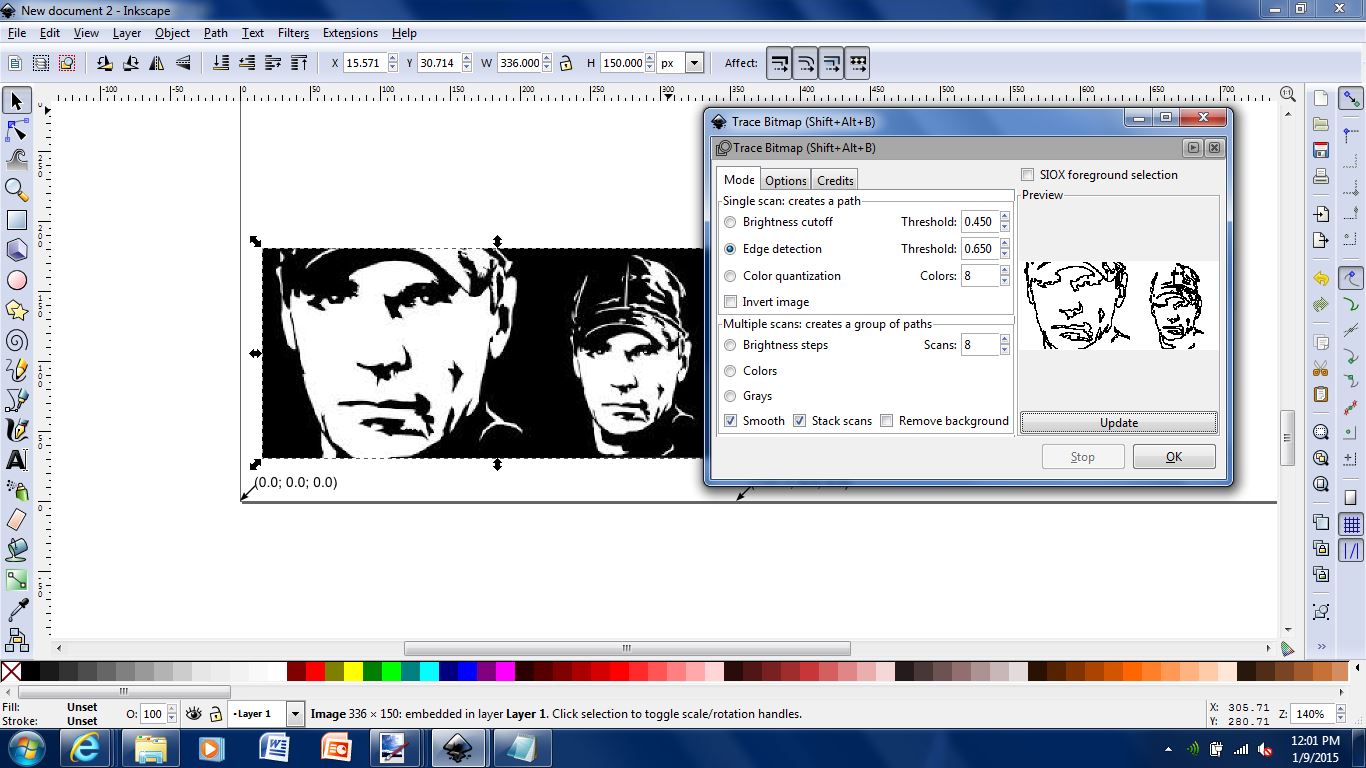
Step 4: Delete the original layer underneath the new edge detected layer.

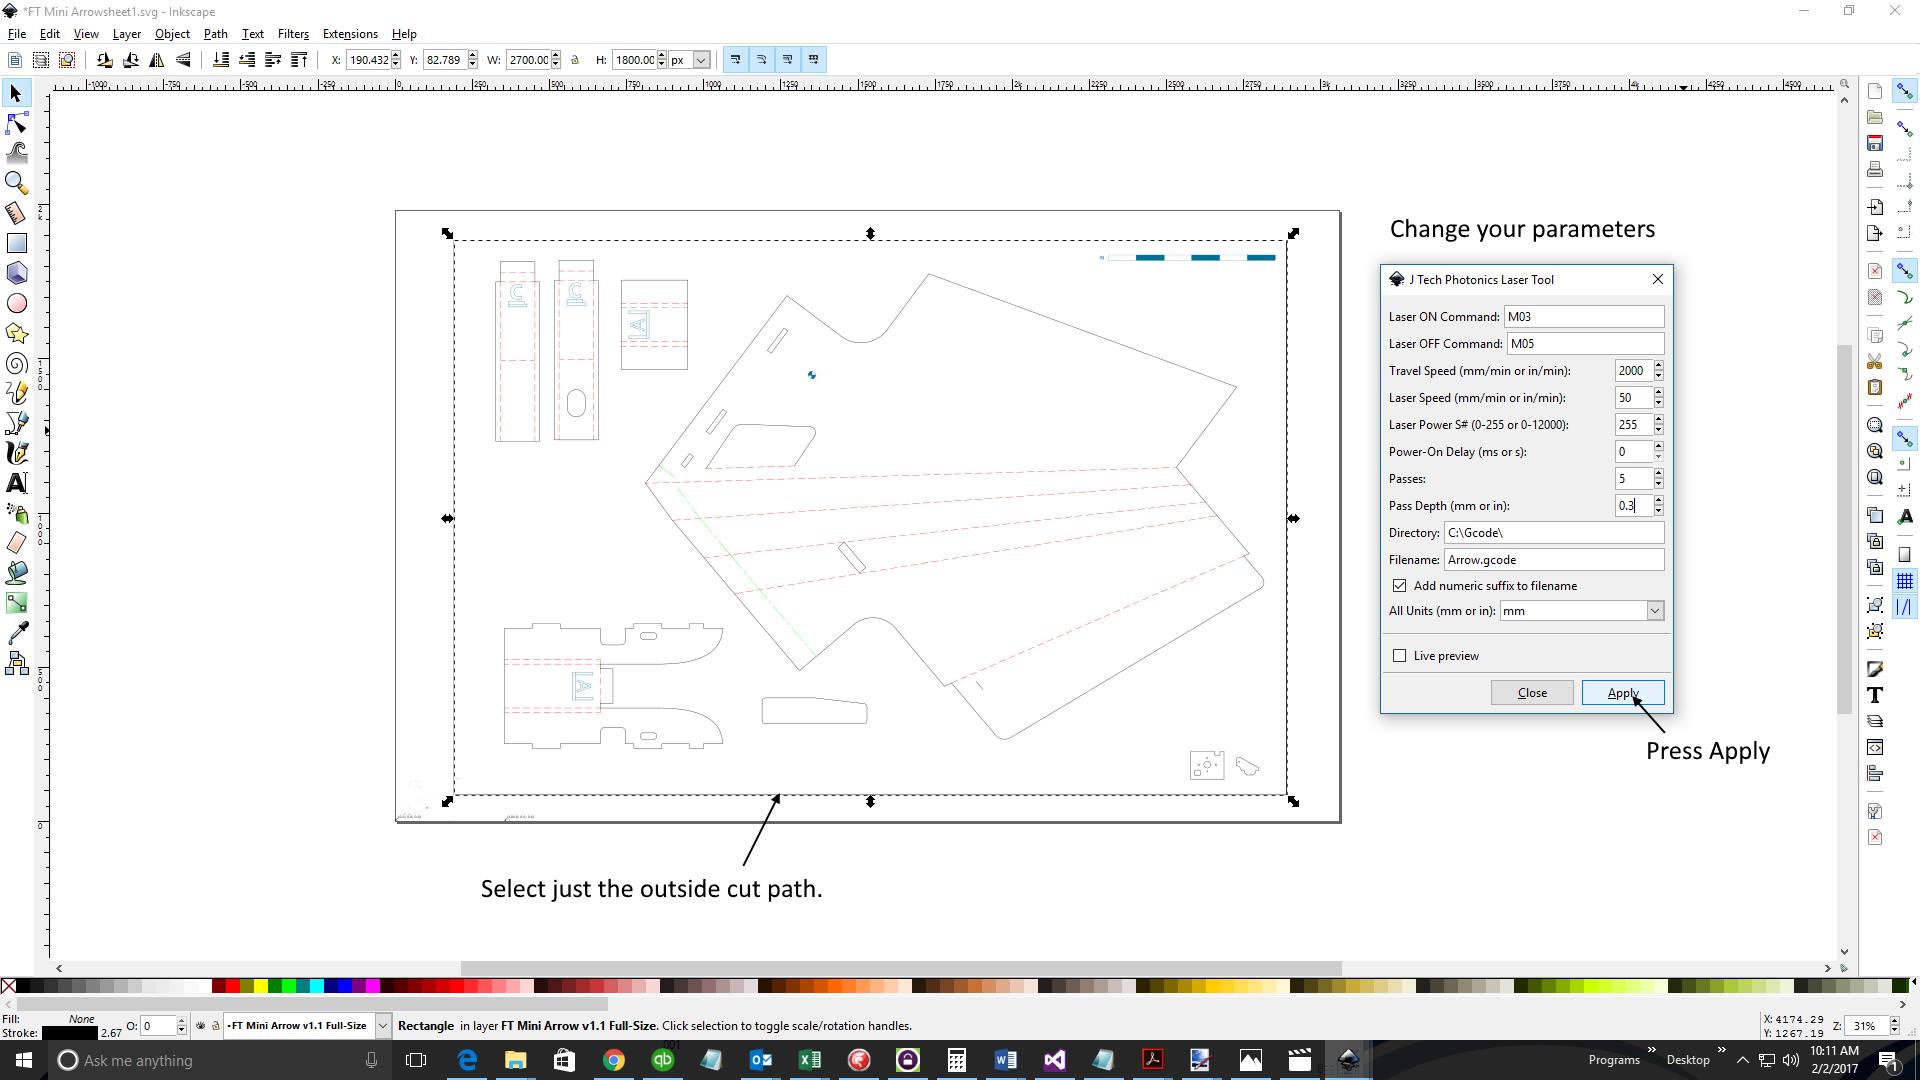
Step 5: Select “object to path” to create laser path.

Step 6: Generate your laser G Code file by entering your parameters and pressing “Apply”. The laser path will be outlined.

Creating C Gode for Engraving and Cutting on the Same Drawing
For cutting and engraving on the same file in inkscape, you need to make at two “objects”. One object will be the engraving and one will be the cut outline. Select the engraving object and click “object to path” and run the inkscape plugin. Put the engraving laser speed for the engraving. Then, click on the cut object (like a line border) and click “object to path” and run the plugin again. This time, put the speed to be a cutting speed (a lot slower) and use multiple passes if needed. Change the name of the file and press apply (or have the “add numeric suffix” button enabled). You will now have a “engraving” G Code file and a “cut” g code file. You can either combine the two in the same file, or you can run the engraving code first, then run the cut code *without* moving the part you are working on. It should all line up if nothing moves.
You can do this process for as many objects as you want to have different parameters in the inkscape Laser Tool Plugin.
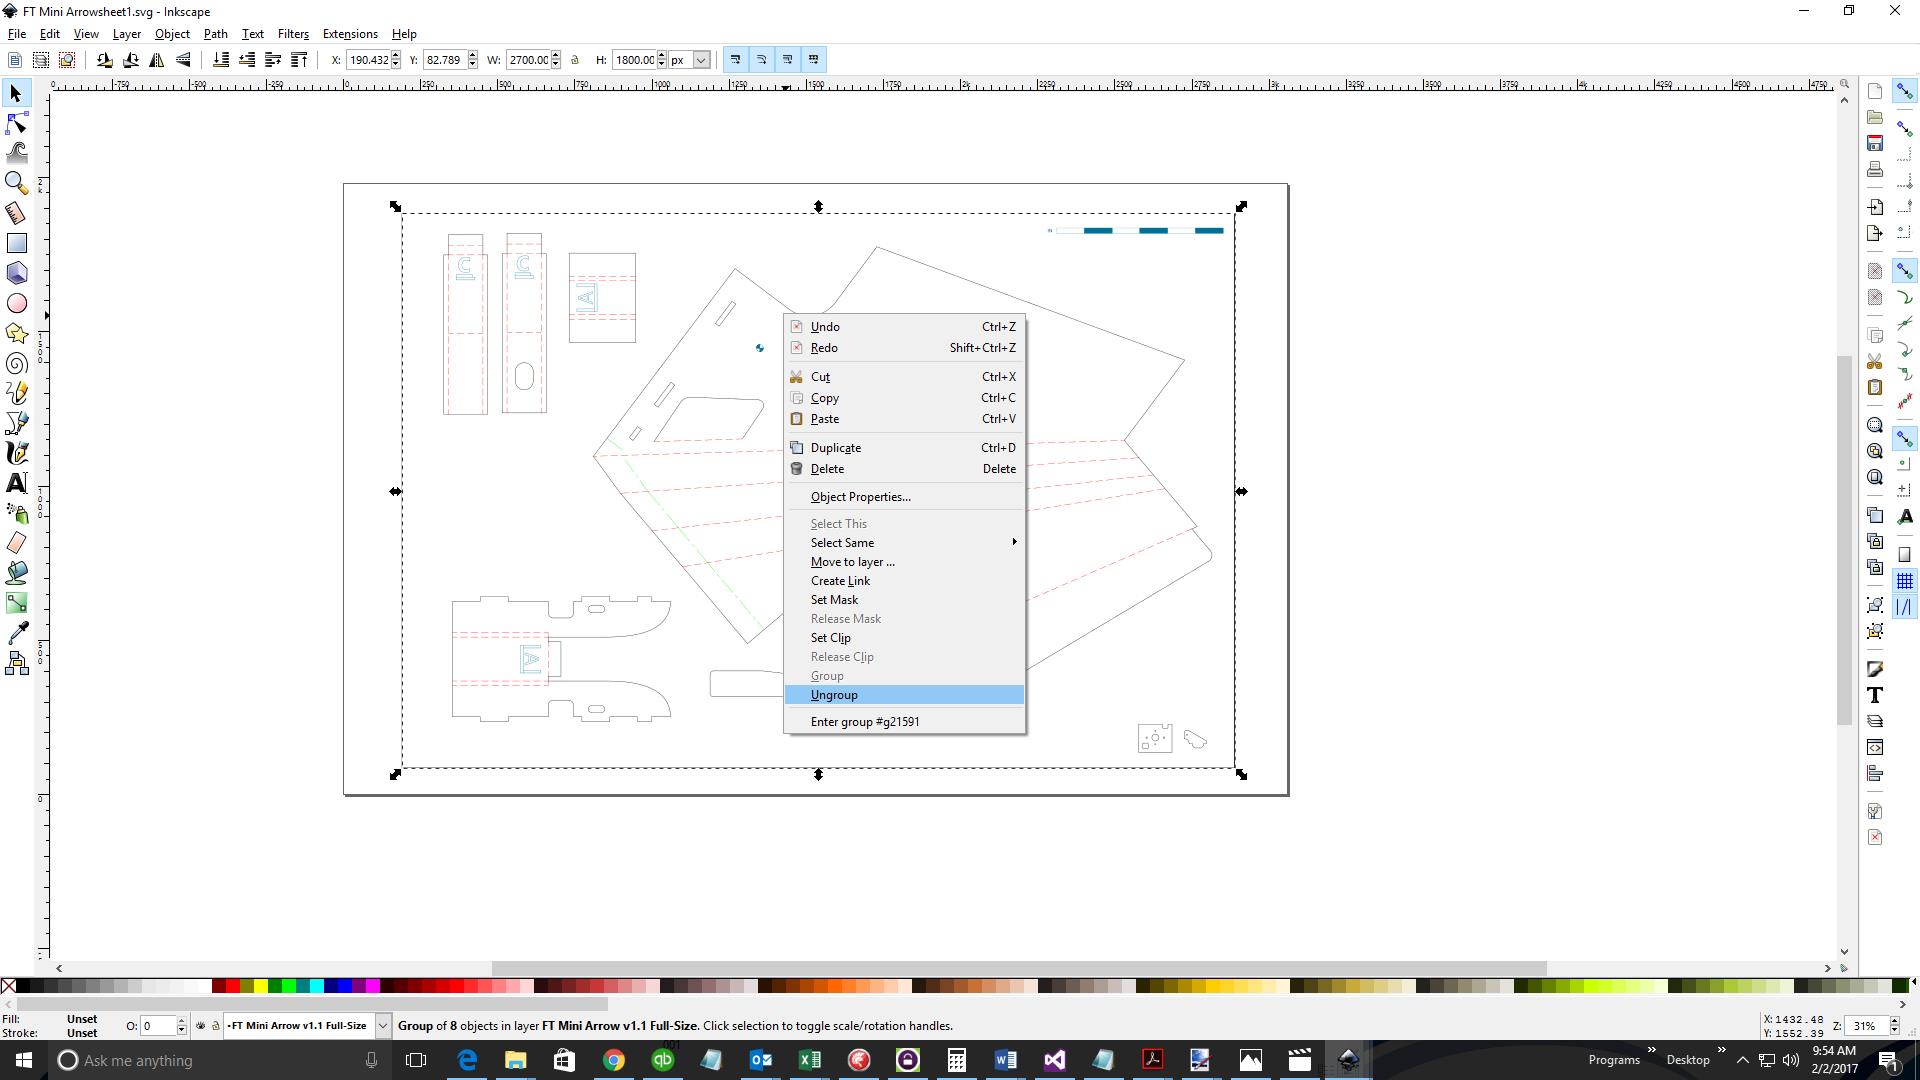
In this example, we have imported a drawing we would like to engrave at one speed and then cut the outside border.
Step 1: Ungroup objects into separate items. *note* If you have drawn several things on your drawing by yourself, then you would do the opposite. You would group your items you want the same parameters together.
Step 2: Select items you want to have the same parameters. If you want to engrave items all at the same speed for example. Hold the shift key down to select multiple objects.
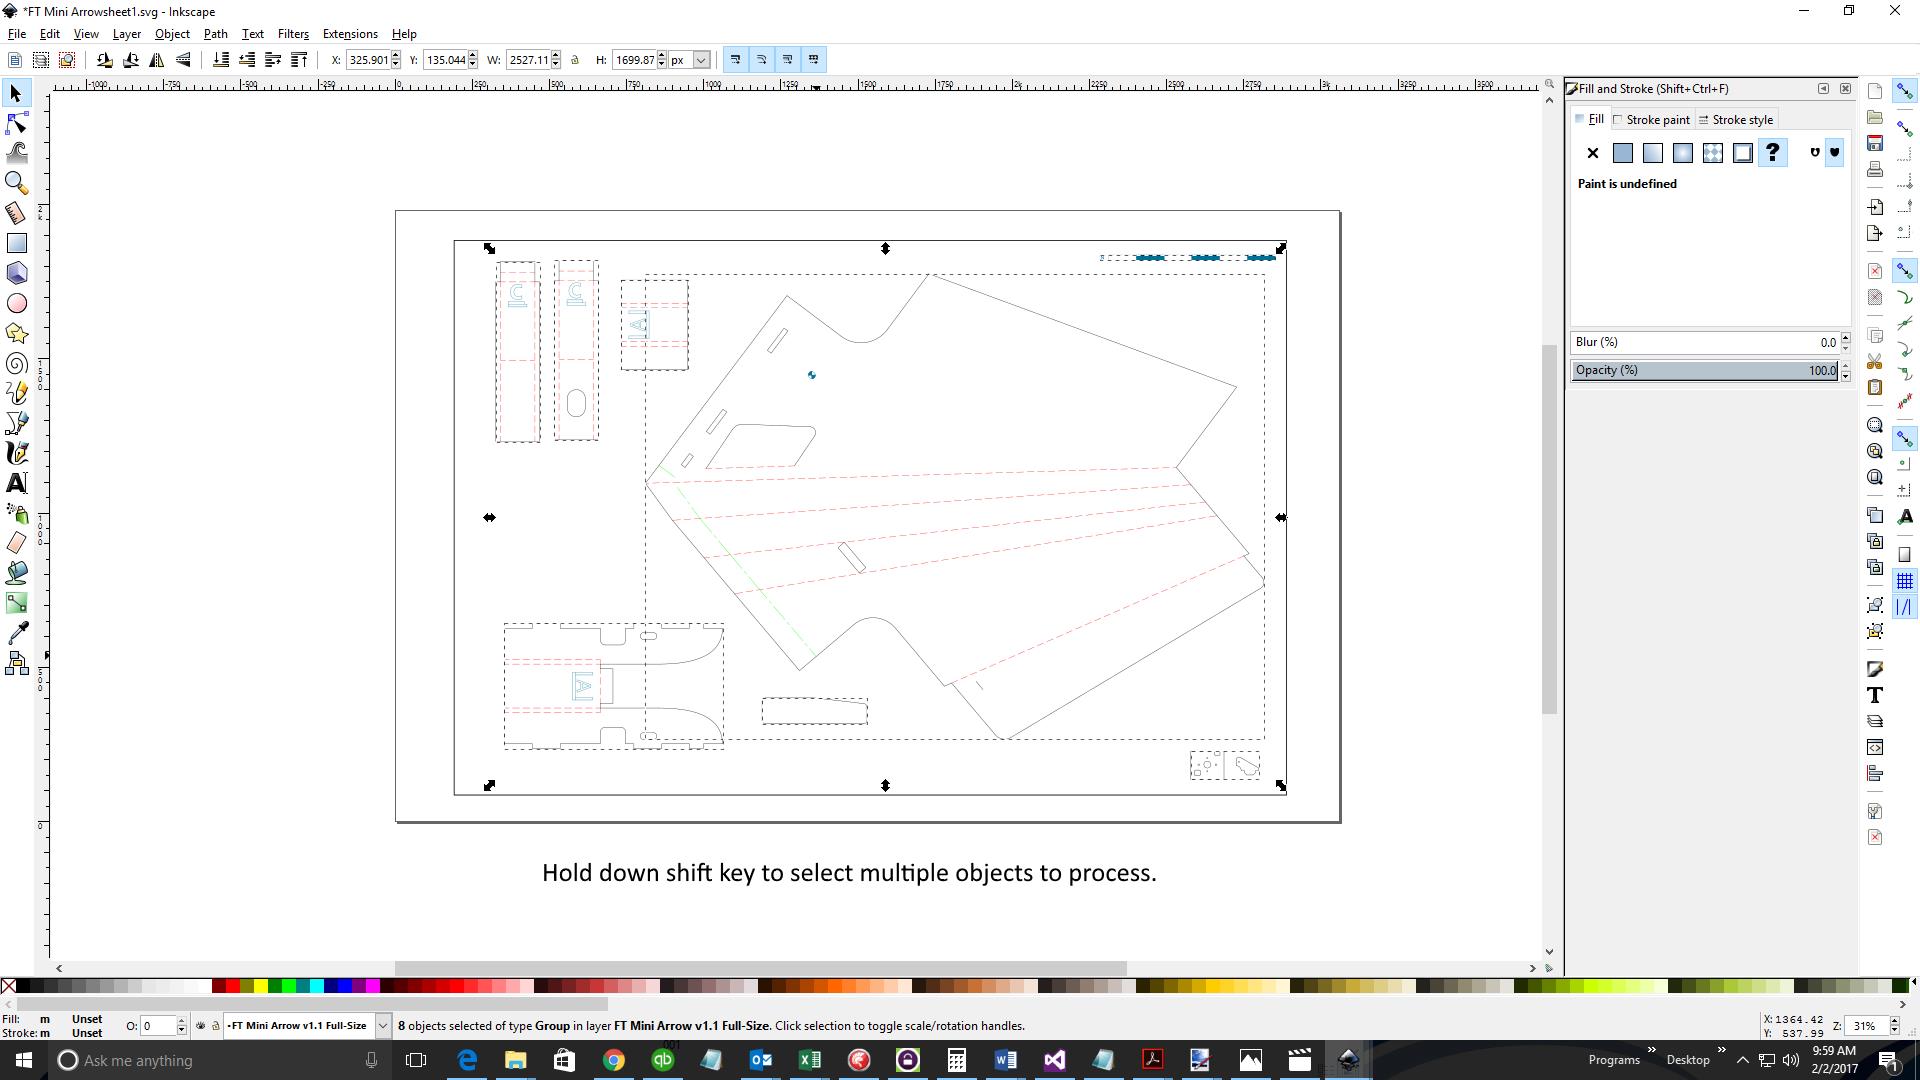
Step 3: Press “object to path”
Step 4: Open Laser Tool Plugin. Make sure “Live Preview” is Unchecked (Live preview assumes you want the whole page engraved the same). Then, enter parameters for the engraving and press “Apply”. This will generate a G Code file for the engraving portion of the drawing.

Step 5: Deselect the engraving objects and just select the cut object (or objects). Press “object to path” again and then change the parameters in the Laser Tool Plugin. In this case, we lowered the laser speed and increased the passes to 5. Press “Apply” to generate another G Code file for the cutting.
Step 6: G Code files.
You now will have at least two separate G Code files, one for engraving and one for cutting (in this example). You can either run them one after another as long as you do not move your workpiece. Alternatively, you can combine the files into one using a text editor and run it at the same time.
So there it is! Now you are ready to start creating!
Featured products
-

Chuck Rotary
$299.99 -
Laser Wall Mount
Original price was: $12.99.$9.99Current price is: $9.99. -
Rotary Accessory
$299.99 -
SmokeBoot™
Original price was: $99.99.$74.99Current price is: $74.99. -
SmokeShield™
From: Original price was: $99.99.$74.99Current price is: $74.99.
Hello there. I tried to use your Inkscape plugin but I get the following errors when I attempt to generate the G Code:
Traceback (most recent call last):
File “laser.py”, line 3173, in
e.affect()
File “C:\Program Files (x86)\Inkscape\share\extensions\inkex.py”, line 215, in affect
self.effect()
File “laser.py”, line 3157, in effect
self.orientation( self.layers[min(0,len(self.layers)-1)] )
File “laser.py”, line 3086, in orientation
doc_height = self.unittouu(self.document.getroot().get(‘height’))
AttributeError: laser_gcode instance has no attribute ‘unittouu’
Any help you can provide would be much appreciated. Thanks a lot!
Will the kit also work with the new Inventables X-carve, and if yes, what is the cost to get this kit delivered to Canada?
I have friends in the US that can send to me if shipping to Canada is not available or is a problem.
Thanks
This is great! Looks like you’ve been experimenting!
Great software here!
What do I need to do? To have the gcode be generated in inches instead of mm
Hi, I get this error every time:
Traceback (most recent call last):
File “laser.py”, line 3173, in
e.affect()
File “/usr/share/inkscape/extensions/inkex.py”, line 221, in affect
self.effect()
File “laser.py”, line 3157, in effect
self.orientation( self.layers[min(0,len(self.layers)-1)] )
File “laser.py”, line 3086, in orientation
doc_height = self.unittouu(self.document.getroot().xpath(‘@height’, namespaces=inkex.NSS)[0])
AttributeError: laser_gcode instance has no attribute ‘unittouu’
I’m running ubuntu 15.10 if it helps.
Make sure you have Inkscape 0.91 for this script to work. I had 0.48 and this script did not work. The error was “AttributeError: laser_gcode instance has no attribute ‘unittouu'”.
When using this plugin for tracing black and white pictures, the gcode output ends up with a bunch of extra arbitrary lines and circles thrown in that completely ruin the original picture. Is there something I am overlooking in this process?
This is great, I got some good and nice burnings with nice finishes, but I´m getting son vertical lines, seems to be a problem with the g-code because those lines are made when the laser doesn’t turn off, its not a driver problem, do you have some mail or something similar to get help with this problem, I’m working with a 1w 445nm laser, for test.
If you are getting vertical lines then there is a problem with the output file. In large imported images, sometimes the output file will miss a “space” between the Y coordinate and the Feedrate command. This will cause the G Code parser to ignore the line and assume you meant “0”, which sends the laser to the bottom of the engraving.
To fix this: Open the file in a text editor (like notepad for example). Then, use the find and replace function. Let’s say you put the laser on feedrate as 500. Then, find all instances of “F500″ and replace it with ” F500″. Note the space before the “F”. Do this for the laser off feedrate as well. Save your file and it should fix the problem.
I’m getting a traceback error
Traceback (most recent call last):
File “laser.py”, line 3173, in
e.affect()
File “C:\Program Files (x86)\Inkscape\share\extensions\inkex.py”, line 221, in affect
self.effect()
File “laser.py”, line 3157, in effect
self.orientation( self.layers[min(0,len(self.layers)-1)] )
File “laser.py”, line 3086, in orientation
doc_height = self.unittouu(self.document.getroot().xpath(‘@height’, namespaces=inkex.NSS)[0])
AttributeError: laser_gcode instance has no attribute ‘unittouu’
any suggestions?
please i need help during exporting gcode for laser cutting it goes very fast during cutting straight lines which maked me problems …
so could you help me fixing that problem
We have made a new version of the inkscape plugin that removes the G0 (rapid) commands and replaces them with G1 (coordinated motion with feedrate control). Rapid commands take a separate feedrate that is in your machine. Coordinated motion G1 commands will follow the feedrate from the G Code file. Download and use the new plugin. If you have files you want to change, then use a text editor and “find and replace” G0 to G1.
How do I get it to do the fill, instead of just the outline?
I’m looking for fill too – anything?
Do you found an solution to this problem?
Did you ever work this out?
I need a setting that will only laser ON Horizontal Lines and OFF on all other directions. Is there a way you could guide me to place that in the code? Thank you
I need to invert the Y axis. My text is coming out flipped horizontally like you would see in a mirror.
Hi Bill,
The default home position for the inkscape plugin is the BOTTOM LEFT of the table. I think if you have your home position set on your CNC to the top right this might happen. Maybe?
I also have the same problem . some say to invert in inkscape using mirror option ..
Hi, This is my case. My CNC have the origin in the top right and the values are from 0 to minus something… The is a way to fix this?
+1 on a Shapeoko3 bottom left is XY 0,0 and top right, the home position, is maxX and maxY.
Hi,
Congratulation for you plugin,
My laser engraver (3dp burner) has the home position in the BOTTOM RIGHT. Can i change the default home position of the j-tech plugin to the BOTTOM LEFT ?
The plugin is open source, so if you want to modify it you only need to change the laser.py file with your modifications. I am not sure exactly what needs to change, so it might require some digging to be able to figure it out.
Did anyone find which line the home position is identified ?
reverse the motor connection to the CNC shield
So I built a horizontal laser code. Works pretty good. Here you go.
https://github.com/warkilt/inkscape-laser
Hi Cale, is it possible that your plugin criscrosses the original (above) while you both have a file named “laser” used?
Hi there
Is there anyone willing on assisting me with Laser cutting knowledge ?
Wkr
Okay, Houston, we’ve had a problem here…
Hello everyone, i’m having fun with this inkscape extension but i found an issue related to some dimension.
I absolutley can’t figure out what’s the difference between some svg files, one file works fine and another one produce a g-code in a wrong position and with wrong dimension.
The shape of the visualized g-code is not wrong, only the relative position respect to the home-position of the machine and/or the size of the generated gcode.
I’ve checked the mm/px possible issue and i set the file in mm (and in every case 0 means 0, so this can’t explain a wrong start position).
I’m using Inkscape 0.91 and grbl 0.9j.
I hope this issue can be solved, it’s pretty annoying.
ps: how about using a relative coordinate g-code?
in this case it’s not a problem to move the zero position of the g code and there’s some tools that can resize a g code. (it’s not an elegant solution, but it will do the job….)
is it possible to set up a code file to only partially cut one area and cut all the way through another in Inkscape? I want to clear and area partially for a nut to be inset and have a hole that goes all the way through for the bolt. can this be done in one job or am I going to need to do it separately? also how would I clear it instead of just engraving it?
Finally got my setup to the point where I can run some files. I understand in Inkscape the text will just be an outline engraving, but how to I take a solid like a Star in the examples above and have it engrave solid? 6 watt LD, JTech controller, PicSender.
I tryed the Plugin the first time.
Why the coordinates differ between the ruler in Incscape and the generated g-code.
I place my Text starting at the ruler at X40 and Y50. But in the Gcode the start position of the text is at X40.0734 Y21.4974.
Is there a offset from the ruler in Incscape and the Plugin ? (I set the units to millimeter in Incscape)
I just came across a problem that I can’t seem to solve. This happens not only with this plugin, but any Gcode plugin in Inkscape. It will work once, then I need to reboot the computer to get it to work again. Before, any time you clicked “Apply” you got a new Gcode file but now, it only works once. And like I said, this is not restricted to this extension only. Other Gcode extensions do the same thing. Has anyone else ever experienced this problem?
How do I make it fill? It only burns an outline of the shape.
Hi,
Great plug in for cutting!!
Is the max number of passes 10?? I cant get more.
thank you
Hi, What if I don’t want outlined text but only one line in middle of text? How can I do it ? Thank
Hello there!
my laser device can not engrave!
Is there any options to customize laser focus and power?
My CNC follow the G-code path, but there is no engraving!
thanks.
Something is wrong, no mattern what i try, the scale is always way off! For example, i make an object that will fill my entire work area (200x200mm). But when starting my machine it only engraves a 50mm area… Looking at the G-code in a viewer it says that the furthest away the head will move is to X55 and not something like X190. I have tried everything i can think of and the scale is always off somehow. Any advice?
Hi folks,
I hav some problem too. If I draw a black box starting from X=0 and Y=0 with 100mm length and witdh my gcode looks like this: (I have no laser so i use a pen ziptied to the extruder -> therfore the G1 Z0 / Z-1)
G1 Z0 S0
G90
G21
G1 F3000
G1 X0. Y28.2222
G4 P0
G1 Z-1 S255
G4 P0
G1 F100.000000
G1 X28.2222 Y28.2222
G1 X28.2222 Y0.
G1 X0. Y0.
G1 X0. Y28.2222
G4 P0
G1 Z0 S0
G1 F3000
G1 X0 Y0
M18
So it’s nowhere near the 100mm.
Any suggestions?
I have a problem at the time of generating the gcode throws displaced coordinates do not correspond to the design, pluing and page design are set in mm.
I have an issue with scaling. The origin and the 100,0,0 reference point don’t align with the page settings. It corresponds with about 350, rather than 100. This means the output is scaled down about 3 times when I run the plugin. Is there a way to fix this? Thanks
En qué escala esta hecho el programa, trabaja con mm ? ocupo mm y no esta a escala… como podría corregir ese problema ?
On what scale is the program done, it works with mm? I used mm and it is not to scale … how could I correct that problem?
Hi,
I got a problem, the plugin doesn’t scale properly, the laser graving is like 1/3 size of the design in inkscape. I couldn’t find any settings for the extension.
Any idea?
Hi,
I’m having an issue where the laser stops with the power still on, stays in put for a second and then skips a bunch of coordinates to go straight to the first point on the drawing (i think), leaving a large burnt spot and a straight line behind. I’m clueless on how to fix it.
Hello. Thank you for the wonderful plugin. It’s incredibly cool. But I had a small problem with his work. The laser does not burn lines until the end. Part of any figure is not drawn. The carriage simply skips this place. Installed Inkscape 0.91
Hi,
i hvae the following Problem:
I have a horizontal china cutter, and it works well.
But wenn I load my code to the sender, it burns only the first given path and stops then.
It burns normaly 5-20 % of the image and then stops.
sry for my bad english, but i left shool long time ago 😉
What good afternoon a question if I update the firmware 0.9 g and can not use the easel x carve
regards
Edgar
Oaxaca, Mexico
Hello,
I’m having the issue with power on delay option, how to put value in ms or s? whatever I’m putting here it is taking it in seconds. I’m using it for application where I need to put values in ms in Power-on-delay option. I’ve used different version of this extension, but unable to solve the issue.
Any help would be much appreciated.
please mail me, if there is any solution for that
Help!? I have installed on a Raspberry Pi 3 and keep getting the following error :
Traceback (most recent call last):
File “laser.py”, line 3173, in
e.affect()
File “/usr/share/inkscape/extensions/inkex.py”, line 221, in affect
self.effect()
File “laser.py”, line 3157, in effect
self.orientation( self.layers[min(0,len(self.layers)-1)] )
File “laser.py”, line 3086, in orientation
doc_height = self.unittouu(self.document.getroot().xpath(‘@height’, namespaces=inkex.NSS)[0])
AttributeError: laser_gcode instance has no attribute ‘unittouu’
What have I done wrong?
Thank You
Todd
After a bit of confusion with the scaling and units for the rulers in Inkscape it appears that the code uses pt as its units with 100pts = 10mm. Is this correct?
Hello, I had a problem with version 1.8. I chose the graphics size not to match the generated graphics size. Is this bug?
Hi,
nice work on plugin.
can somebody give me a hint when i heve smaller path in gcode then in inkscape ???
I tryed made rectangle 100 x 100 mm for test cut, but gcode heve coordinates in G1 X28 and Y28
i cant figure where is problem (tryed DPI, changing mm to inches, pixels…)
same behavior is with other gcode generator…
Hi,
is it possible to show where the laser will be engraving. Like a square with 1% Power, that you know where to plase the object exactly?
Maybe with an toolchange command that you have to click resume. (for standalone laser)
I would recommend doing the following process:
1. Do your full power drawing in inkscape, create it as an object and generate the g code file.
2. In the SAME page, make a second object that is a box around the first object. Generate a second g code file that is at 1% power.
3. Either combine the two g code files (put the box one first) or just run the box one first and then the main file.
When generating the gcode for a rectangle 100mmx100mm in inkscape, the gcode file is have the wrong scale : below the file generated.
————————–
M05 S0
G90
G21
G1 F600
G1 X2.9898 Y100
G4 P0
M03 S255
G4 P0
G1 F300.000000
G1 X100 Y100
G1 X100 Y3.1838
G1 X2.9898 Y3.1838
G1 X2.9898 Y31.406
G4 P0
M05 S0
G1 F600
G1 X0 Y0
M18
M05 S0
G90
G21
G1 F300
G1 X6.187 Y58.0303
G4 P0
M03 S255
G4 P0
G1 F150.000000
G1 X34.4093 Y58.0303
G1 X34.4093 Y29.808
G1 X6.187 Y29.808
G1 X6.187 Y58.0303
G4 P0
M05 S0
G1 F300
G1 X0 Y0
M18
——————-
Hey so I keep having a problem with the size not being accurate, I set the document properties in Inkscape to 200mmx200mm the size of my bed, when I made the text size according to the window box size, it came out like maybe a tenth the size? what do you thinks up with that?
Also having troubles with the X axis starting out like 2 – 3 inch’s away from the X limit, it will burn fine, but will run into the x limit, What do you think is up with that as well? I have tried to look it up but I haven’t a clue, so last-ish resort ask you guys
One more thing, I don’t think its something up with your program but my firmware, im trying to run the ttl signal off my extruder fan output on Ramps, but it doesn’t shut off at all, no response to my fan controls from the machine itself, any thoughts or ideas on that?
Thank You for your help and when I get all this worked out I was going to purchase a license for your PicLaser program it looks pretty good
by the way V.92 inkscape
And it looks like after I generate the Gcode a object in the layer jumps up quite a ways? any clues from that
Hi Guys, First off great job. I’m able to draw and generate executable Gcode.
I’m having an issue with scaling however. The co-ordinates in Inkscape don’t line up with that of the outputted Gcode. For example if I draw a 100mm X 100mm square in Inkscape with the bottom left corner at the origin (0,0) and then generate the code the outputted square is only 28mm (approx).
As soon as you generate the code two points are plotted on the Inkscape page (0,0,0) (100,0,0) which are representative of the Gcode generated and it is obvious the the square drawn is no where near the plotted points.
You would expect to see the bottom right corner of the drawn square on-top or near to the (100,0,0) point but its no where near.
Has anybody had this issue and if so how did they resolve ?
Hi
I am having a problem with the scaling from Inkscape when using the plugin. It comes out about a third of the size. I have tried the previous version of Inscape (0.91) and cant find the problem, any suggestions would be appreciated.
Tim
Hi, I tried the extension, and it is really impressive.
I do have questions, I use laserweb and directly load the generated Gcode from your extension:
– Circles in inkscape, look close to a square in Laserweb
– Do thick letters or thick lines are “filled” or only the perimeter is taken into consideration
–> On your example, you show group of objects, some a black filled, is the generated Gcode will engrave all the surface?
Thanks
Guys I installed the plugin “JTP_Laser_Tool_V2 – inkscape 9_2 version” on “Inkscape 0.92.1”.
I can see “Generate Laser GCode” under the Extension Menù, but I have not the final entry point “J tech …”.
What’s the problem? Not suitable versions?
Thanks for this plugin, it really helps simplify things for running the two DIY XY Plotters I’ve recently built.
On Windows 7 everything runs flawlessly, but when I try to run your plugin on Inkscape on my RPi 3, it always kicks out this error:
Traceback (most recent call last):
File “laser.py”, line 3173, in
e.affect()
File “/usr/share/inkscape/extensions/inkex.py”, line 221, in affect
self.effect()
File “laser.py”, line 3157, in effect
self.orientation( self.layers[min(0,len(self.layers)-1)] )
File “laser.py”, line 3086, in orientation
doc_height = self.unittouu(self.document.getroot().xpath(‘@height’, namespaces=inkex.NSS)[0])
AttributeError: laser_gcode instance has no attribute ‘unittouu’
A gcode file is not generated. Any idea as to why this happens?
Cheers!
how can i raster engrave?
Great plug-in, but something is wrong with the size.
I run the latest inkscape as of late august 2017. I have a svg generated from gerbv. When I ooen the svg in inkscape it looks fine. All sizes are correct. All document prooerties are set in px measurement. All objects are grouped to one and have run object to path. Then I run the plugin with default settings. The object that is created that shows the orientation points start at 0,0 but the 100,0 is not at 100mm. It tesults in gcode that is not scaled correctly. Laser engraved becomes atleast 4 times to big.
I have tried to set other document measurement units, but same result.
Any idea?
So I want to actually do more than just outline my logo, I’d like the black areas to be shaded not just outlined. how can i do this?
I tried the plugin yesterday on a simple circle. The gcode produces a circle but twice. Once in the clockwise direction and again in the anti clockwise direction. How can we have only one circle?
Will this plugin work on mac?
Hello, can you explain me how can i install, and use it on linux Debian?
All working with new version of inkscape from jassie-backport – thanks!
Hi,
I’m using GRBL firmware which doesn’t recognize G2, G3 circle commands. Is it possible to generate Gcode with only G0, G1 commands instead?
Thank you.
how can i get an infill instead of an outline
followed your youtube part 3 , I get error when using extension and no file or gcode saved
Hi.
Does it work only outline mode ? Is it possible make a gcode to fill inside ?
Regards,
Reinaldo de Souza.
Hi I’m getting this error when trying to changer laser extension params in Inkscape. Any pointers please?
Traceback (most recent call last):
File “laser.py”, line 3173, in
e.affect()
File “C:\Program Files\Inkscape\share\extensions\inkex.py”, line 283, in affect
self.effect()
File “laser.py”, line 3170, in effect
self.laser()
File “laser.py”, line 3032, in laser
self.check_dir()
File “laser.py”, line 2554, in check_dir
if self.options.directory[-1] not in [“/”,”\\”]:
IndexError: string index out of range
I’m trying to ruin the plugin on Windows 10 and I’m getting the following error “Fatal Python error: PyThreadState_Get: no current thread”
Any Idea what the problem could be?
II resolved the problem. I did a full uninstall of Inkscape followed by a complete install using the msi package and the plugin now works properly
Hello, thank you for creating such a great tool. I’m having a small issue with scaling on gcode output files. For example if I make a 30mm square in Inkscape, run your plugin and then open the gcode file in universal gcode sender it says that the square is now 31.73mm (or something like that). Do you have any ideas what might be going on?
Hello,
I drew a 1.000 inch square with the origin set to 0,0. The “X” and “Y” values in the Gcode were not X1.000 or Y1.000 as I expected. I am running v 0.92 64 bit Inkscape and loaded your extension a few days ago. Do I have to define a tool or tell the software that I want to cut “On” the line or set a parameter? Also, is it possible to visit your facility in Kemah? I live in Spring.
Best Regards,
Bill
Hi jtechphotonicscom,
There is 4 files in your inkscape extension, two being “dxf input.py” and “dxf input.inx”. Those files are already present in the Inkscape extensions folder. Should we overwrite them, and if yes (or no), why?
Thanks.
Just installed on Mac, tried to generate code for a text but got the following error:
Traceback (most recent call last):
File “laser.py”, line 3173, in
e.affect()
File “/Applications/Inkscape.app/Contents/Resources/share/inkscape/extensions/inkex.py”, line 283, in affect
self.effect()
File “laser.py”, line 3157, in effect
self.orientation( self.layers[min(0,len(self.layers)-1)] )
File “laser.py”, line 3086, in orientation
doc_height = self.unittouu(self.document.getroot().xpath(‘@height’, namespaces=inkex.NSS)[0])
IndexError: list index out of range
I’m using my laser to shallow engrave materials. I can’t work out how to get letters to be filled in. The laser only cuts the outline.
Is there a way to get the laser to fill in solid areas of an image rather than tracing it? For instance, what method should be used to engrave a solid-filled circle rather than just the outline of the circle?
Hi.
Many many thanks for such a valuable plug-in.
I would like to add some homing function for my engraver before it starts to prin5. Is there a way to do this in your plugin, Inkscape, or Repetier Host.
Many thanks
Dave
Does anyone know how to adjust the tolerance for how closely the generated gcode path follows the original path in Inkscape? Sometimes straight lines in between sharp corners get bowed out to the outside. I can share a link to an image if you need more clarification.
I have a problem
When i started the generate G code with the techphotonics laser tool in INKSCAPE i get this response
Kan opgegeven deelobjectbestand niet openen: mm) C:\Users\GEBRUI~1\AppData\Local\Temp\ink_ext_XXXXXX.svgBTTKGZ.
Also the G code is not written in the desired map.
I found the error itself
The path for the destination map was not correct .
when exporting it gives me this error:
Traceback (most recent call last):
File “repetier.py”, line 36, in
import numpy
ImportError: No module named numpy
Can you help me?
Hi, When generating the gcode, it does a path much larger than the items I want, I then hit apply again and it then seems to cover the items I want how ever the when looking at the gcode the x direction is 11.667 mm longer and in the y dir, 5 mm longer, can not for the life me figure out whats happening?
Can you make your code to use G1 when the laser suppose to be on and G0 when is just traveling/
The M3, M5, M8, M9 don’t work for my LED laser.
I’m getting a smaller cut size than the size of the vector I see in Inkscape.
I’m working in imperial (inches) and the results are the same no matter what size I stretch the vector object to. I’ve also tried to leave the bitmap to its native size and do the tracing so I can get more arcs in the gcode. The larger the object to trace the more arcs I get. Then I do the “path to object” as described above and run the plug-in. Same size object gets output.
Yes, I know I can scale up the gcode, but the resolution of the curves suffers due to lots of short line segments.
One thing I have discovered is within Inkscape, the document properties allow for changing the scale. This is going to take a little playing around with to get it set correctly. After a little math extraction, right now I have my x-scale at 76.76 instead of the default 25.4. That did help, but thought maybe I’m missing something from within the plugin.
Plugin doesn’t work at all. Inkscape keeps crashing on this plugin. Amateur Crap!!!!
Hola no un poco novato en esto, como hago para generar el código g de una imagen para que la CNC (axidraw) lo dibuje
Nota: estoy usando un servo para el eje Z
Hi great plugin
But it over scale it e.g. if I draw a 25mm square in inkscape it cuts a 80mm square on the laser ?
I have a DIY CNC with 2.5 laser added. using your laser plug-in I have a problem with SIZE.
When I try a work piece say 6 inch dia. it turns out 2 inch dia. Same with Metric
what am I doing wrong ?
Hi,
I am having trouble where my gcode is scaled incorrectly. From a vector based PDF imported into Inkscape, a path that is 430mm in the PDF is 1670 mm in the gcode.
How can I make sure the gcode will be the same scale as my source file?
Is there a forum or somewhere to go for help with this? I’ve converted a 3D Printer printer into a laser cutter / engraver, but the problem I’m having is that the generated G-Code homes fine, but then it starts burning from the HOME position (eg rear right) instead of the expected front left. I’ve not let it continue because the “home” position is actually off the print bed area, so it just started burning the wood chassis!! What am I doing wrong?
Hi,
I am getting weird gcode output with Inkscape 0.92.3, OS: W10x64
For a path stretching from (x,y): (0.3,0.3) to (24,37) mm the gcode goes all the way up to Y48mm and crashes my GRBL laser engraver into the end. Even the visualised path is measured it is still well constrained to the path.
What could I be doing wrong?
Im having issues trying to save to a directory on MacBook Pro. I’m not sure about the file path.
Hello, a question, I write a text for example HELLO, and I would like that when I execute the gcode I first grave the H second the third O the L and fourth the A, in order, not random, as I do, thank you very much, and Greetings.
I bought a laser engraver and the software provided didn’t work I’m hoping this will work but how do you determine wich code to use as an on and off code
Thank you for the nice extension and this tutorial. I have used it with success several times.
But now I’m experiencing some issues with the gcode-path.
Inkscape 0.92
Document Size A5 horizontal/landscape orientation
The plugin always creates the gcode with a vertical offset. I’ve tried changing the document scale from px to mm and back again without success. Do you have an idea what may be wrong?
I’ve been trying to run your extension and there’s a bug in the Directory folder option. If you put a directory name from the user home directory, it claims there is no directory of that name. If you leave it blank, no output gets written and an error message is generated:
This using the latest Ubuntu linux (bionic)….
Traceback (most recent call last):
File “laser.py”, line 3173, in
e.affect()
File “/usr/share/inkscape/extensions/inkex.py”, line 283, in affect
self.effect()
File “laser.py”, line 3170, in effect
self.laser()
File “laser.py”, line 3032, in laser
self.check_dir()
File “laser.py”, line 2554, in check_dir
if self.options.directory[-1] not in [“/”,”\\”]:
IndexError: string index out of range
(bionic)kester@localhost:~$ lsb_release -a
No LSB modules are available.
Distributor ID: Ubuntu
Description: Ubuntu 18.04.1 LTS
Release: 18.04
Codename: bionic
(bionic)kester@localhost:~$ inkscape –version
Inkscape 0.92.3 (2405546, 2018-03-11)
(bionic)kester@localhost:~$
This is why we put our directory as “C:\Gcode\” so there are no problems with syntax. If you are using your “home” directory, you need to specify the actual path on the C:\ drive where it is located. It normally is something like C:\Users\Username\…
I get a syntax error everytime I try to generate to code. Do I have to send the file to a specific place or just to whatever folder I choose? Right now I try to send it to C:\Users\Gcodes
OP is using linux, there is no C: drive
I use Inkscape 0.92 to generate gcode of 100×100 mm square, but It generates a 28x28mm square in gcode. Please help me this problem.
You need to download the 0.92 laser plugin for it to be the correct size. If you are using the wrong plugin, then the size will be incorrect.
Is anybody else having a problem where the laser is turning off just before it closes the object? There is a small, about 2mm, uncut part on each letter. Seems to be at the end of the path of each letter. Any ideas?
Something is missing here. I downloaded your drivers for inkscape and there is no way to create laser filled text, only outlines. Even the text grouped with the stars does not get filled. I see other questions here about the same topic that seem to be unanswered. So, does this work, or do I need to write my own driver for filled text. Yes or No would be sufficient.
Regards.
You can accomplish hatch fills in inkscape that you can then engrave with the plugin. Google “hatch fill in inkscape” and you will get a ton of tutorials on how to do this in the program.
kenap file g code anda tidak mau di buka di grbl laser
Hi, is this compatible whit LaserAxe`s board? (grbl 1.1f firmware)
Yes. Use M04 and ON and M05 as Off commands if you are in laser mode ($32=1). You can also use M03 and your ON if you are not in laser mode.
I like your pluggin! I need it for the m4/m5 command because im using a arduino and coil to push a pen down. but i want to use it for a plotter. Is there any way to do infill paths?
You can do a hatch fill in inkscape. Just google “hatch fill inkscape” and you will come up with a lot of tutorials on how to do this.
Is there a way you can make it go over the same path twice with out it jumping. So let’s say I want to do a a word “HI” but I want it to go over the leter H twice be fot it goes to I. But with the the m3 comand on when it goes around twice.
The only way to do this is to have it do another pass on the whole item. It will do the first pass on everything and then do another pass again on everything. The source is open, so you can change it by editing the laser.py file in a text editor if you want to change anything.
Hello, I have a problem with the orientation points. Any object I design don’t have the same measures in the cnc than inkscape.
I.e.: My design have 210 mm and the plugin generates de gcode for a 60mm piece. I have change the documents properties to Px and Inches, but the problem continues.
If I use the gcodetools extension for cnc engraving the orientation points are correct
I have the problem only with J Tech laser tool
Can you help me?
Thanks
You need to make sure you have the correct inkscape version for your plugin. The two versions available are here: https://jtechphotonics.com/?page_id=1980
If you have the wrong version of the plugin for your inkscape version, it will have a scaling issue.
Hey Jtech, this plugin is awesome!!
My problem is that it creates a 00;00 origin and 100;00 origi , so when I start engraving it will one time start to the left and the other to the right.
How do I fix this?
Thank you guys for your awesome plugin!
The plugin should only have the 0,0 origin in the bottom left of the page. On the preview, it will have a 0,100 location to show the scale of the drawing as a reference, but it should not alter the g code start position. If you have a more detailed explanation of the issue, please send it to [email protected] and we can troubleshoot it.
Hi!
If I use this tutorial (https://jtechphotonics.com/?page_id=3905) for the Stepcraft with PWM control for my laser the laser On and Off commands are again M03 and M05 ?
Also, you are saying that I will have control over the power of the laser using the command: M3 SXXX where XXX is a value between 0 to 100. But in the current tutorial you are specifying that the Laser power is between 0 to 255? Is this correct?
It will be whatever you set your “max duty percent” value is for the maximum. We suggest setting it to 100 for UCCNC. A M3 S100 will then set it to 100% duty cycle and power. If you have mach3, then set your pulley to 100 and you will send M3 S100 for 100% power. Hope this helps!
Hi, guys, I am using inkscape the version 0.92 and the plugin from your site, unfortunately I get scale problems., If I make a box in inkscape 100mmX100mm I get results something like 84mmX84mm or sometimes after exporting even more funny, like 20mmX20mm. Any ideas where the problem is?
Most of the time it is because you are using the wrong plugin for the version of inkscape you have. If you design in inkscape and get an output scale error of about 2.54x, then it is this issue. Make sure you download the correct plugin for your version of inkscape and see if it fixes the problem.
Hi, I use 0.92.2 on Mac os x and ubuntu, none of it works correctly with 0.92 plug in.
I’ve been using Inkscape and the J Tech Laser Plug-in for about a year. I use it on an old lap top using XP. I use Inkscape version 91 and J Tech Laser Tool Plugin V1_10 for inkscape 0.91. It was working fine. I was cuting foam designs and went to make a new design and create a gcode and the plug-in no longer worked. This was the error message.
The called script passed additional data to Inkscape. The script did not return an error message, but the result may be unusable.
Traceback (most recent call last):
File “laser.py”, line 3172, in
e.affect()
File “C:\Program Files\Inkscape\share\extensions\inkex.py”, line 268, in affect
self.effect()
File “laser.py”, line 3169, in effect
self.laser()
File “laser.py”, line 3031, in laser
self.check_dir()
File “laser.py”, line 2553, in check_dir
if self.options.directory[-1] not in [“/”,”\\”]:
IndexError: string index out of range
Any idea? Odd that it worked one moment then didn’t an hour later. I’m not sure what could have changed in that time.
You have an issues with your directory. You need to make sure your directory string in the plugin is written exactly correct. We use “C:\GCode” and make sure we have a directory on the C: drive called “GCode”.
I am having problems with the gcode generated in inkscape. I have it set with origin at x0 y0 bottom left corner. When I generate the g code it give coordinates at large numbers i.e. y 854.154.
How do you get the correct scaling for the gcode? I have the correct extension for the inkscape I have installed.
I was having an issue where my the Gcode that this extension produced wasn’t drawing any of the curves, only straight lines and I found the solution. My 3D printer (which I outfitted with a laser for engraving) firmware did not have ARCs enabled (G2 and G3 commands). I flashed it with a customized version of Marlin firmware and enabled arc support. This is done by uncommenting the line “#define ARC_SUPPORT” in the Configuration_adv.h file. I hope this is helpful to anyone who had this issue.
Nice. I was looking how to solve this bug since it cannot fill the round letters. I will give it a try. Many thanks!
do you know a way to enable ARC_support through Gcode? or does this have to be done through the firmware?
cheers
Hello, I am having the same problem, and I was not finding a solution until I saw this question.
This is happening to me with an ENDER 3 PRO, is it easy to solve?
Well, I have same issue but Creality Workshop can make curves so this solution is not for me probably . Thanx anyway
Can you select or change where the laser path starts and ends or is it randomly picked?
It starts where ever you put your laser. It will start and make the zero the bottom left of the laser path.
Hello
Do some very initial work. SO, this is probably an “operator error”
simple square in Inkscape 0.92 – 1 x 1 inch at 0.0
– First. when the JT Plug-in gets done, it always Inkscape back to mm rather than inches ?
– Second – I’ve generated by using bot inches and mm in the driver box selection, As expected
I get the G20 or G21 BUT the G1 lines have the same values ??? Neither of which corresponds to
the 1 inch by 1 inch
M05 S0
G90
G20
G1 F3000
G1 X0.0013 Y0.281
G4 P0
M03 S255
G4 P0
G1 F750.000000
G1 X0.281 Y0.281
G1 X0.281 Y0.0013
G1 X0.0013 Y0.0013
G1 X0.0013 Y0.281
G4 P0
M05 S0
G1 F3000
G1 X0 Y0
M05 S0
G90
G20
G1 F3000
G1 X0.0013 Y0.281
G4 P0
M03 S255
G4 P0
G1 F750.000000
G1 X0.281 Y0.281
G1 X0.281 Y0.0013
G1 X0.0013 Y0.0013
G1 X0.0013 Y0.281
G4 P0
M05 S0
G1 F3000
G1 X0 Y0
Any ideas what I am doing wrong.
Hallo, vielleicht können sie mir helfen.
Ich bekomme beim Aufruf der Extension diese Fehlermeldung:
Traceback (most recent call last):
File “laser.py”, line 28, in
import inkex
File “/Applications/Inkscape.app/Contents/Resources/share/inkscape/extensions/inkex/__init__.py”, line 11, in
from .extensions import *
File “/Applications/Inkscape.app/Contents/Resources/share/inkscape/extensions/inkex/extensions.py”, line 33, in
from .elements import load_svg, BaseElement, ShapeElement, Group, Layer, Grid, \
File “/Applications/Inkscape.app/Contents/Resources/share/inkscape/extensions/inkex/elements/__init__.py”, line 8, in
from ._base import SVG_PARSER, load_svg, ShapeElement, BaseElement
File “/Applications/Inkscape.app/Contents/Resources/share/inkscape/extensions/inkex/elements/_base.py”, line 31, in
from lxml import etree
ImportError: No module named lxml
Hello i want to made change in the inkscape plugin is that ok ? It will not generate the gcode but rather collecting path data and send to another app.
I will redistribute the plugin again together with the Chrome extension that receive the data and convert it to GCODE.
Hi
There is a version for MAC OS ?
Arcs are turned into straight paths in the g-code. Is there a way to output arcs or to interpolate the path into smaller segments? Testing a Logo that has rounded corners and they are all chamfered and a 3/4 circle is a boxed shape.
This is driving me nuts and I can’t seem to make any sense out of it! I am using Inkscape 1.0 and the appropriate plug-in. How do you properly deal with document settings, units, and scale? After importing a svg file of a logo and taking the proper steps to generate the g-code, the size of the engraving is way off. I’ve tried numerous document settings and nothing works as expected. I think that this subject would be a good tutorial topic.
Please help me. I cant start the extension.
Traceback (most recent call last):
File “C:/Program Files/Inkscape/lib/python2.7/site.py”, line 64, in
import traceback
ImportError: Bad magic number in C:\Program Files\Inkscape\python\Lib/traceback.pyc
Running Inkscape 1.0.1 with the corresponding jtech gcode generator. I follow the steps to generate a code with text and an image but my gcode only contains “M107 S0
G90
G21
G1 F300
G91
G1 Z-0
G90
G1 X0 Y0”
My printer, apparently does not support G2 and G3 (Ender 3)
Is there a way around this?
Inkscape version 1.0.1
And every time I run the extension I get this message:
laser.py:1360: DeprecationWarning: Effect.unittouu is now a method in the svg document. Use `self.svg.unittouu(str)` instead.
doc_height = self.unittouu(self.document.getroot().xpath(‘@height’, namespaces=inkex.NSS)[0])
laser.py:295: DeprecationWarning: inkex.bezier.bezierlength -> Get length of bezier curve
return bezmisc.bezierlength(bez, tolerance)
Can someone please tell me why I keep getting this message and what I need to do to fix it. Thank you
File “laser.py”, line 51
def bezierslopeatt(((bx0,by0),(bx1,by1),(bx2,by2),(bx3,by3)),t):
^
SyntaxError: invalid syntax
I’m using Inkscape and the J Tech Laser Plug-in in a Mac. When I try to generate Gcode appears an error message. «Directory does not exist! Please specify existing directory at options tab!»
I’ve tried putting the complet path : Mac:/Usuario/Username… Mac:/Macintosh HD/Usuario/Username…
I’ve tried with C:/Usuario/Username…, C:\GCode but in Mac there is no drive named C
Thanks for your help
im having a issue setting up a directory path to have it save to on my mac…. is there anything special i am messing up on?
i got it nevermind!!
i get this message when i am using the plugin…
laser.py:295: DeprecationWarning: inkex.bezier.bezierlength -> Get length of bezier curve
return bezmisc.bezierlength(bez, tolerance)
am i doing something wrong?
Hello,
i love your Inkscape-Plugin. I am using the current “Beta-Version for Inkscape 1.0.0” sucessfully with Inkscape 1.0.1.
As described above, the scaling-problems with former version-mismatches, are happening in my constellation, too.
I found out that this scaling-effects typically occur, if you change the document-size in the document-preferences after your have drawed and then let the plugin produce gcode.
So as a workarround i can recommend to set the final document-size first, then draw and then generate gcode .
Maybe this helps someone 🙂
Hi! Thanks so much for the software! Love it!
I was wondering: when engraving surfaces, the lines are parallel following an axis. Is it possible to set which axis to follow. I would like to give a criss-cross pattern finish to the fill surfaces. Thanks!
P.S.: running your software on Inkscape/Ubuntu 20.04.
Hello! Can I use this extension in mac-os?
I installed it in the 1.0.1 version of inkscape, but it didn’t work. Appears in the extension menu, but is deactivated.
I am using inkscape 1.0 and have different grouped paths on two layers. I want to create two separate code files by hiding and locking layer 2 then doing the opposite with layer 1. Unfortunatly all layers are added to the one gcode file? I tried following the description above but the layers are all combined into one gcode.
File “laser.py”, line 51
def bezierslopeatt(((bx0,by0),(bx1,by1),(bx2,by2),(bx3,by3)),t):
^
SyntaxError: invalid syntax
i am getting this error, is there any solution for this ?
What i have to do to work with this extension in inkscape 1.0.2? Thanks!
Hi There,
I am experiencing the following issue with your plugin.
When I try and generate GCode the following pops up:
” File “laser.py”, line 51
def bezierslopeatt(((bx0,by0),(bx1,by1),(bx2,by2),(bx3,by3)),t):
^
SyntaxError: invalid syntax”
what s is it?
Traceback (most recent call last):
File “laser.py”, line 78, in
from inkex.paths import CubicSuperPath # noqa
ImportError: No module named paths
hello im a mac user and have a “Directory does not exist! Please specify existing directory at options tab!” how do i fix that
Having issues with Gcodes. Using Inkscape V9.25 and JTech extension for V0.9. Do a drawing, select object to path, select Jtech laser extension, change settings as necessary and hit apply. It seems to do something, as a message flashes on screen it is working. No gcode is ever produced. Have uninstalled everything and done fresh install of both Inkscape and the Jtech extension, but same issue.
Any ideas on what is wrong ??
This is the problem I am getting, please explain in laymens terms thankyou
File “laser.py”, line 51
def bezierslopeatt(((bx0,by0),(bx1,by1),(bx2,by2),(bx3,by3)),t):
^
SyntaxError: invalid syntax
Dear Hi,
Because I use the CANSON carton for cutting, the laser burns the corner and makes a hole.
Please advise if there is a method to reduce the laser power when reducing the laser speed.
Many thanks in advance
Best regards
I. Iordanidis
Hello 😀 i have an issue when I get the gcode the image is deformed and simplified even the letters are deformed and I dont get the result i want Thanx for your time
Can I use this to make a test burn grid with layers?
I’m running the latest version of Inkscape and have just downloaded this plug-in, however, I am getting a syntax error in the python file, could you give me any advice?
File “laser.py”, line 51
def bezierslopeatt(((bx0,by0),(bx1,by1),(bx2,by2),(bx3,by3)),t):
^
SyntaxError: invalid syntax
hello, I’m a huge fan of this extention. Clearly you put a lot of work into developing it, so I almost hesitate to bother you with a question. But my problem is, that after testing a few hand drawn lines, that turned out just like your excample pictures on this page. I tried it with the Nasa Logo (svg file) from wikipedia. and now the tool path isn’t getting drawn on my graphic but in the upper left corner if the workspace. The g-code also starts whith Y-values that are far to high. I got a message after converting my graphic and this text was shown:
C:\Program Files\Inkscape\share\inkscape\extensions\laser.py:928: DeprecationWarning: simpletransform.parseTransform -> Transform(str).matrix
t = simpletransform.parseTransform(t)
C:\Program Files\Inkscape\share\inkscape\extensions\laser.py:938: DeprecationWarning: simpletransform.applyTransformToPath -> Path(path).transform(mat)
simpletransform.applyTransformToPath(trans, csp)
Could someone pleas help me figuring out what it means. Since it sais something about transformation, I believe this is related to my issue.
thanks
Great plugin, grat!
Is there an option to use dashed lines? So if changed the line type to dashed (e.g. 50%), the generated code splitted half time ON and half time OFF?
Best,
Laszlo
hi, I have been using this plug in for a few days, I need to insert a pause M0 between one layer and another, you can tell me how to reach my abbiattivo, thanks
Hi.
I have some issues with sizing using J-Tech Photonic laser tool.
I have imported dxf with coordinate mesh for my router. The original size of single cell in te drawing and preview in Inscape is 10×10 mm.
But J-Tech converts it to ~ 38×38 mm.
Any idea?
Thanks for this great Extension. It works fine, aslong as i am converting lines, but when i have curves or circles, the Laser runs the Gcode as a chain of straight lines, accelerating and decelerating every time, takes forever and the lines are not smooth either. Somehow it seems not to have the G2/G3 commands. Where can i look for a solution to this problem? i use a dxf file i imported to inkscape and convert it with this extension to GCode to run it on my laser with LaserGRBL. Any suggestions are welcome, thanks in advance, J
Hi, Whevener there are curves in the image, the laser is treating them as straight line.
For example If I draw a curve then laser is travelling shortest distance among two nodal points and not tracing the curve.
Hi. Thank you for this plugin. I’m using it to make my own drawing bot. I’m using an arduino uno with the firmware grbl tweaked to use a servo as Z-axis to handle the pen. I’m using Inkscape 1.1 with the beta version of your plugin. I have issues for example with the star shape. By drawing a single star, doing “Object to Path” and applying your plugin, I get:
JTP-Laser-Tool_v1.1-beta_ink1.0/laser.py:928: DeprecationWarning: simpletransform.parseTransform -> Transform(str).matrix
t = simpletransform.parseTransform(t)
JTP-Laser-Tool_v1.1-beta_ink1.0/laser.py:938: DeprecationWarning: simpletransform.applyTransformToPath -> Path(path).transform(mat)
simpletransform.applyTransformToPath(trans, csp)
The laser path produced is wrong, scaled up and highly translated according to the initial shape. I think i will check your code to see how to fix that with the new inkscape API. Did you notice that issue? Thanx for your great work!
Very nice!! Im trying to import a DXF but the coordinates after creating Gcode are very strange. My drawing starts at x0y0 and after generating Gcode, it wants to laser-engrave farrrrr out of range.
Any ideas? Al the examples are working fine but DXF seems to be a problem and I have no idea why 🙂
Hi. I installed the 1.0 beta version, and the latest version of Inkscape (1.2.2). I’m getting a strange error when I click Apply:
C:\Program Files\Inkscape\bin\pythonw.exe: can’t find ‘__main__’ module in ‘C:\\Program Files\\Inkscape\\bin’
There isn’t any output in the directory.
Any thoughts on how to fix this?
Scratch this – I accidentally had both versions in the extensions path. I removed the 0.92 version and just have 1.0 beta now. When I click on it in the extensions menu, nothing happens – no dialog box
Ok, I think I have this… almost. Instead of using the download button above, I copied text files from the github. It’s generating an error:
C:\Program Files\Inkscape\share\inkscape\extensions\laser\lasertools.py:1557: DeprecationWarning: inkex.deprecated.main.transform_mul -> Use @ operator instead
transf = Transform(transf) * Transform(node.get(“transform”, None))
Strangely, if I turn on contours and/or infill, it generates a file anyway. If I turn these off it doesn’t. This is an SVG doodle I’m trying to print, not an image.
Hi there.
Downloaded the program. I can find the Jtech extension, but no dialog box open up to control the laser.
it’s got me stumped..
I have the lower left corner in Inkscape as X0; Y0
I type some text in that corner, confirmed as position 0,0
When I generate the gcode via JTech extension, the gcode shows the X position correctly but the Y is way out eg. Y139.
Viewing the gcode via NCViwer confirms the Y position is way out.
Any help?
I have set the lower left hand corner of the page in Inkscape to X0; Y0 and saved it.
I write some text on the page and move it to X0, Y0 coordinates as indicated on the top banner in Inkscape.
I then use the JTech laser extension to generate the gcode which it does.
The problem is when reading the Gcode, the X coordinate is correct at X0 but the Y coordinate is way out eg. Y139.000
View the gcode results in NCViewer confirm the Y coordinate is indeed way out.
All settings in the JTech extension and Inkscape are as per your installation instructions.
Any idea as to what the problem is?
No matter what I try, the generated gcode does not generate the proper dimensions- for example a 100×100 mm square starting at 0,0 does not originate at 0,0 in the gcode but at X0.673375 Y98.426620.