


We ship all of our lasers with the High Efficiency AR Coated lens and have been doing this for about 3 years now. They push through a lot of power to the work surface. However, especially on the 3.8W lasers, the long axis of the laser diode is quite long and it can be visible in the engravings and cause longer kerf widths on cutting. Good news! We are now offering an additional lens option, the High Resolution lens.
In this post, we will discuss the differences between the lenses and which ones work best for different lasers and types of engraving and cutting. For a background on why the diode laser has a rectangular profile and how to focus, check out this post here: Focusing 101
Two Lens Options
- High Efficiency Lens (Lens_HF). This is the standard lens shipped on our kits. It works very well, especially on the 2.8W laser for doing most engraving and cutting projects. It will output a more rectangle beam profile with minimal loss of power.
- High Resolution Lens (Lens_HR). This is our newer lens offering. It will “round” the beam profile by slightly reducing the long axis and slightly increasing the short axis of the laser beam profile. In cases where you need a more round profile, this lens is a great option. It works especially well on the 3.8W laser because the spot size is larger.
In the case of the the lasers at 2.8W or below, the long axis of the laser is not as pronounced compared to the short axis. This means that the benefits of the High Resolution Lens might not be needed in most cases. However, in the case of the 4.2W (3.8W) or 7W laser we see the long axis is considerably larger than the short axis causing the more “rectangle” profile of the beam which can be visible in engravings.
Here is a comparison of the two beam profiles using a 4.2W(3.8W)or 7W laser as an example:
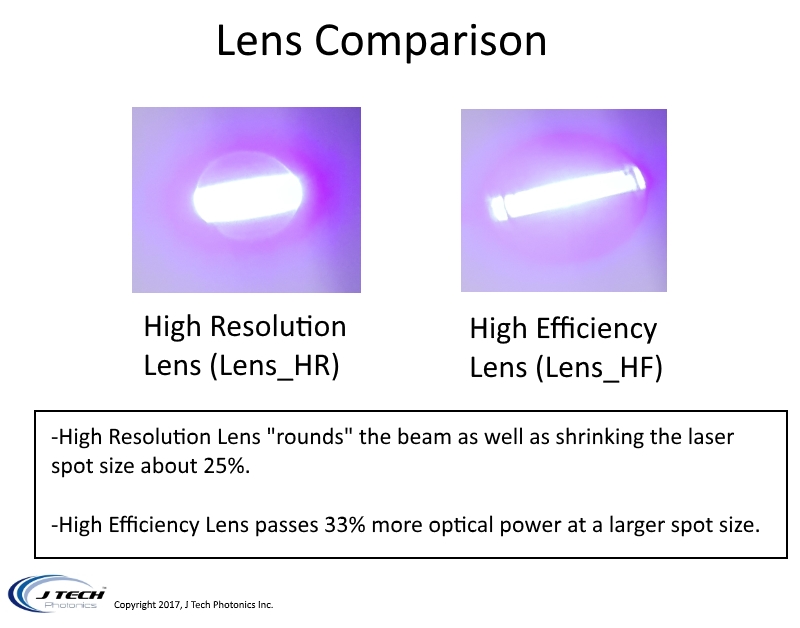
Notice how the lens transforms the laser beam profile in both axis to make a more symmetrical more “round” beam profile.
Typical Spot Sizes
Here is a list of the different lasers with both lenses for typical spot sizes when engraving in wood.
Standard High Efficiency Lens:
- 1W 405nm: 0.004″ (0.1mm)
- 2W 445nm: 0.006″ (0.15mm)
- 2.8W 445nm: 0.007″ (0.18mm)
- 3.8W 445nm: 0.011″ (0.28mm)
- 4.2W 445nm: 0.011″ (0.28mm)
- 7W 445nm: 0.011″ (0.28mm)
High Resolution Lens Option:
- 1W 405nm: 0.004″ (0.1mm)
- 2W 445nm: 0.0055″ (0.14mm)
- 2.8W 445nm: 0.0065″ (0.165mm)
- 3.8W 445nm: 0.0075″ (0.19mm)
- 4.2W 445nm: 0.0075″ (0.19mm)
- 7W 445nm: 0.0075″ (0.19mm)
Beam Profiles Burnt in Paper
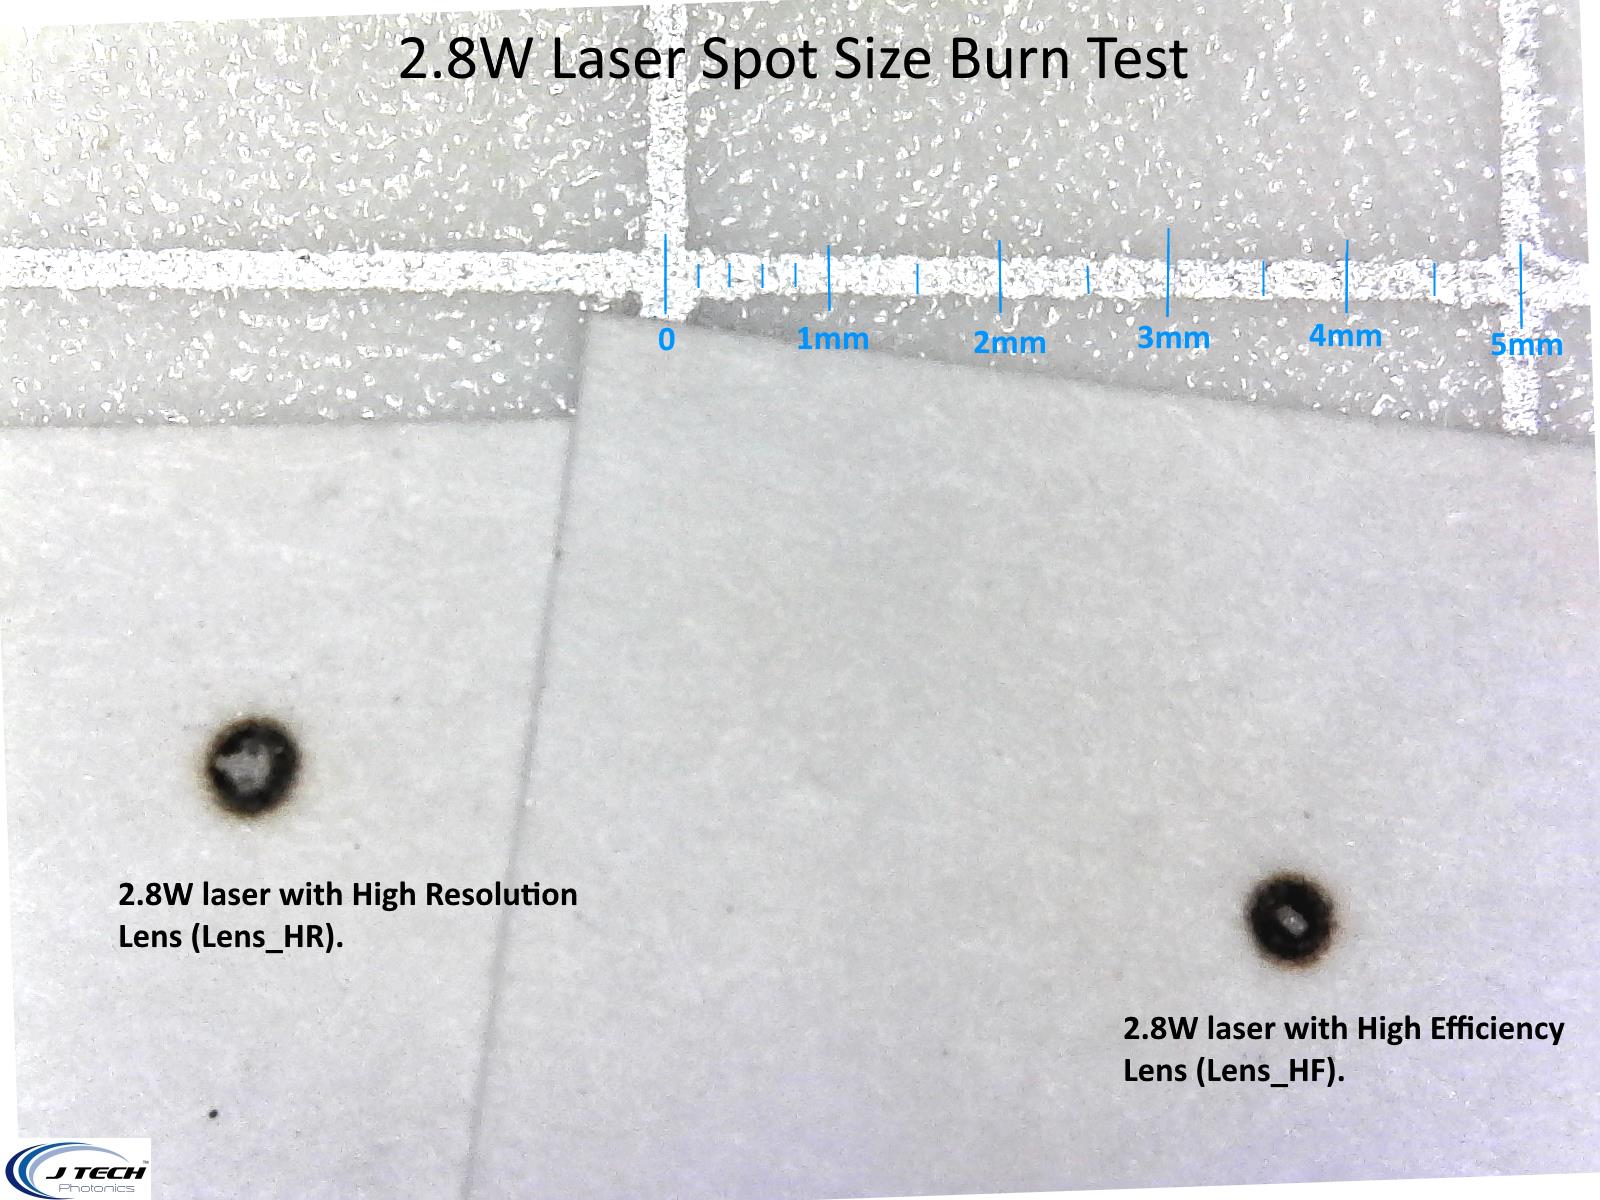
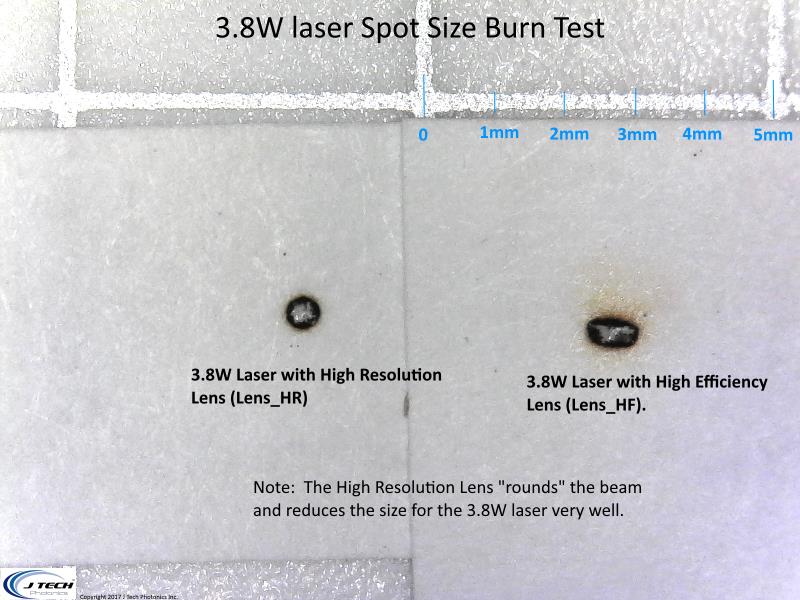
We did a series of tests in paper to see the difference when the laser interacts with material by processing it. This can give you a good idea on how the laser will actually burn. We did a quick shot with the laser and then took the results under the microscope. Note, the timing of the burn was not exact, so the profile might not be the correct size (it might be larger because the paper burned more). This test is supposed to give just an idea of what your beam might look like.
2.8W Laser Burn Test Lens Comparison
With the 2.8W laser, the beam profile is so small that both lenses will make an almost round burn profile. Note the only different is the hole in the paper. One is a rectangle and the other is more of a circle.
3.8W Laser Burn Test Lens Comparison
With the 3.8W (4.2W) laser you can now see that the High Resolution Lens has a distinct benefit. The burn pattern is much more round and the the hole created is a lot more round as well.
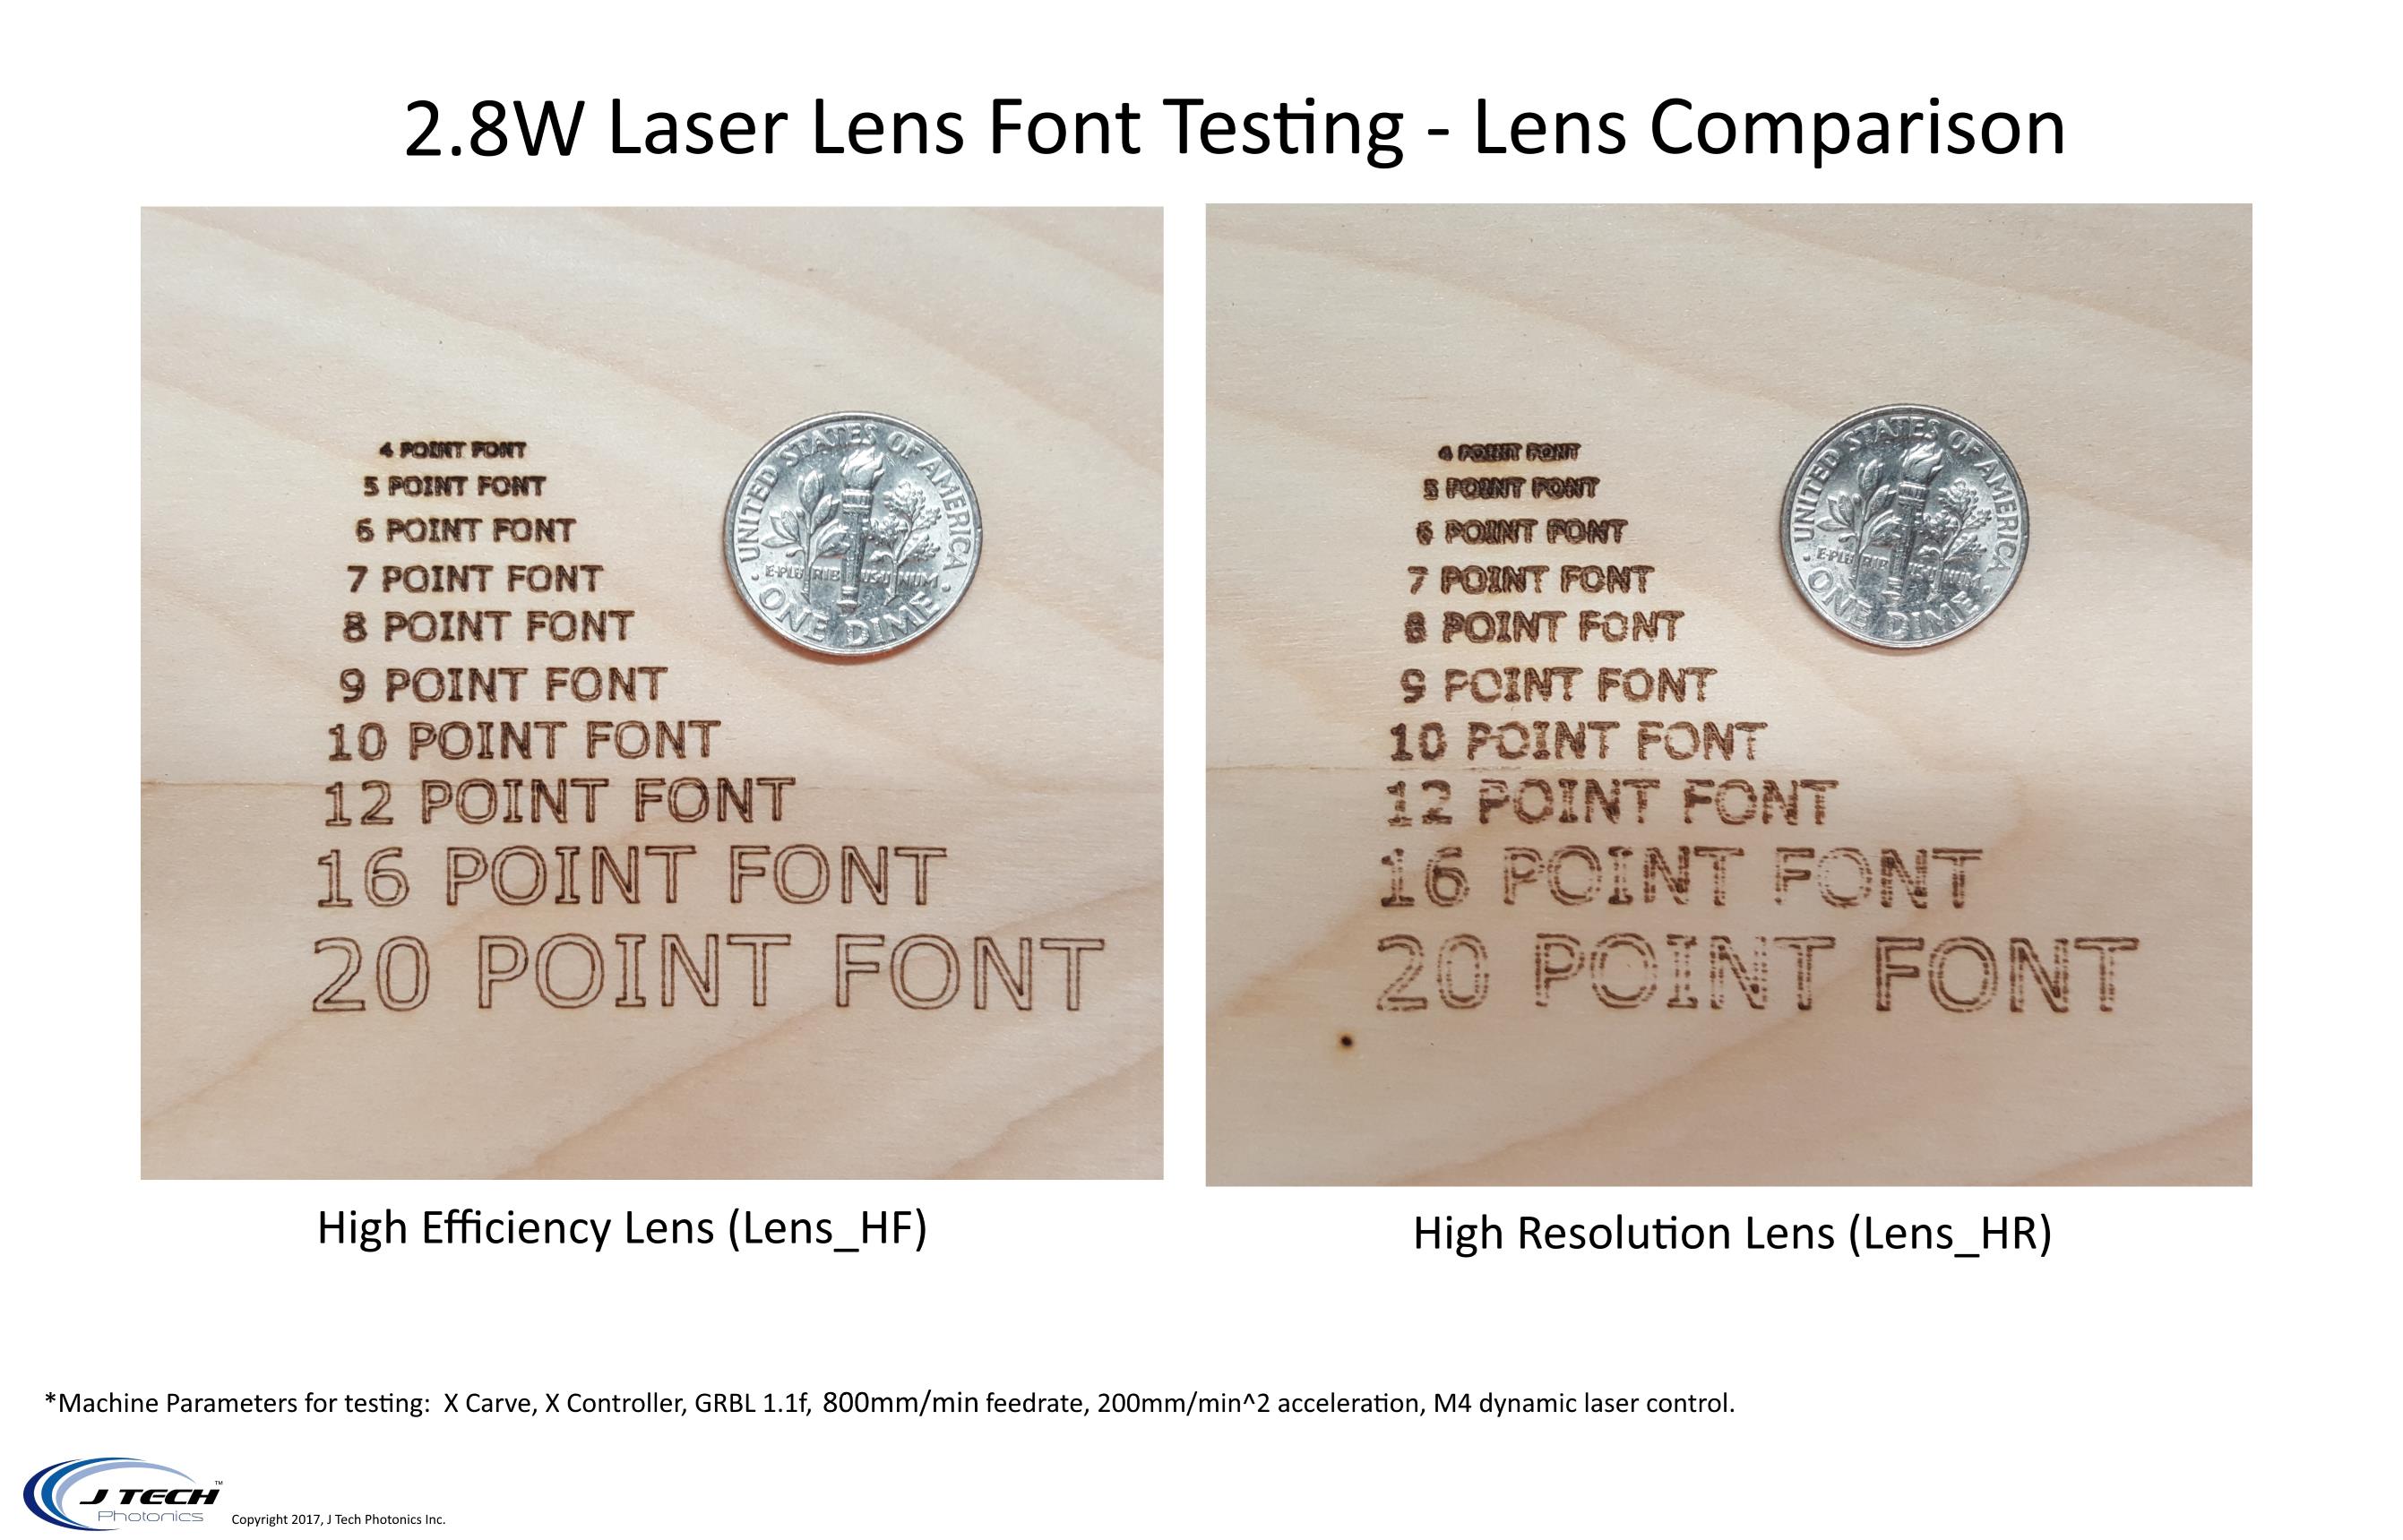
Engraving Fonts in Birch
Now that we have seen the beam profiles in burn paper, lets actually engrave on wood. Using the Inkscape Plugin, we created a font file using the Arial font. The output g code file will engrave both the inside and the outside of the letter. So, if you want to get even better resolution at the small font sizes (under 5 point) it might be better to just to one line for the letter. Other programs like Vectric will allow for this type of engraving. We just opted for using the Inkscape Plugin for this test.
2.8W Laser Font Comparison
Since the 2.8W laser already has a very fine beam profile, you can see the High Resolution Lens does not have a considerable benefit when engraving. You can tell there is power loss with the High Resolution Lens because it does not burn completely running at the same feedrate.
3.8W Laser Font Comparison
On the 3.8W laser the benefit of the High Resolution lens is noticeable. The lines are a bit smaller, so the fonts are more crisp, especially when they get below 10 point.

3.8W Cutting Example
When cutting different materials that are a bit less dense, the High Resolution Lens might be a benefit for the 3.8W laser. Depending on which way you have the beam profile aligned with the 3.8W laser and the High Efficiency Lens, you can have difficulty cutting thin lines and even lines in every direction. This is seen in the next example test when cutting a popular foam product, 1/2″ Fomular. These lasers can cut through this like butter, but sometimes it is difficult to get the speed, power, and also the orientation for the 3.8W laser with the High Efficiency Lens.
In this case, we positioned the 3.8W laser with the High Efficiency Lens with the long axis perpendicular to the cut axis (the worst case) and tried to cut at 2500mm/min. Here are the results:

Now, just because the High Resolution Lens performed better cutting Foamular, it does not suggest it will perform better in every material. That being said, the smaller kerf and higher power density can override the loss of power in a lot of cases making this lens a better option.
Can I use Both Lenses with my J Tech laser?
Yes, both lenses are interchangeable with all of the lasers. Both lenses will have a focus range between 1″ and 3″ from the work surface. We set them from the factory at 1.5″ from the base of the heatsink. If you have the shrouded version, then it is 1/8″ from the base of the shroud. When changing them, just don’t tension spring behind the lens too much when changing them out!
Here are my Final Thoughts
You just finished reading all of this and you are saying to yourself, “great, now what should I do?” Well, I think it depends on which laser you have, so I’ll break it down:
If you have the 2.8W laser or lower power
You are going to be good with the High Efficiency Lens for almost all cases. We have not seen a strong benefit for cutting or engraving to suggest that it is necessary to have the High Resolution lens. Now, if you are going to do microscopic engravings and you just can’t handle the beam being slightly rectangular when you look at it under the microscope, then you should get the High Resolution Lens as well.
If you have the 3.8W laser or higher power
There is a bigger case for the High Resolution Lens for this laser. Because the beam profile is exaggerated in the long axis, having a slightly more round beam makes more sense. In cases where you are doing picture engraving you can get a better resolution image at the expense of some speed. In some cutting applications it might work better because you have a more round spot which will lead to a smaller cut line and better cut properties. If you are doing logo engraving, then the larger beam with the High Efficiency Lens will be better because you can do the “fills” a lot faster and reduce your engraving time significantly.

Purchase the High Resolution Lens (Lens_HR)
