
Information on our Vectric Laser Post Processor</h2>
We have been asked by a lot of people to make a laser post processor to the Vectric Software so it can be used with the laser. You ask and you shall receive! We started one for the X Carve, but it should not really have anything that specific in it to make it unusable for other machines as well. If you would like to modify it the source file can be edited with a standard text editor pretty easily. We have made now specific versions for different machine controllers. If you have a new post processor for another controller that you would like to share, just let us know!
This post processor will work with all of the Vectric Products including Cut2D, V Carve, and Aspire. It works with the desktop and the Pro versions.
The basic concept is that you set up a tool in V Carve Pro (or other Vectric Software) that has the laser parameters to it (the spot size is the drill bit width). Then, you draw in V Carve Pro (or other Vectric Software) to get the file that you want. When you make your G Code, the laser post processor will change all of the “retract” portions in the file where the spindle moves up to a laser OFF command. Viola!
We have a couple of versions depending on the controller you use. Here are the download links:
*Right click “save link as” versus clicking the link *
GRBL 1.1 – Dynamic Laser Mode M4 & No Z (X Carve, Shapeoko 3, etc.)
GRBL 0.9- With Z Older Machines (X Carve, Shapeoko 3, etc.)
GRBL 0.9- Older Machines No Z Version (X Carve, Shapeoko 3, etc.)
ONEFINITY
MACH 3
MACH 3 – M11p1/M10p1 option
MACH 4 – Vector Laser Mode – No Z
CNC SHARK
STEPCRAFT (UCCNC) Relay Option
UCCNC (Stepcraft) PWM Option
UCCNC CNC4 Newbies PWM Option
3D Printer (Using Fan Control M106/M107)
3D Printer (Using Fan Control M106/M107) with ARCS
ShopBot (Using OP5 Connection)
WinPC-NC
USB-CNC
LinuxCNC
TinyG
Axiom Precision Pro/Basic/Iconic
Axiom Elite Machines
CAMaster
Laguna CNC
ShopSabre
Probotix (with M68 power control command)
*Note: These post processors will probably work for a lot of different machine controllers. If you are having problems, then let us know and we can help modify it for your machine.
Now we will cover how to set it up.
1. Set up the Laser Post Processor
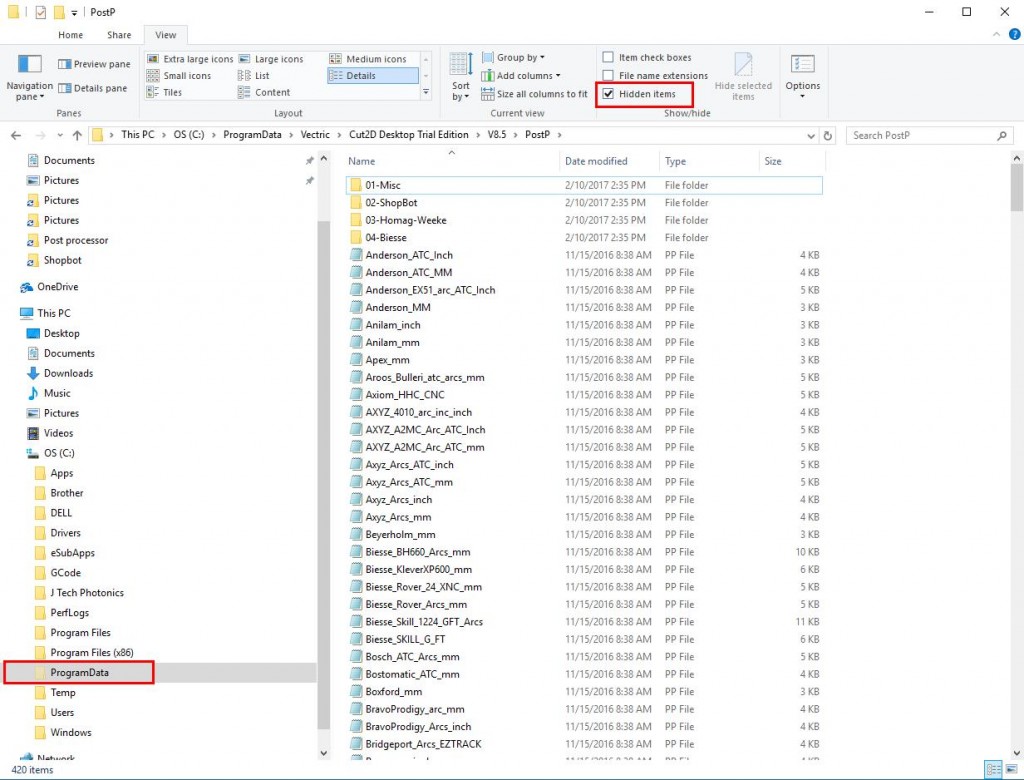
Put the post processor file in the directory: C:\ProgramData\Vectric\VCarve Pro\V8.0\PostP
You need to click on your c:\ drive and on the “view” tab you need to click on “hidden items” to view the program data folder. Then click on Vectric and your product folder to browse down to the PostP folder.
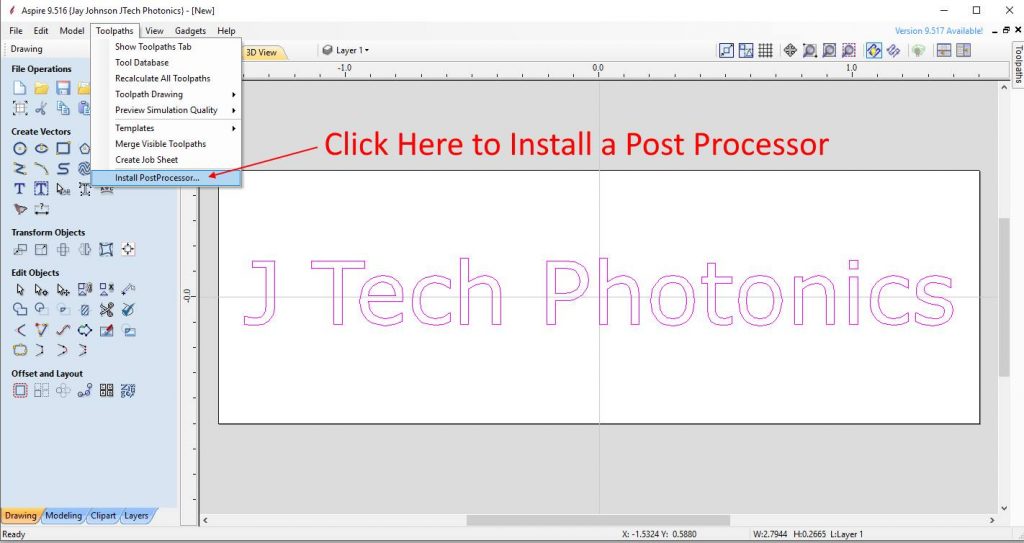
If you have the newer versions of Vectric, then you can install the post processor from inside the tool itself.
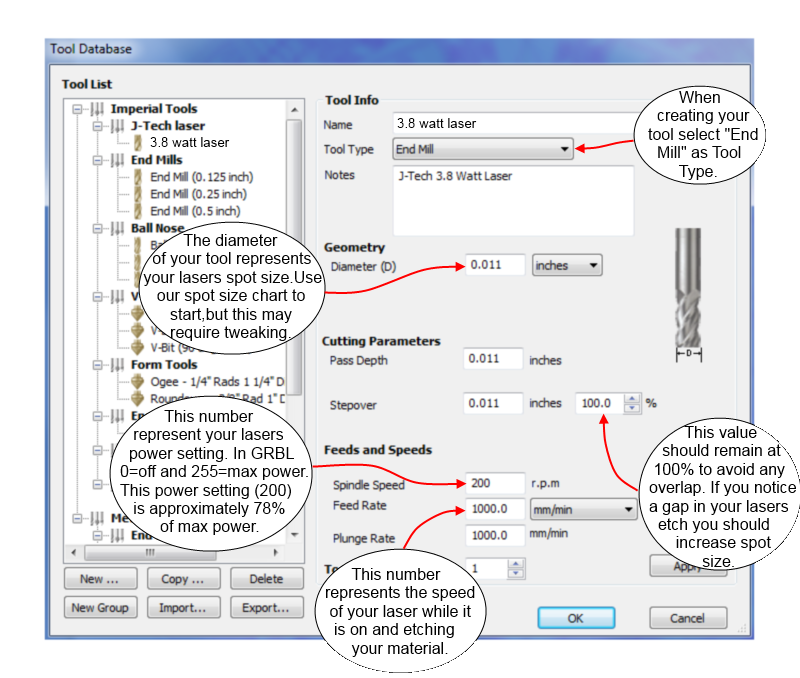
2. Set up Your Tool
First you need to have a tool for your laser with the correct parameters. In the “Tool List”, make a new tool for the laser. For the “Diameter” put the spot size for the laser. For the different lasers you will have different spot sizes and it depends on your ability to focus as well. Here are some values you can try. If you notice on the fill engrave that there are a lot of space between the lines, then make the numbers smaller until you don’t have spaces anymore. These numbers assume you are using wood as your material. If you are engraving plastic or metal, they need to be smaller.
Standard High Efficiency Lens:
- 1W laser: 0.004″ (0.1mm)
- 2W laser: 0.006″ (0.15mm)
- 2.8W laser: 0.007″ (0.18mm)
- 3.8W laser: 0.011″ (0.28mm)
- 4.2W laser: 0.011″ (0.28mm)
- 7W laser: 0.011″ (0.28mm)
High Resolution Lens Option:
- 1W laser: 0.004″ (0.1mm)
- 2W laser: 0.0055″ (0.14mm)
- 2.8W laser: 0.006″ (0.19mm)
- 3.8W laser: 0.006″ (0.19mm)
- 4.2W laser: 0.006″ (0.19mm)
- 7W laser: 0.006″ (0.19mm)
- 14W laser: 0.006″ (0.19mm)
- 24W laser: 0.006″ (0.19mm)
- 44W laser: 0.006″ (0.19mm)
You can then set the feedrate here for the tool. You can make different tools for different feedrates, or you can modify the tool whenever you want to change the feed speed. Here are some parameters we have:
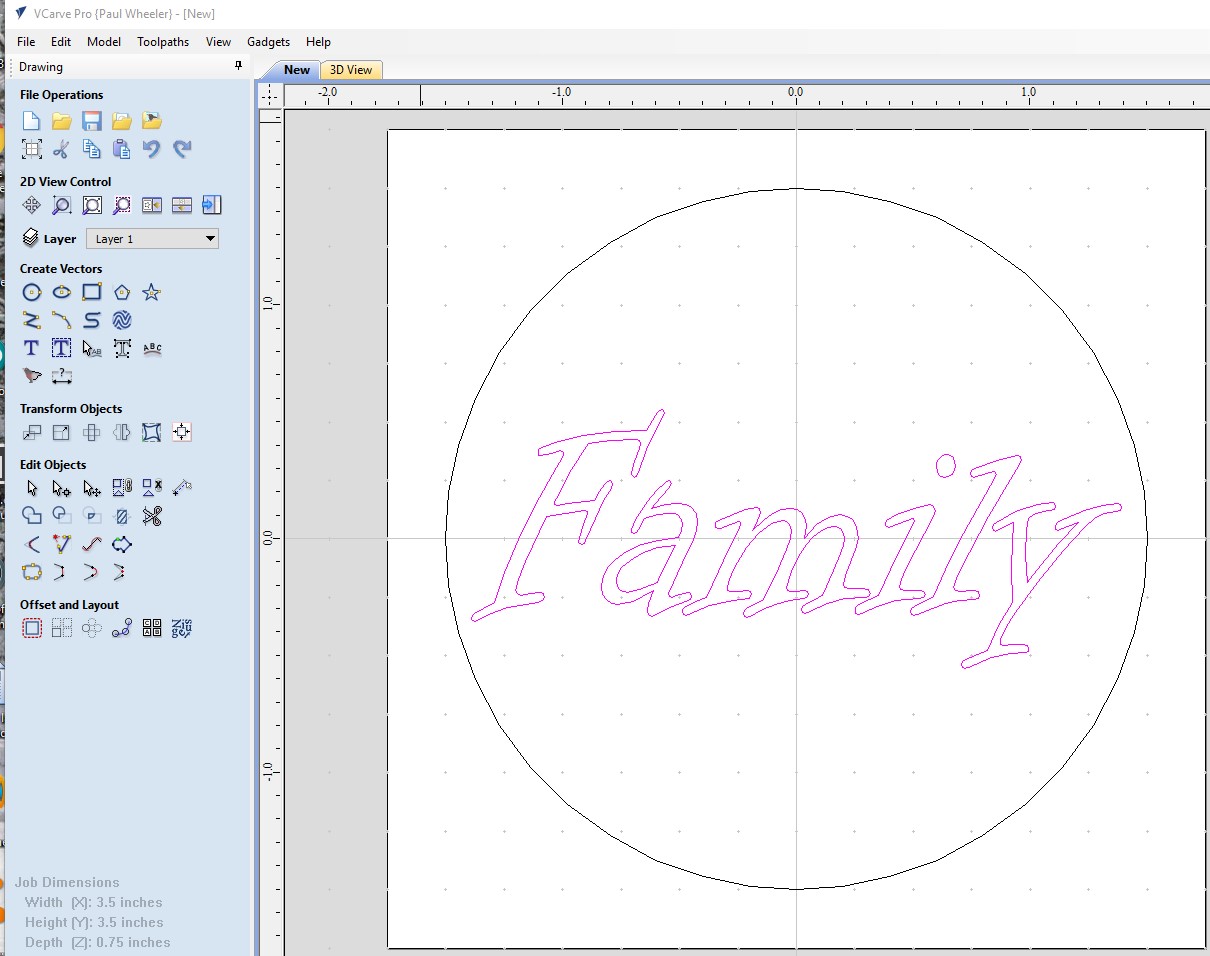
3. Make Your Project
Do what you normally do in your Vectric Software to design. Use your tool from the previous setup in your drawing. Here is an example we have:
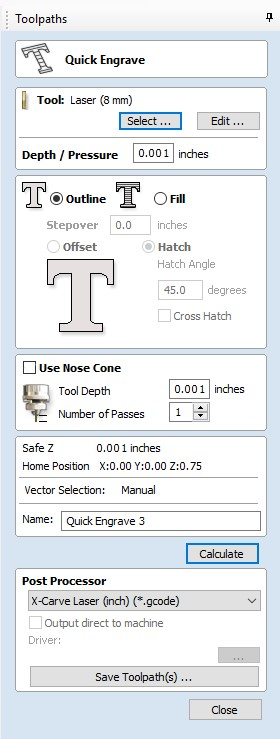
3. Set Up your Toolpath
Change your Z settings to reduce the Z movement of the machine. The laser will be on during the “plung” and the safe Z moves. You need to eliminate these or the laser will leave a “dot” where it stops to move Z because it will burn.

Set your toolpath settings for your project and then select the post processor from the drop down box. It will be named based on which post processor you downloaded.
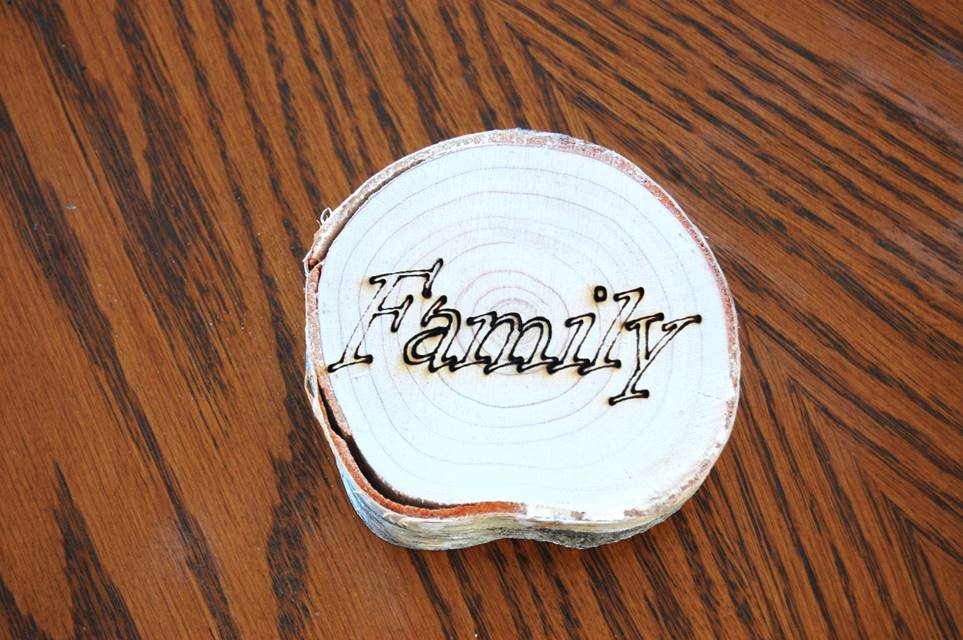
4. Save G Code and RUN on your machine!
It is pretty easy. Here is the result from this project:
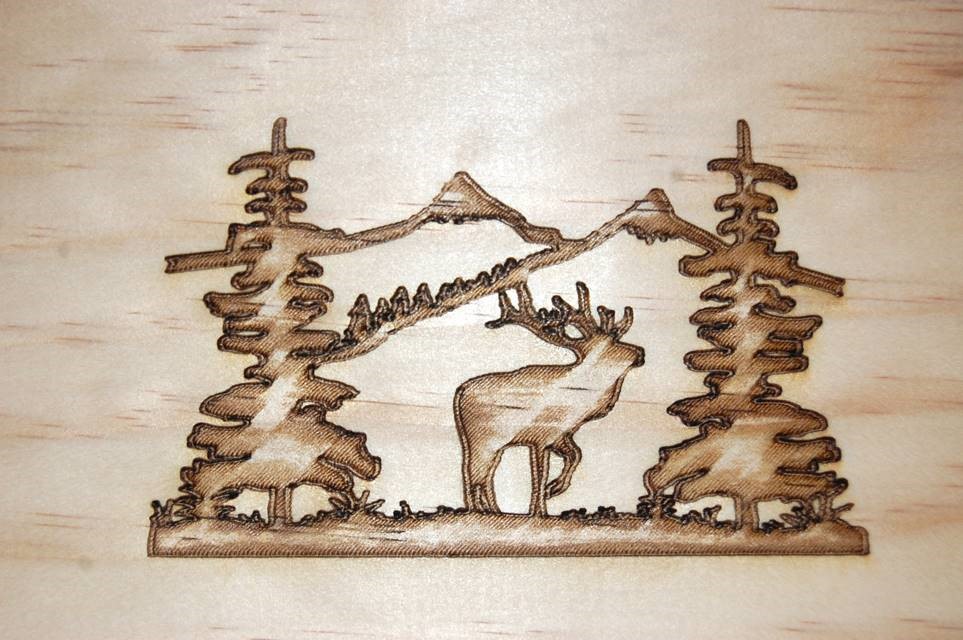
There are a lot of cool features in the Vectric Software to try out. Here is a filled engrave example:
So there it is. If you have any questions, let us know and we’ll help you get your Vectric software working with the appropriate laser post processor for your projects.
Can the spindle speed be used to control the power of the laser in this post processor?
Yes, the spindle speed is the laser power when you have PWM on your machine. The spindle RPM will be placed into the code line as a “S” parameter which will set the PWM output for the laser power.
I HAVE FOR MY PLASMA CAN THE Z BE LIFTED BEFORE A RAPID
Do you have a metric version? MM instead of Inches?
Yes. Added it to the drop down list in the download section of the page.
Hi Roman
You are in Germany- I´m in Germany and I think I have some questions later to CNC and laser-
Will this plug in work on V-Carve Desktop?
How I can install this plugin in ART Cam?
In ART Cam, extension for postprocessor file is*.con, this plugin have extension *.pp?
Please Help!! After posting my program it doesn’t appear my spindle (laser) is initiated to stop during rapid movements. The spindle only starts one time at the beginning of the program.
Found my error and it is working now. Thank you.
Im using the grbl post prossesor,everything works great until job ends then the gantry goes at a snails pace to return to home X0 Y0 ? is there a setting im missing,help please,,,gantry takes 2 minutes to travel 300mm after job done.
This post-processor (for GRBL) can be made the managing program for a burning out of pictures in gray gradations (for different shades of gray – different commands S from S0 to S1000)???
Hi,
Can you tell me if any of the post processors will work on a Stepcraft CNC machine with the factory controller?
Thanks
Rodrigo
Hi,
Once the laser is ON it seems that there is some delay, is it possible to decrease or eliminate that delay?
Thanks
Rodrigo
I have the 2.8 W laser setup on my Xcarve. I’m using the vetric post processor. Can you supply any additional information on how the other settings on the tool setup and toolpath setup affect the final etchings?
Hi,
I’ve tested the Stepcraft Post Processor on my machine today and the laser is allways on, it does not turn of between different paths.
Can you please review it?
Regards,
Rodrigo
This looks promising. I bought a second hand laser machine built by RedSail. It uses a program called Autolaser and is quite rudimentary. It seems to use file extension .out is there any chance a post processor could be made for this so I can use Vectric? I tried opening the file using notepad but it is just Chinese characters so I wouldn’t even know where to start. From what I see online there would be a serious amount of people ho would also be interested in getting a more user friendly program fro their machines.
OK, I am good all the way up to selecting the post processor. My only choice is Easel. How do I change that in Vectric so I have more choices?
I got it. Finally after two days I finally figured it out.
I have set my Z1 and Z2 to .001 but I still get a burn spot?
Hi, I am using this post processor to generate gcode for a plasma cutter, everything is working fine except i need some dwell times for torch on and torch off, in the gcode. Right now i am generating gcode and than editing the gcode manually. Can i edit the post processor to get it to create dwell or do i have to use mach3 to create dwell time. I am using spindle output 1 pin 17 with a relay to turn the torch on and off. I don’t have a z axis, the torch is at a fixed height.
Thanks,
LeRoy Mader
Hi Leroy- You can put in a G4 P# command (where # is the time in seconds you want to dwell). Just edit the post processor in a text editor. When there is a M3 command, then put a G4 P# command on the next line. Also, put a G4 P# in the “retract” section after the M05 command. This will generate the g code file you are looking for.
I’ve also created a post processor to prep tap files for my laser system. The options include:
1. Optional removal of z commands,
2. Optional open editor of output files,
3. Insert S255, S1000, or Sxxx (xxx replaced with optional value),
4. Insertion of M3 or M4 (user select),
5. Insertion of G20 or G21,
6. Optional replace feed rates with user selectable value,
7. Optional insertion of G4 delays after user selectable number of gcode blocks (duration user selectable, this allows the laser to cool down on long duration cuts),
This is a windows application that should run on 7,8, or 10.
Free to download from http://www.sawdustpro.com/tap2laser.exe
If you like the program and plan to use it please drop me an email at [email protected]
If you don’t like the program please drop me an email at [email protected] and let me know why.
oops. That second email address should be [email protected] and NOT [email protected].
Great idea, thanks !
So If I understand correctly, I plug the laser in the same socket as I usually plug my spindle, and it will switch power off where the spindle usually goes up ?
Yes. It will turn on the laser when the spindle normally does the “plunge” and then turn it off when it does the “retract”. Works pretty good!
Hi
My laser doesnt turn off between letters so there is a burnt line joining up my text,
can you help me please?
Thanks a lot, works fine. very Helpful. JUST PERFECT
Hi, I have grbl v0.9g I try these above post processor my spindle connect via. relay it does not work for me.
everything works fine in gcode but it does not turn on/off spindle continues on.
Could you help me I try both pp for grbl inch version and no z version.
Thanks
I have followed your instructions and settings exactly and the problem I am experiencing is that the laser comes on for a second and then shuts off right away and CNC takes off running the program as if the laser were still on. I have run a friends project and the laser comes on and stays on till the end of the project. I have the XCarve with a 2.5 watt laser attached. I have looked at his code and mine and just can’t seem to spot the code error. I thought the error might be within the first 10 or so lines, but as far as I can see there is no difference in code.
Hey, thanks for this, I was wondering how I would generate G-Code if I was to upgrade to the laser kit, and now I know so have purchased the upgrade!
Just one thing, I’m confused with the zeroing part. If you think about a normal carving, I would set the zero position from the tip of the v bit, or whatever i’m using. How do I set the zero position with the laser? Or doesn’t this actually need zeroing? This can also be said for the X/Y positions, how is this determined?
Many thanks,
Rhys
I must be missing something… I click on the link for the HD Shark download and I simply get a new page – no download of a file to save to the PostP folder….
Hi Tony- You need to right click on it and press “save link as” to download it.
Thank you ???
I have followed all of the instructions and cannot get this work.
Thank you for the GBRL Laser Post Processors. Both Metric versions work well on my Chinese K40 machine.
Tip: For single line text using a TTFont, Choose a TTFont, Calculate using any V-Carve bit, Feed Rate 40 and Laser power set at 5. This produces a nice clear single line text.
Is there a chart or something that shows spindle speed to laser power output when you are setting up a project?
I need to cut clock gears from .25 inch plywood.
Thanks in advance.
I’m able to get the STEPCRAFT (UCCNC) post processor to work with VCarve Pro v8.5xx.
When I try to import the post processor into VCarve Pro v9.0xx I get an error “An error occurred. We are unable to import the post-processor.
Any ideas?
Is there a chart somewhere that gives suggested feed rates for different applications / materials? I read on the applications page that with the 2.8w kit you would engrave wood at 400-600mm per second, what does that translate to for the 3.8w? Then below that where they talk about cutting wood no speeds are given. I would love to get some ballparks.
So I’m using this PP on my BZT machine with a TTL laser Diode, I hooked up the PWM output from my UCBCNC (CPU5A3) to the TTL input, and found that a PWM above 10% turns the diode full on and below turns it off… (it’s the modulation that changes the overal power, I get that!)
So TTL is not supposed to be higher then 5V, could I still use the PWM (10V) output at 50% (45% for safety) to turn the diode on, and how would I get the post processor to translate the “on” not to do m3 or m05 for off, but just change the PWM value,
– with S for spindle speed? 10rpm for 0% and ??? rpm for 45%?
Guess I’ll try it out myself.
My logic thinking tells me I could limit the max RPM in edingcnc to resemble 5v on the PWM port, I’ll have to measure what rpm does the trick. I don’t use the PWM for sindle speed when in routing mode!
I came to your Vectric V Carve Pro Laser Post Processor | J Tech Photonics, Inc. page and noticed you could have a lot more traffic. I have found that the key to running a website is making sure the visitors you are getting are interested in your subject matter. We can send you targeted traffic and we let you try it for free. Get over 1,000 targeted visitors per day to your website. Check it out here: http://0nulu.com/sdq Unsubscribe here: http://0nulu.com/nbz
Pingback: Making an Aztec calendar using VCarve Pro and a J Tech laser | J Tech Photonics, Inc.
This is a message to the Vectric V Carve Pro Laser Post Processor | J Tech Photonics, Inc. admin. Your website is missing out on at least 300 visitors per day. Our traffic system will dramatically increase your traffic to your site: http://0nulu.com/opx – We offer 500 free targeted visitors during our free trial period and we offer up to 30,000 targeted visitors per month. Hope this helps 🙂 Unsubscribe here: http://0nulu.com/nbz
Sorry, for such a basic question but can the post processor turn the laser off when traveling from one engraving point to another?
i need a post processor for plasma already written can anyone help me
Hello,
I don’t see a download to use with my machine. I have the MillRight CarveKing using VCarve pro. Can you tell me which GRBL I would use. Thanks!!
Can you describe me the difference between:
GRBL – (X Carve, Shapeoko 3, etc.)
GRBL – No Z Version (X Carve, Shapeoko 3, etc.)
GRBL – Dynamic Laser Mode M4 & No Z (X Carve, Shapeoko 3, etc.)
Undefined feedrate error in GRBL version
Got my 2.8w unit running on my R7 cnc. I used the TynyG mm post processor for Vcrave Pro.
The M3/M5 codes are used to cycle the laser but am getting over burnt dots at the start/stop of each burn segment. Is there a solution to prevent this? I read a post about using M10p1/M11p1 for GRBL solution. Is there a simular code for the TinyG board?
Feedrate missing in gcode.
Using Vcarve pro 8.5, GRBL x-carve post, jtech laser
I added “G1 [F]” to the end of begin header section, which adds the feedrate to the top of file.
Why would post delete all feedrate commands? Did I miss something?
Any idea if this works for Trotec or ULS lasers?
Doubt it. The Trotec and ULS have their own software for running the laser.
What is the spot size of the 4.2w laser that I should use for the diameter?
Do any of these work with a Jtech laser with a DAC board set up on the A axis work?
If you are using mach3 and your have your output for M03 set to an output pin to turn on and off the DAC, then yes it will work. Just set your laser power by jogging your DAC to your desired level, and then run the program generated by the post processor that will turn the DAC on and off for the engraving.
what is the difference in these?
A) GRBL – (X Carve, Shapeoko 3, etc.)
B) GRBL – No Z Version (X Carve, Shapeoko 3, etc.)
C) GRBL – Dynamic Laser Mode M4 & No Z (X Carve, Shapeoko 3, etc.)
A) For older versions of Firmware (<1.1f) and includes a Z component (allows for Z path following)
B) For older versions of Firmware (<1.1F) and does not include Z component.
C) For GRBL 1.1F and newer Firmware that has Laser Mode ($32=1).
If you have a new machine with GRBL 1.1F, use the GRBL - Dynamic Laser Mode and make sure you have your firmware setting $32=1.
Hi. thank you for putting this out there. I have a StepCraft 840 and an Opt Laser 6W and i’m using VCarve 9.5. I’m having a “scaling” or “conversion” issue with this PostP. An example is when I take a file that I’ve routed, make all the changes to the “laser” and save the file, the UCCNC executes the file very, very small. So small I can distinguish the letters. I can see on the UCCNC interface that it is following the path, but the product is not scaled correctly. thoughts???
I have a Stepcraft 840/D using UCCNC with an Optlaser 6w with Stepcraft kit. I get the laser to turn on and off at the correct times, but the tool path is changed some time during post processing. it becomes much smaller. I set my laser up as a new tool as described above. thoughts???
Hi,
I have downloaded the Mach3 version for my Blacktooth Laser.
All my tool paths seems to be correct but the laser itself does not switch on. My laser is wired to the Z up/down movement (Pin 16 through the relay) instead of the spindle.
Will it be easier to change the pp instead of rewiring the whole machine.
I’m using V-Carve Pro 9.5 with Mach 3.
Thanks
You can download and edit the post processor. In the “retract” section, put your Zup movement and in the “plunge” put your Z down movement. Just download it and edit in a text editor to make changes.
I NEED HELP! lol… Seriously, I need help. My laser never turns off during the file leaving burn marks showing ALL the machine movements on my Axiom Pro+. What’s the deal?
Do I understand right? The Vectric Laser Post Processor does not work with VcarveDesktop? I must be misunderstanding. Thanks
It will work on all vectric products. We just happen to have V Carve Pro, so we mentioned it. It will work on both pro and desktop for Cut2D, V Carve, and Aspire.
awesome stuff i was able to sync it up with my aspire and shapeoko 3xxl. Love it.
please help me. i’m new and i don’t know what post processor is CNC 3018 woodpecker 3.2, brgl 1.1f
thank in advance
Use this one: “GRBL – Dynamic Laser Mode M4 & No Z”
The stepcraft PWM MM processor isn’t working with Aspire 9.5515. I get an error saying the text in line 1 is too long.
Getting ready to try my first test…. Do i need to turn the laser on before I send the code with picsender or will it turn on automatically?
Have the power to the laser turned on with both fans running. Keep it in “input control mode” with the small switch in the front to the right labeled “TTL”. The program will turn on and off the laser when needed.
If I use this with V-Carve pro, do I need Lightburn as well?
No, you do not need lightburn if you just want to do vector engravings. However, lightburn will be able to do pictures as well. Both are very good programs.
Hi
can you say me how you do this filled engrave with vectric?
Matthias
In the quick engrave toolpath you have the option to choose “fill”. Select this and then define your stepover and your angle of the fill. You can do an offset or a hatch. Directions are on the top of this page where it shows how.
Was having a weird problem with loaded gcode, usually it would just map out a graph type line in toolpath visualisation that exceeded bed limits, other times it would load and the toolpath visualisation was correct.
Having looked at the generated code I found there is no explicit setting for G91 or G90. Have added a G90 to the header section and now it always loads properly.
After downloading the GRBL PostP for X-Carve and saving in VCarve Pro V8.0 PostP directory, I keep getting a error when I try to run the G-code in UGS (v2.0 nightly). The error indicates that feed rate has not been set or is undefined.
Checking the G-code in a text editor, I do not see any F commands defined to specify feed rate. In VCarve Pro I created a tool for the J Tech laser as defined above with 1000mm/min feed rate. I make sure to select the J_Tech_GRBL_inch_v1_4 PostP when creating the quick engrave toolpath in VCarve.
Is this a problem with the GRBL PostP or a step I am missing in VCarve Pro to include the defined feed rate for the tool in the G-code?
I started to follow the instructions for making a tool, but in the Tool Type dropdown list there is a Laser Cutter type. I assume this showed up after the example above was given. Have you given instructions on using it, maybe on another page, or is this the latest?
We are going to test the “laser tool” function to make sure it works with all of our post processors. Right now, we suggest using an end mill where the RPM value is the laser power. We will update these instructions later for using the laser tool.
Hola tengo problemas con este Vectric ASPIRE Laser Post Processor .
el problema es que dispara el laser unos milisegundos ante de que empiece el movimiento de los ejes
.y quema un punto por el resto funciona perfecto, se podría regular el retraso el disparo.
gracias
VERSIÓN MACH3 MM PARA ASPIRE
Hi, I have problems with this Vectric ASPIRE Laser Post Processor.
the problem is that it shoots the laser a few milliseconds before the movement of the axes begins
.and burning a point for the rest works perfect, you could regulate the delay the shot.
Thank you
If you are using mach3, make sure your spindle delay is set to zero. Check this on any controller you may be using. If this is still an issue and you are using Mach3, then try to use the M11P#/M10P# direct outputs to control the laser. You can see the details on setting this up here: https://jtechphotonics.com/?page_id=1436
Hi.
How you made this filled engrave with vectric? Its possible with bmp?
I purchased the Jtech 2.8 Watt laser and have it all hooked up. I downloaded the Postprocessor for Vectric and have Mach3 turning laser on and off, everything is working great. However,…..I want to move to the next step of controlling the laser power. Right now my Laser is either ON or Off.
My HobbyCNC Pro board does not have PWM output capability.
Is the DAC-PWM board my next option? Mach 3 cannot control laser power by itself, is that correct?
I just want to make sure I’m on the right path.
You can use mach3 to control laser power by setting up the PWM output. You can see the details in this post here: https://jtechphotonics.com/?page_id=1436
Try messing around with it to see if you can get it to work with your machine. The DAC-PWM board is a much harder way to go versus just getting PWM to work with mach3 outputs.
V-Carve has a laser cutter in the drop down box. Still set it up as an endmill?
We are working on getting the “laser cutter” tools to work soon. I’ll update the instructions when we have all of the post processors verified that they work with the new laser tool dropdown. As for now, we know they work using the “endmill” option.
I am having trouble getting my laser to turn on, then I saw I should download this post processor. But, when I did what it told me to do it says I already have the post processor and that it was installed in 9/2018. I bought my CNC Shark HD4 with the spindle and 2.8w laser in November of 2018, so do I need to download this still, and if I don’t I’m not sure what to do? I can get all the lights to turn on, and the spindle is moving like it is doing a project, its just the heat (laser light) is not on, although there is power getting to it. Yes I am new to the whole world of CNC, so I am sure it’s user error but can someone help?
I followed the directions to the “T” … I’m using a Shapeoko XXL and am getting a nearly 2 second delay from when the laser is activated to when the motion of the X / Y axis begins. How do I remove this delay? My plunge is set at .001 and so is my cut depth.
Thanks very much for the above post processors. I have just been trying the GRBL – (X Carve, Shapeoko 3, etc.) [mm] processor and found something I think may be an issue, at least for potential plasma cutters.
I am very new to CNCs/Gcode etc, so correct me if I am wrong but….
If you are running it with a plasma you really should probably lift the Z before doing any rapids in X & Y between cuts. This processor does NOT do this, the Z is only moved to Z home (or Z) at the beginning and end of the program.
I can’t check it at the moment but I think the code below will sort this. The G code appears correct now with the Z rapids (away from surface in case of warpage) between cuts.
I have also added a dwell timer (G4) along with the rapid Z movements. I took a punt and am starting the cut at 1.5mm from the surface. See below.
+—————————————————
+ Commands output for the plunge move
+—————————————————
begin PLUNGE_MOVE
“G0 Z1.5”
“M3 [S]”
“G4 P1”
+ —————————————————
+ Commands output for Retract Moves
+ —————————————————
begin RETRACT_MOVE
“G4 P1”
“M3 S0”
“G0[Z]”
Hopefully I will get to give it a dry run soon.
Sorry I forget the pierce cut, maybe this is better.
+—————————————————
+ Commands output for the plunge move
+—————————————————
begin PLUNGE_MOVE
“G0 Z3.5”
“M3 [S]”
“G4 P1”
“G0 Z1.5”
+ —————————————————
+ Commands output for Retract Moves
+ —————————————————
begin RETRACT_MOVE
“G4 P1”
“M3 S0”
“G0[Z]”
I tried to download the GRBL – No Z MM and CNC Shark (inch and MM) versions by using “Save target as” but the file format is HTML. Is there something I’m missing to download a .pp file format?
Hi, did you know why the laser Don’t start and stop automatic. Alway on
Thanks
Hi, i try everyting. I download the post processor for axiom pro and th elaser just work in manual mode =. Can someone help me
Hi, very informative forum! I’m running NC STUDIO inches and outfitting a stone cutting 1200×2400 ,300mm Z with a 95 watt laser diode array with vectric Aspire 8.5,Vcarve pro 6.0 as well as photovcarve. Any help would be most appreciated in your area of expertise. My CNC is a Chinese Laiytang Baixin Stone Machinery Works.
Regards,
Duane Bohemier
Hi there,
I am using WinPC-NC v3.40-82 and a NeJe 5,5,Watt PWM controlled laser.
My question is when I use the Laser tool setup as showed above and put the spindle speed in, how do I know what is the max speed (100% power)? The post processor generate G-code whit the S command for speed, what settings are needed in WinPC to create the correct power output?
How to set the maximum power/speed for the spindle/laser?
The laser postprocessor for WinPC-NC comes with a ATC function why? I never change my laser?
My cnc has my spindle(M3) and the laser on it and I’m using UCCNC, the laser turns on with M10 Q (0-255)
Can I ask if there is a post processor to cover that setup? or can I change it myself?
I have Carveco Maker Plus software. I’m trying to setup my laser but the instruction are for different software. Do you have instructions for my software?
Which post processor is most compatible with Masso G3 controller?
Everything is good until I run this file on my laser software. It’s run smoothly but it doesn’t burn at all. Can you help me please.
Looking for a way to import a pictures and businesses logo’s. The trace bitmap has very low quality. Is it better to import from a PDF or Jpeg?
Great postprocessor for vectric any chance of getting one for wrapped toolpath for vectric?
Hi — Will the VCarve Pro post-processor in making a profile toolpath for the laser allow “project toolpath onto 3D model” to work and enable the laser to read Z heigh values from a 3D model to enable engraving on a 3D surface?
Hi, when I hit the the go button on the masso the z axis raises up or re tacks, have done a couple test pieces seem to work fine.
when I hit start the z axis goes up. I must have something set wrong.
I have went through everything looks set right.